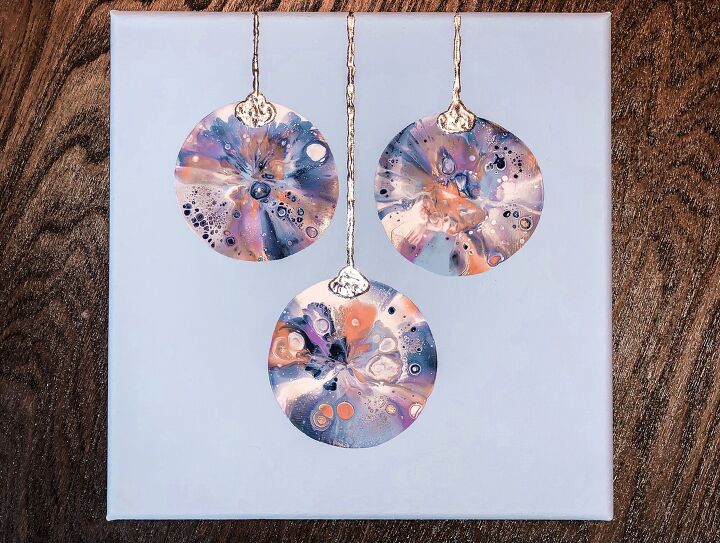
Balloon Smash Tree Ornament Painting

Hello and welcome to my post today!
Here's another super fun craft project that's so easy to make, the kids can get involved too!
I've made a full YouTube tutorial for this project which I'll link below so give that a watch if you prefer to follow along that way 👍🏻
WHAT YOU'LL NEED
- A canvas or thick paper (my canvas is 10 x 10 inches)
- Acrylic paints
- Mixing cups & sticks
- Balloons (I use the little water balloons)
- Glue/relief paste
- Silver leaf
Optional:
- Floetrol
- Silicone spray/liquid
- Heat source (I use a blow torch)
1 - YOUTUBE TUTORIAL
As I mentioned above, I created a YouTube tutorial for this exact project that you can watch by clicking on the video link above.
If you enjoy this video then I'd very much appreciate if you'd give it a 'thumbs up' and consider subscribing to my channel too 👍🏻☺️
2 - PREPARATION
First, choose a colour scheme for your painting. You can choose any colours you like but make sure you also have white.
My colours don't really look that Christmassy when you look at them separately but after they all come together, and added to the fact they resemble ornaments and have silver detailing, they end up looking very festive.
Once you've picked your colours (I recommend at least 3 and probably no more than 6 - not including your white), choose one of them to be the base colour for your canvas.
You don't have to choose one of these colours if you don't want but I personally feel it's a nice way to tie the whole piece together.
Paint the entire canvas and sides and then let this fully dry out. You may need to do a second coat depending on the paint you use. I got amazing coverage with just one coat of this blue cotton colour.
3 - MIXING THE PAINT
For my colours I went with mostly Apple Barrel shades except the rose gold which is by FolkArt. My white is by Craftsmart.
In separate small mixing cups, squeeze in a small amount of each of the paints. I probably add about 5mls of each. This left me with quite a lot of leftover paint at the end of the project but I have loads of different ways to use up leftover paint so it didn't go to waste. Check out my YouTube channel for some ideas of what to do with your left over paint if you're not sure.
The reason I haven't recommend just using less paint is because it can be tricky to mix properly and to judge a change in consistency with very small quantities, which will be needed next.
One at a time, add in a small amount of water and mix this in thoroughly. I use a pipette for greater control over this stage but pouring from a small cup/jug will work just fine.
After mixing, let the paint run off the mixing stick to gauge it's consistency. I always say that you're kinda looking for a warm honey-like drizzle. If thick blobs fall from the stick, add more water. If watery-like drips fall from the stick, you've probably added too much water so add more paint to thicken it back up.
Optional Floetrol & Silicone:
I'm saying that these ingredients are optional because you can achieve a similar outcome to my painting by using paint and water alone.
However, whilst experimenting with floetrol and silicone (the 2 ingredients that kept coming up when I was first researching and getting into paint pouring) I found that they really do give you that extra edge. By edge, I mean cell definition.
If you're looking for cells but you're less serious about the size or number of cells that you'll get, then by leaving the Floetrol and silicone out, you will still get gorgeous results! The cells will just be a little less predictable and reliable.
So for the paint and water only method, now move to step 4.
However, if you want to incorporate floetrol and silicone, first add in the floetrol.
You want to add as much floetrol as you did paint, but don't worry about being too precise! Mix the floetrol in until the paint-water-floetrol mixture runs off the stick with the same warm honey-like consistency as before. This should be easy to achieve if your paint-water mix was correct because floetrol itself is the perfect honey consistency.
Next you'll add the silicone.
Add a small squirt of silicone to each colour EXCEPT the white. The white will act as a carrier, it helps all the other paints do their thing because of it's heavier make-up and helps create cells all by itself without needing added silicone.
Very gently fold the silicone squirt into each of the colours. Try not to mix too vigorously because the less you disturb it, the larger your cells should be, but you do want the silicone to be laced throughout each of the paints.
4 - BALLOON SMASHING
Now its time for the oh so fun bit!!!
Blow up 3 balloons (or however many balls you want to make). I use a fresh balloon for each smash because I think the splats can get a little muddy when using a balloon more than once. Alternatively, use 1 balloon and clean it off between smashes.
Put them to the side and set your canvas out in front of you.
Drizzle a small circular amount of each paint in 3 different locations on your canvas (for 3 balls). You want to layer your paints one on top of the other starting and finishing with white.
I add mine in the following order:
- White
- True Navy
- Rose Gold
- Lilac Mist
- Tropic Orange
- Blue Cotton
- White
That's 7 layers! So try not to add too much paint at a time or you may have thick pools on your cavas by the end 😂
Once you have your 3 lots of layered up paint-puddles, it's time to start smashing (not sure why they call this technique 'smashing', is should be 'smooshing' really).
Holding your first balloon firm and steady, slowly 'smoosh' down onto one of the paint puddles.
The balloon will want to slide around at this point so keep a good grip of it and stay in control.
You'll be able to see how big the ball will be if your balloon is semi-transparent like mine. This is very handy for knowing how hard to press down.
Once you like how big it is, slowly lift the balloon straight up, off and away.
This will leave behind such a cool mash of colours and you should start to see soon the little cells forming.
Repeat this process with all the puddles.
If you've seen balloon smashing before, you might have noticed that the edges aren't usually so neat and defined. This is usually because the artist is doing the smash directly onto a layer of wet pet.
Because we're doing our smash on a dry painted canvas, we get the lovely clear outline.
If you have a heat source like a lighter or blow torch, you can use this now to help encourage the cells to form. Briefly drift the heat source over the paint areas and don't hold it there too long. You'll see little cells start to form.
Now leave the paint to fully dry out. I leave mine for 24 hours but if yours needs longer then allow for that.
5 - FINISHING TOUCHES
Once the paint has fully dried out, draw straight lines from the top of the canvas down to the tops of each ball so that they look like they are hanging. Also draw the little topper piece that the 'string' would tie onto.
Using relief paste trace along the straight lines and toppers. Allow the paste to dry out and then apply silver leaf all over it. Dust off the excess with a brush.
If you only have glue, allow the glue to part dry or to turn tacky before carefully applying the silver leaf. Then allow the glue to fully dry out before dusting off the excess.
And there you have it. A beautifully unique festive piece of wall art!
I hope you enjoyed this post and if you have any questions at all then please drop them below and I'll be happy to get back to you.
Please remember to check out my YouTube channel where I regularly upload crafty content so make sure you subscribe too 👍🏻
I also have an Etsy Store where I sell lots of little bits and pieces. Just click this link to take a look at what I have for sale.
Thanks again so much for checking out my post today!
Until next time, happy crafting! x

Enjoyed the project?
Comments
Join the conversation
-
 Dl.5660408
on Nov 26, 2021
Wow! What an amazing and unique technique, beautiful!
-
 Hannah Somerville's Crafty Tutorials
on Nov 26, 2021
Thank you for your continued support ☺️
-
-
-
-
 Hannah Somerville's Crafty Tutorials
on Dec 29, 2021
Thank you so much x
-
-


Frequently asked questions
Have a question about this project?
I, too thought they would become free hanging?? Lovely canvas
How to you get the silver leaf to stick only on the relief and not get on the canvas?