


Concrete Creations (and Not Just Stepping Stones!)

by
Kim
$15
2 Days
Easy
One 80 pound bag of concrete, a few days, some household items and some imagination is all you need to make some stepping stones, mosaic tiles, personalized bricks, tic-tac-toe game board and a bowl to keep the tokens safe, sturdy watering bowl for the neighborhood dog, butterfly baths, and even some vases!
PLEASE READ THESE SIX TIPS BEFORE STARTING....
1. This is an outdoor only project!!! DO NOT use your indoor sinks/plumbing for this project either before, during, or after. Use an outdoor water source because you do not want to have a concrete dry and clog up your plumbing inside your home. Reread #1.
2. Wear old clothes! The oil will splatter for sure, no matter how careful you are. Trust me.
3. Read warnings on your cement bag. They may suggest using a mask because of the dust. (I grabbed a mask at my last doctors appointment but they do sell them at Home Depot and the like.) I think a mask is mandatory! You don't want to breathe in the dust.
4. The cement bag may also suggest you wear gloves (Grab a few at your next doctor appointment or they do sell these at the dollar stores, Walmart, Home Depot, etc.) I could not work with gloves on, but it's up to you.
5. Remove all rings and bracelets due to the cement that could scratch your jewelry and the oil... It would be bad if your ring slipped off into a concrete stepping stone and you didn't realize it until it's too late.
6. Moisture is NOT your bag o' concrete's friend. Get some friends to create with you or make sure you have several items to serve as molds and use up the concrete within a week or so. Store in cool, dry place. I was able to make many projects with one 80 pound bag of concrete… And only had one project failure that was the size of a small coffee can.
From one bag, I made:
9 square stepping stones,
3 round stepping stones,
4 small butterfly bath bowls,
1 long brick stepping stone,
1 tall vase,
2 shorter vases,
1 block watering bowl...
______________________
21 projects...
*** Very detailed, step-by-step instructions on how to create all of these projects (and more!!) are on my blog ***
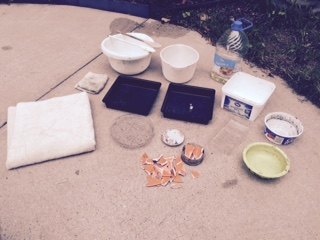
Some supplies
Get ALL of your supplies outside and ready to go. The old bath towel is if you need to move your concrete pieces inside due to weather while they are drying, lay them on the towel . Even when you wait 24 hours and remove your piece from its mold, it may still be damp and need another 24 hours to dry. Let it sit on the towel. Not shown in photo: mask and gloves.
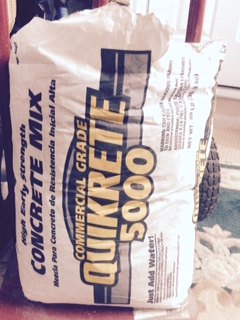
Heavy! This has little stones in it...
This is the 80 pound bag of concrete I bought at Home Depot. It had little stones in it. I almost took it back and return for the concrete mix that does NOT have any stones in it but honestly, I didn't want to deal with 80 pounds of dead weight so I tried it... It worked great!! So go for the mix that doesn't have stones in it or try with the small pebbles, like I did.
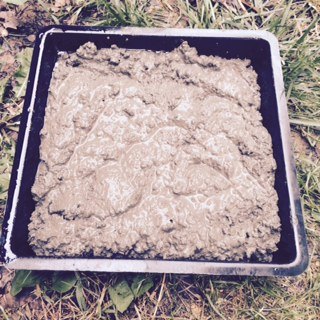
Concrete is cool!!
Using vegetable oil, generously coat the mold. Mix the concrete and water until it's like pancake batter... but lumpy. Remember that my cement mix has the small stones in it. Gently tap it 10 - 15 times on the ground to remove air bubbles. Let sit for 24 hours. Remove from mold and let dry another 24 hours. Results at the bottom of this post....
Concrete short vase
You can also make a concrete vase! This is using an old water pitcher minus the lid. Oil up the inner pitcher, add about an inch of concrete, then gently sit a plastic cup that has oil all on the outside of it in and carefully fill with cement. Gently tap several times to get the air out and level. Every 30 minutes or so for the first few hours, I will rotate the inner cup a 1/4 turn to make sure it isn't sticking. I will set the timer on my phone. Let site for 24 hours before trying to remove. Let sit another 24 hours to completely dry. Results at the bottom of this post....
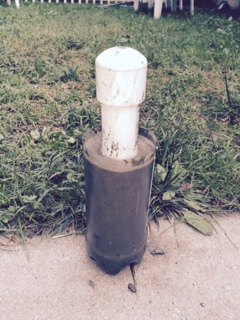
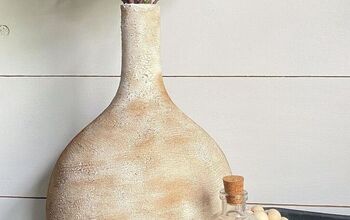
Making a tall vase from a Pepsi bottle
How about a tall vase using a Pepsi bottle? Oh yeah! Cut off the top of the bottle, oil it up inside. Add about an inch or two of concrete to the bottom. Then oil up a piece of PVC pipe and put in the center. Carefully fill the rest up leaving about one inch at the top. Tap to remove the air bubbles and level. Every 30 minutes or so, carefully rotate the PVC pipe a 1/4 turn to make sure it isn't sticking. Results at the bottom of this post....

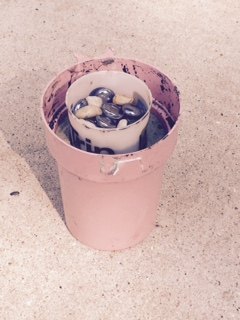
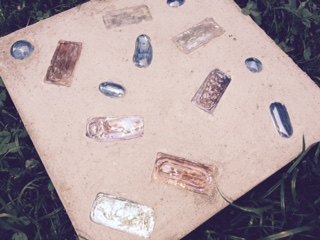
Tic-Tac-Toe game boards and bowl for tokens
Tic-Tac-Toe anyone? Oh yeah. Create the square stepping stone as above and then after you tap out the air bubbles and level it, gently push in decorative stones like the one on the left. Or use mosaic tiles and stones for the design on the right. Those bowls are great to keep the playing pieces in. The playing pieces can be white flat-bottomed marbles, decorative flat-bottomed glass marbles, decorative stones, painted stones, coins - think pennies and nickles, etc. I wanted these to be able to sit outside and not worry about getting messed up. If you worry about them scratching your outside table, you can add felt squares on the bottom or a piece of cork or fabric. **Not sure I would put these on a glass top table. My outdoor table is wrought iron.
Large D Stepping Stone
This stepping stone is using a larger square mold. I pushed in larger river rocks and actually sealed this one recently with polyurethane. It makes the stones shiner and repel water but honestly, not sure if it's worth the time, effort and cost to bother. I had the sealer already from another project.
mosaic glass pieces capture the light!
Smaller stepping stone with mosaic glass pieces pressed in.
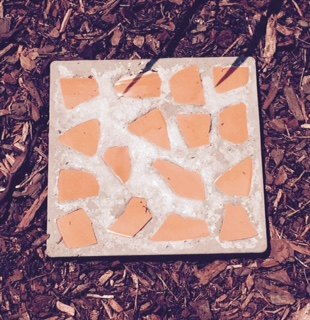
Mosaic Stepping Stone
Stepping stone using a kitchen plate that accidentally broke. If you use a broken plate or pieces that you purposely break up, safety first. Place a plate in a pillow case or folded towel. Gently break into pieces using a hammer. Wear safety glasses. When putting pieces into concrete mold, be mindful that no sharp or jagged edges are raised. Push in far enough that when it's dry, it will be smooth. Cutting up the bottom of your bare feet in your garden would not be good.
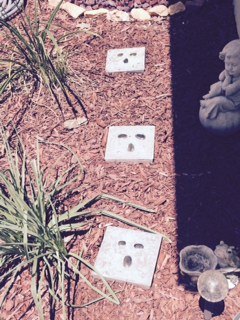
Eyes and noses...
Funny faces stepping stones using large river rocks.

Raised design on stepping stone mold
This is the one side of the round very flimsy stepping stone mold I use often. Pretty details. Oiling it up helps to release it from the mold.
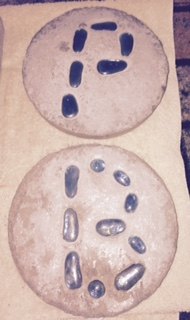
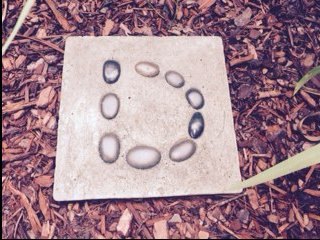
Initial Stepping Stones
This is using the same round mold that has the butterfly and flower design. My daughter pressed in glass marbles to make the P and B. They are my mom's initials. But my 9yo daughter pointed out: The P is for Patricia and the B is for Bethany. :)
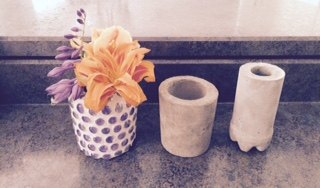
Concrete Vases
Here are my 3 vases! I love them.
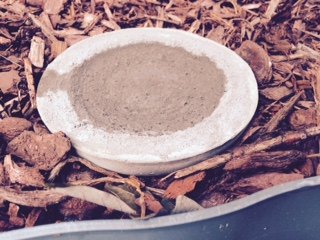
Butterfly Bath
Every creature needs water... Butterflies, bees can sit on the ledge and safely take a drink of water. This little Butterfly Bath holds about 1/4 cup of water. It is very shallow. I have it sitting next to my walkway.
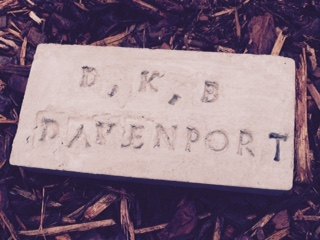
Brick Mold
This is using my brick mold and my plastic letter stamps. Our initials and last name... But you could put dates, nicknames, pet names.... Many concrete molds can be purchased at craft stores -- Hobby Lobby, Michaels, Jo-Anns, Walmart, etc.
Comments
Join the conversation
4 of 6 comments
-
These are so wonderful Kim! Such a fun project to do while the weathers warm and you can keep them forever. Cement projects are huge right now too! Thanks so much for sharing this! :)
-
Thank you for this great tutorial! clipping.


Frequently asked questions
Have a question about this project?
Do I need to wet the concrete several times after it first is cured?