


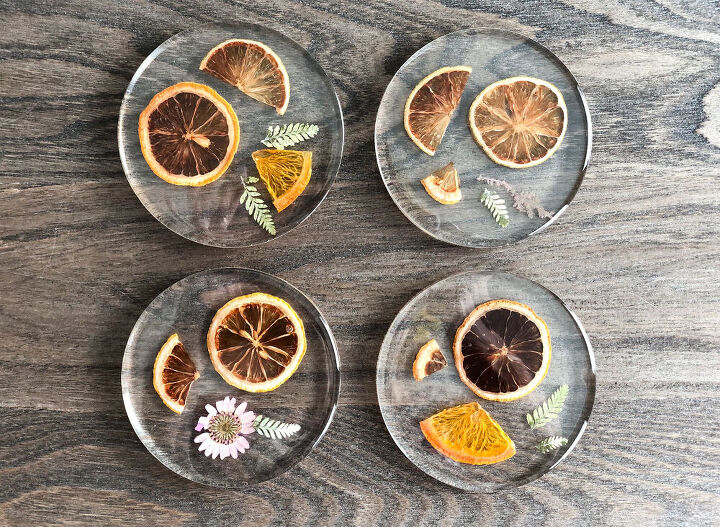
Dried Fruit & Flower Resin Coasters

What do you think of these cosy, rustic coasters? Making a set of your own is so so easy!
If you're new to the resin game then this could be a great project to get you started. I used a vacuum chamber to get mine completely bubble-free but with a thin viscosity resin, heat gun and blow torch, you can achieve the same look without one.
YOUTUBE
I have a YouTube channel where you can watch the full tutorial on this exact project. Simply click the video link above to view.
Please also consider checking out the rest of my channel and subscribing for future crafty content. Most of my Hometalk projects can be found on my channel if you're interested in viewing these too.
I work with a company, Rockstar Resins, that offers discounted resin products, so getting your hands on the right product is easier and cheaper than ever with these guys.
WHAT YOU'LL NEED
- Resin - Use this link and my code HANNAH for a 10% discount on resin from Rockstar Resins. For this project I recommend their 5 Star 2:1 Thin Coat Resin or any of their deep pour products
- Fruit
- Dried, pressed flowers
- Baking trays, tin foil + oven
- Round coaster molds
- Mixing containers and sticks
- Heat gun
- Blow torch
- Pam oil spray
*Always use the necessary protective wear when handling resin.
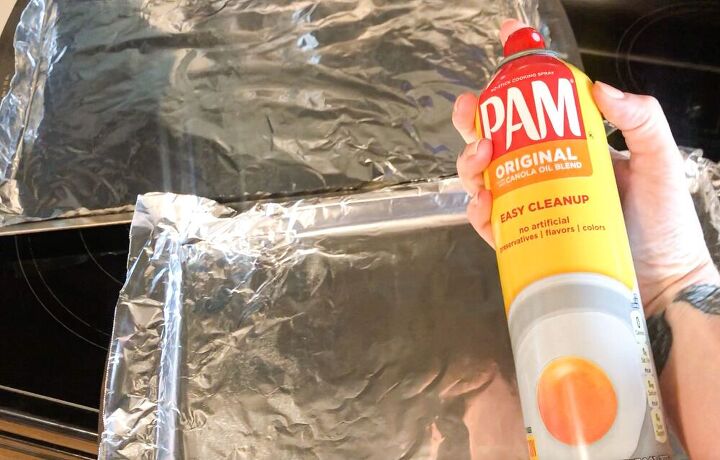
STEP 1 - PREPARING THE FRUIT
If you're drying your own fruit then feel free to follow the steps I took to do this or alternatively choose from the numerous options out there on the internet.
First, very lightly spray baking trays lined with foil with oil spray and set the oven to 200F.
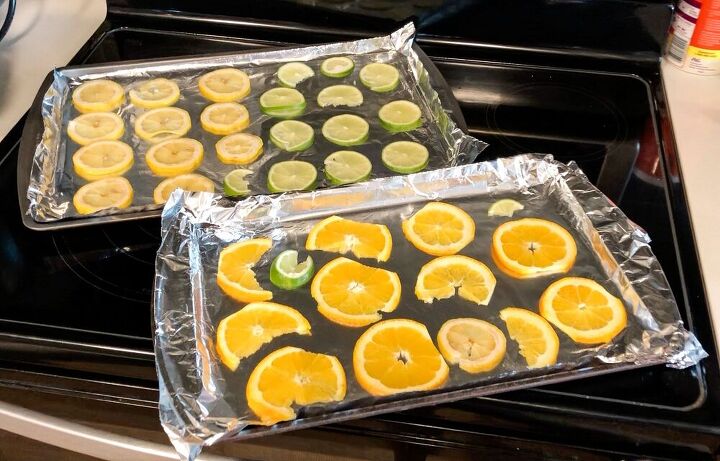
Then very thinly slice oranges, lemons and limes and lay them out on the trays. I'm pretty sure you can do this with most fruit but I wanted a specific look for my coasters.
I then apply another very light misting of oil spray over my fruit slices before putting the trays in the oven for 2 hours.
I had never dried fruit before this so I didn't know how well it would go but I was happy with the outcome, even if a few pieces were a little toasty looking. I liked the wide variety of colours.
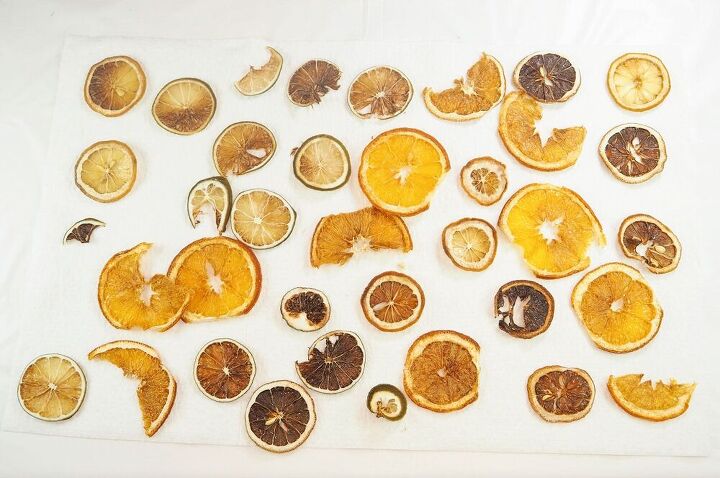
STEP 2 - PICKING FRUIT
Next, select fruit to go in your coasters.
I picked some full slices and then chopped some others up to create smaller segments. I matched these with some dried flowers I already had and laid them out in my coaster molds to check if I liked the composition.
Consider taking a reference photo once you're happy with how things are looking so that you can lay the fruit back in their assigned places after the next steps.
Save any left over fruit piece for future projects.
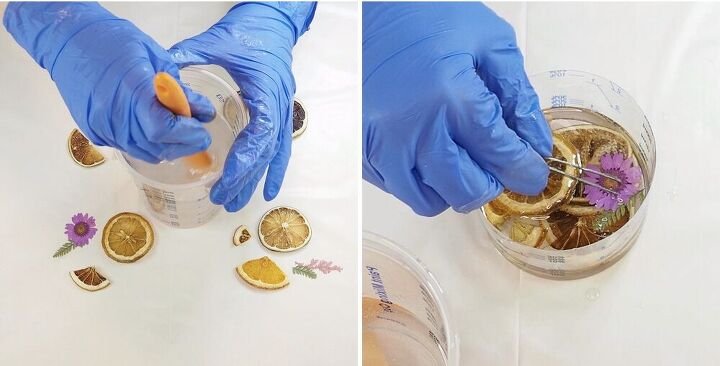
STEP 3 - DUNK IN RESIN
Mix together enough resin to fill your coaster molds to the desired thickness, plus extra for the dunking process.
I mixed together approx 300mls of resin and after this was fully combined, I separated out 100mls into a shallow container. Consider a later use for this 100ml portion that isn't a part of this project...I'll explain more later.
Now, one by one, submerge each piece of fruit and the pressed flowers into the 100ml portion of resin. Top up this portion if your fruit pile starts to stick out above the surface.
As I mentioned before, I used a vacuum chamber for my coasters and it was at this stage, once all my fruit was submerged, that I used it. It took a few minutes to exact all the bubbles from the fruit and resin.
It's likely that you don't have a chamber, however, as long as you have a thin viscosity resin and you let your fruity resin pile sit for as long as possible before moving onto the next step, (i.e if your resin has a work time of 1 hour, leave the fruit to sit for as much of the hour as possible whilst also allowing time for the other steps) then you should achieve a similar outcome.
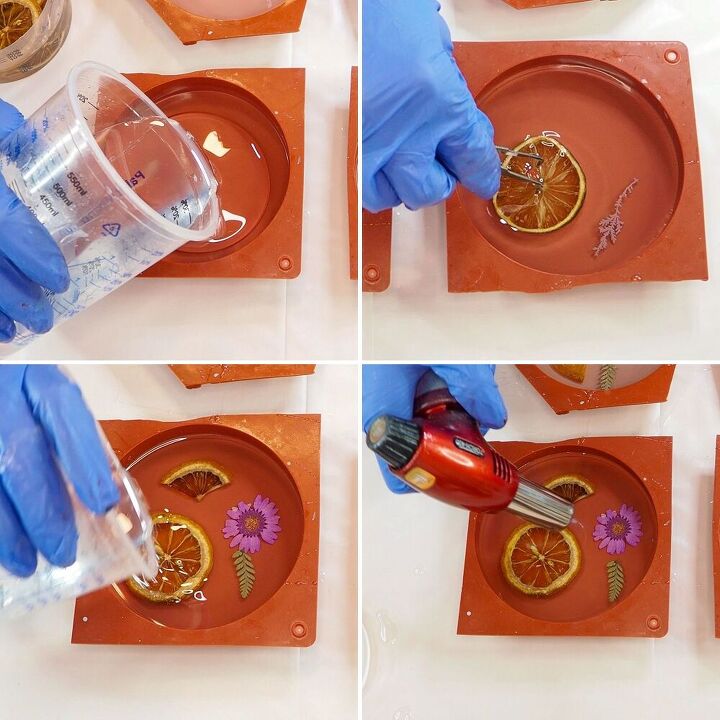
STEP 4 - COMPOSITION
After letting your resin sit and allowing the bubbles to rise to the surface, pour approx 100mls of the clear, 200ml, non-fruity-resin portion from earlier into your coaster mold cavities.
Now using your reference picture from earlier, start to lay your fruit and flower pieces out into the coaster molds.
Once you have you desired composition remade, top up the cavities with the rest of the clear 200ml resin portion.
Use a heat gun and blow torch to get rid of any last surviving bubbles and then leave your coasters to cure for however long your particular formula of resin needs. Mine needed 48 hours.
You'll now have a portion of resin left over, the 100ml fruity portion that is still perfectly usable but may have a few floaty bits in it. For an example of what to do with this resin, I mixed in gold glitter to hide the floaty bits and poured it into my DIY handle molds for a future project.
Whatever you decided to do with yours, don't waste it ☺️
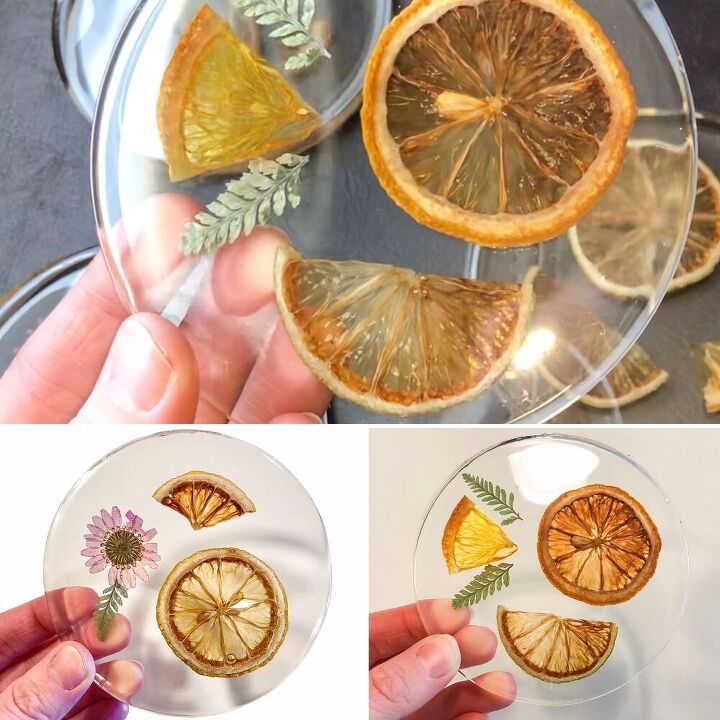
STEP 5 - FINISHING TOUCHES
Once your resin has cured, demold your coasters and check for any rough edges or to see if they would benefit from a resin top coat.
I like to lightly sand the edges of my coasters and to apply a top coat to most of my resin pieces but you may feel this is unnecessary so it's totally up to you.
Either way, you now have a beautiful set of citrus coasters ready to brighten up any space.
I've added mine to my Etsy store in case you're interested in buying them. Just click this link to view or to see all the other goodies I have for sale.
Please remember to check out my YouTube channel (link above) and consider subscribing too 🙏🏻
Thanks so much for reading my post and feel free to drop any questions or suggestions you may have down below.
Until next time, happy crafting x

Resources for this project:
See all materials


Comments
Join the conversation
-
Thanks Aimee! ☺️
-
Wowzer! Those are beautiful!


Frequently asked questions
Have a question about this project?