


My Dining Room Chandelier Makeover-Before and After
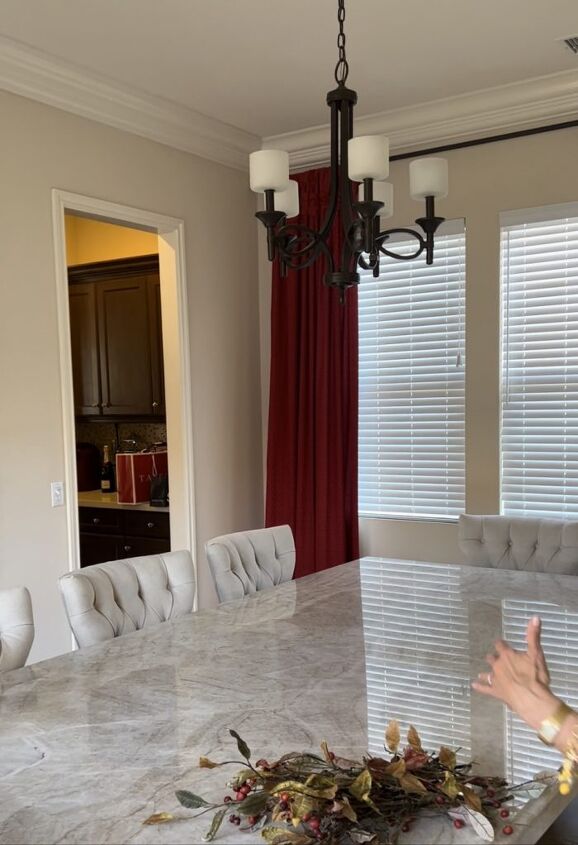
Have you ever wanted to do a chandelier makeover? Many of the chandelier makeovers that I researched, involved painting a fixture, replacing the various parts, etc. When Mr. G.Q, and I moved into our California home, the existing bronze chandelier was much too small for the size of the room and length of the dining room table (see photo below).
I tried to find a fixture that would suffice but I was really having trouble finding the perfect one. I then decided to try a DIY chandelier makeover. I went to my favorite silk flower store and got inspired by their baskets of artificial branches and berries. I wanted to purchase branches that I could cut to various lengths and that I could bend around the arms of the fixture.
In this post...
Step One (My Dining Room Chandelier Makeover)
I purchased three three-foot branches as the attached video shows, each with silk leaves and berries. I cut one of the branches into small pieces while keeping two of the branches whole. I then wove the two long branches into the arms of the chandelier, orienting them in the same long axis as the dining room table. My goal was to make the fixture longer, not wider.


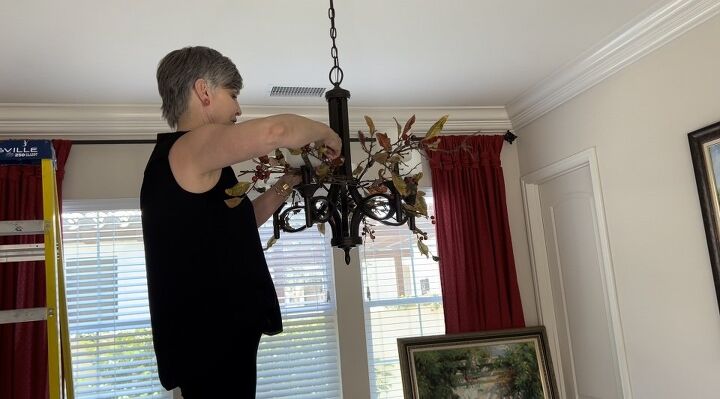
Once I was happy with the two bigger branches, I then took all the smaller pieces and wove them into a sort of bird’s nest, covering the ends of the big branches and creating a grid. I just lay the branches on top of one another without securing the pieces as my plan was to leave them alone once they were arranged to my liking. If you were so inclined, you could add some hot glue to the whole shebang if you wanted the fixture to be totally stable.
Now I fussed a bit over the arrangement, making sure that the branches were all evenly distributed, and that the thick branch ends were camouflaged sufficiently. I was trying to cover any of the thick ends of the long branches. This wasn’t exact, just artful.
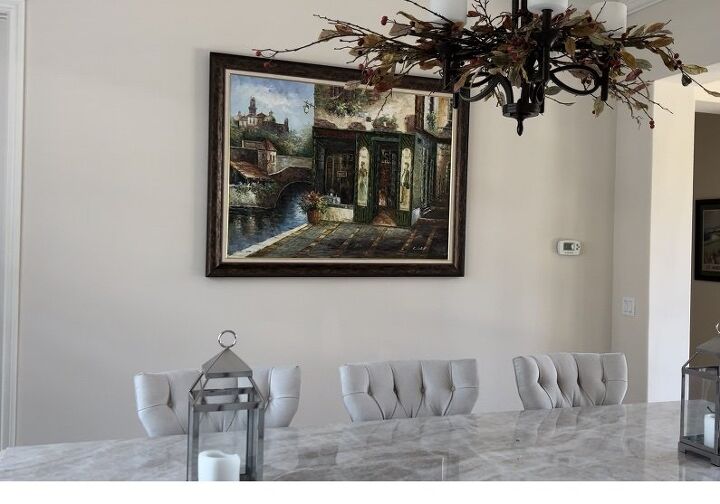
As you can see, I accomplished my goal! The final chandelier is long enough to be proportionate with the table and the silk branches made for a whimsical yet interesting chandelier. The whole process took less than 30 minutes once the branches were purchased, and the ladder was in place.
What do you think of my handiwork? Would you ever do something similar at your home? I am delighted with my one-of-a-kind dining room chandelier makeover. Let me know your thoughts and ideas for projects you have done or would like to consider.
Thanks for reading and spending some time with my blog today!
XO,
Dr. Julie
PS Here are a few more posts for you to enjoy:
My Kitchen Refresh
Deliciously Easy Lemon Bars
A Gorgeous Summer Tablescape!
Dr. Julie’s Fun Friday Finds – What to Bring to the Beach
Dr. Julie’s Fun Friday Finds – Guest Room Essentials
***Many thanks to my friend Linda Wagner who graciously filmed this video!


Frequently asked questions
Have a question about this project?