How to Recycle Aluminium Cans Into a Wall Hanging

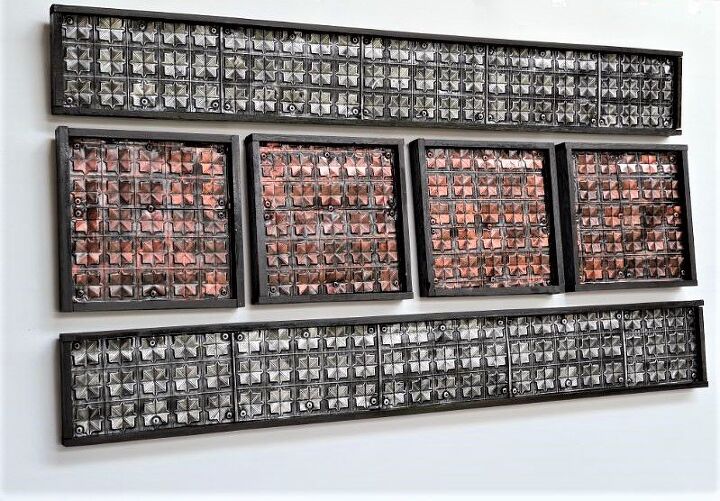
If you follow my blog you will know that I try and create all my projects from recycled materials. In our house, we all love Pepsi Max, which leaves us with a fair few aluminium cans. Instead of sending them to the recycling centre, I wanted to try and create an aluminium can wall hanging with them. Because aluminium cans are not very big, I wanted to create a wall hanging that was made up of smaller panels that could be arranged in different designs on the wall. So your wall hanging can be changed around when you get bored with the design.
The idea came to me one night when I was cleaning out my craft drawer and found an embossing folder. I bought it years ago when I bought my Cricut machine with the intention of making my own cards. I must have had a stupid moment because I did not realise that I would need an embossing press to use it. So it has sat in my drawer ever since.
This was not my first attempt at this project, my first attempt was a steampunk mannequin covered in embossed aluminium cans. I embossed them all by hand using the folder which did work but the design was not consistent. I mentioned this so you don’t think you have to have an embossing press to do this project.
While I was doing the mannequin project, my mind was spinning with ideas for future projects. So I bought a second-hand machine off the Facebook marketplace, which I used in this project. This project looks time-consuming when broken down into steps but it was very easy and took about 2 hours excluding drying times.
I used 2 sizes of cans for this project, the mother cans give you a bigger sheet of aluminium to work with. To cut the cans you will need a Stanley knife and a pair of scissors. Wearing gloves to cut the cans will prevent any injuries. To get the most out of each can, I found it worked better to cut them as follows.
Using the knife you cut into the top of the can at the start of the flat section. You only use the knife to make a hole to get the scissors inside and then cut off the top section. You can now rinse out the can.
Next, using the straight line of the text as a guide cut down the middle. This will save time later because these edges will already be straight.
You can now cut off the bottom using scissors.
This was not enough cans for my project because I kept changing my mind, so you will need more.
Cut the edges straight, I found it was easier to have all the aluminium cans cut to the same size. You can use a cutting mat, Stanley knife and ruler to do this.
You only need to cut the long sides of the cans because you already cut along the text in the step before.
When you load the cans into the folder you want the embossed side to be on the silver side. This makes it easier to see the design and to paint later. To make it easier to match up the design you should always put the can in the same position in the folder. At this minute in time, I only have one folder but I will be ordering more for future projects.
You now load the folder and roll it through the embossing machine.
When I did the mannequin I did not have the machine for embossing. At first, I tried using a rolling pin to push down but I was not strong enough. I then used a very primitive method, I put it on the floor and stood on it. This definitely worked but the pattern was not always consistent.
The cans look like this after embossing. I cut away the excess to use in a later project.
Cutting the wood Before I added the cans to the wood I did a test run first and found plywood to work better. It was softer than wood which allowed the pop rivets to embed into the back of the wood. You can glue the cans into place if you don’t want to add pop rivets. I cut the plywood to the following sizes.
- 1 x 690mm x 120mm
- 2 x 690mm x 80mm
- 4 x 140mm x 140mm
Next, you place the can onto the wood and drill a hole through the cans and wood. Using the pop rivet gun add the pop rivets.
I used the smallest pop rivets I could find because they are easier to put in.
The pop rivet pulled itself into the wood at the back. Cover all the wood and try and match the pattern up as you go along. I did have to trim some of the cans after with scissors. Note to self, put some wood between the wood and the table, lucky it was my workshop table.
Your cans attached to the wood will look like the image below.
To paint the aluminium cans I used a cheap black matt spray paint.
You will need about 2 coats to get good coverage.
To get the design to pop, I used copper and silver wax paste.
To apply the wax paste, you dip your finger into the wax paste and rub it over the raised surfaces.
You still want to see some of the black below to add to the effect. The wax needs 12 hours to dry before you seal the wall hanging.
To prevent the wax paste from going dull over time you need to seal it with 2 coats of clear spray polyurethane.
The image below is how it looks at the back.
This is where I originally stopped, but when I was taking the photos they looked unfinished.
I went for a very basic frame, by cutting some wood strips 1cm thick from 2 cm wood, and painted it black.
I used glue and a nail gun to attach the frames to the panels. If you don’t have a nail gun you can clamp the frame in place while the glue dries. You can jump across to my website shown below to see more way to arrange these panels on the wall. This project was very cheap to make because I used mainly recycled materials.
It looked more complete with the frame. All you have left to do is create your aluminium cans wall hanging layout on your wall.
More project ideas
This steampunk mannequin looks like it would be really hard to make. I have broken it down into step so you can see how it was created.
This wooden suncatcher was made from a slice of wood with coloured resin added.
Enjoyed the project?
Resources for this project:
See all materials
Comments
Join the conversation
-
 Kathaleen
on Jun 23, 2021
Loved the mannequin!!! the embossing not being consistent just makes it more authentic. It is beautiful .Liked the wall hanging too, but the mannequin really got my attention. Steampunk is always interesting. I am always in awe with projects like these. GREAT JOB!!😀
-
 Unique Creations By Anita
on Jun 23, 2021
Thank you Kathleen, if you go look at the mannequin post there are more mannequin on there.
-
-
-
 Marsha
on Jun 24, 2021
I applaud you for taking something we throw away without thinking and re-imagining it in such a creative and unique way...awesomeness 👌
-
 Unique Creations By Anita
on Jun 24, 2021
Thank you so much.b
-
-


Frequently asked questions
Have a question about this project?
I see that embossing machines are anywhere from $90 to $300. Which model did you purchase?