


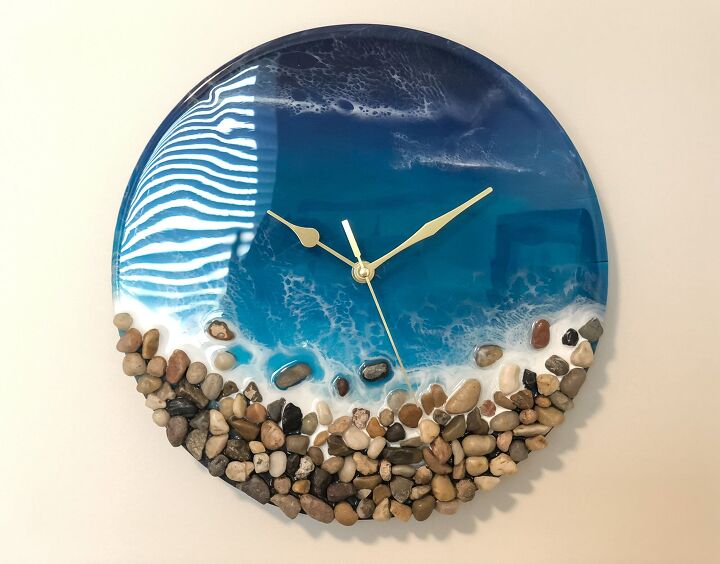
Resin Waves & Pebble Clock

Hello and thank you for taking the time to view my post today.
Whether you're new to resin or have been in the game for a while, I think this project is suitable for all skills levels.
I've made a YouTube video to go with this project for those who like to follow along that way. Details and link below.
WHAT YOU'LL NEED
- Resin - mine is by Rockstar Resins - use this link and code HANNAH for 10% off along with free delivery
- Round wooden board - mine is 13 inches
- Pebbles
- Acrylic paints
- Mixing cups and sticks
- Clock mechanism
- Tape
- Drill
- Heat gun
All the links to products used in this project can be found in the description of my YouTube video if they aren't already linked below.
Always use protective wear and take the appropriate safety measures when handling resin
STEP ONE - WATCH MY YOUTUBE VIDEO
As I mentioned above, I've made a YouTube video of this project and it's up on my channel now. Just click the video link above to watch.
Please check out my YouTube channel too and consider subscribing whilst you're there ☺️
I post weekly showcasing a range of crafts besides resin too 👍🏻

STEP TWO - PREP YOUR SURFACE
These wooden rounds usually come in multiples and can sometimes be a little rough straight out of the packet so you may need to give them a quick sanding to smooth any spikey edges.
Some of my discs were fine and some needed sanding so it's pot luck really.
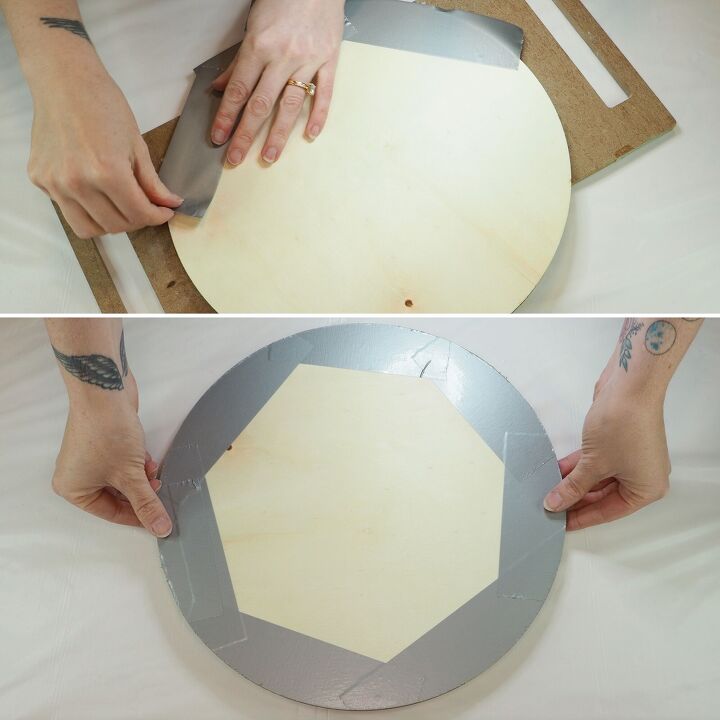
With a smooth board, tape off the reverse side edges with duck tape or painters tape to protect it from resin drips.
I like to use liquid latex for a lot of my resin projects but unfortunatley this can't be used on wood because it soaks into porous surfaces.
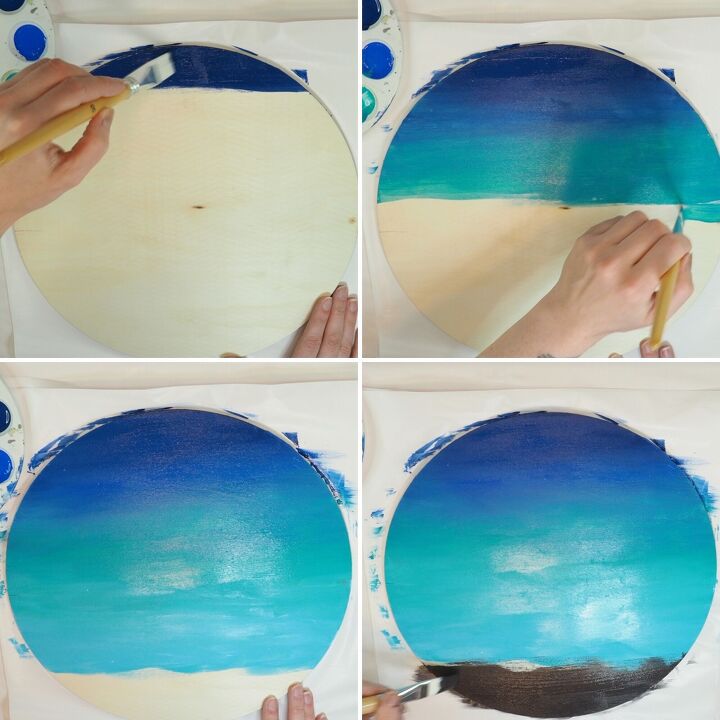
With the back edges taped off, it's time to paint a beachy scene on the front.
This doesn't need to be in great detail because there will be resin layers going on top, but I found that without a painted base, the resin colours don't pop in the same way.
Blend the colours together for a seamless flow of greens and blues going from the darkest shade down to the lightest.
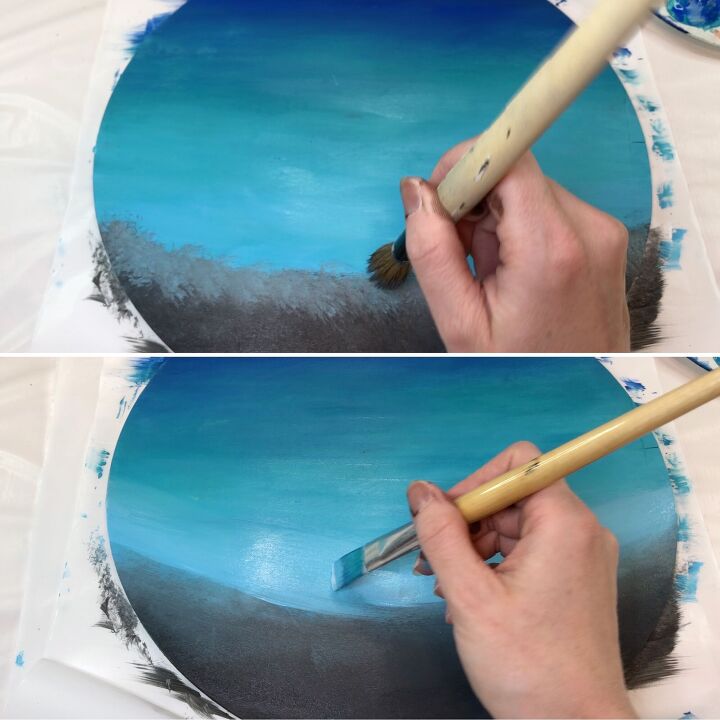
At about 4/5s of the way down the board, next to the lightest shade of blue-green, paint a band of grey.
This grey will act as a background for the pebbles.
Blend the blue and grey together where they join so that there isn't an obvious line.
Allow your paint to fully dry out.
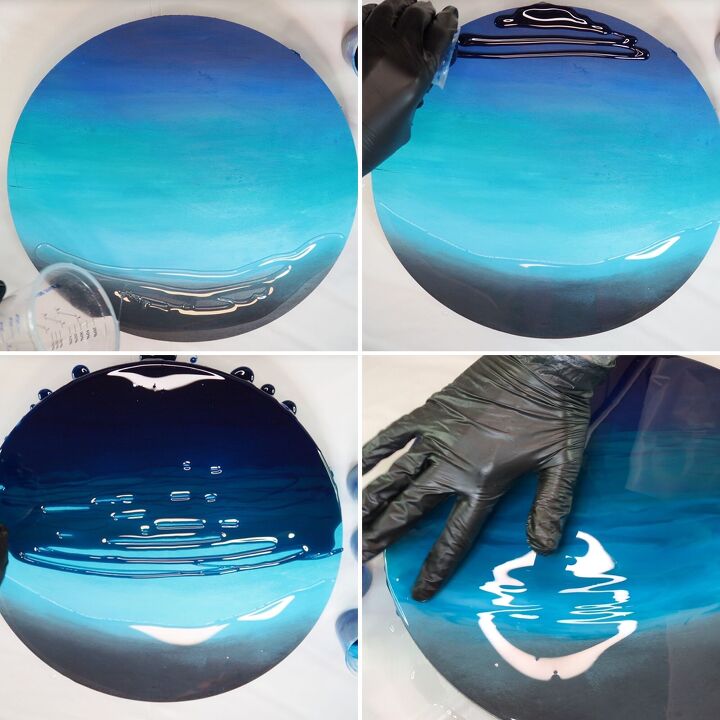
STEP THREE - FIRST RESIN LAYER
Mix together enough resin to fully cover your board. With my board being 13 inches in diameter, I mixed up about 150mls of resin.
Split the resin into a few smaller portions and colour these smaller portions in similar shades of blue-green to your paint. Leave a portion clear.
This roughly how I split up my resin:
Clear: 50mls
Dark blue: 20mls
Medium blue no1: 30mls
Medium blue no2: 30mls
Light blue: 20mls
Colour your portions with resin pigments if you have them or just use a small amount of acrylic paint.
Make sure your board is laid on something like a coaster mold or mixing cups so that it is lifted up off of your work surface before you start.
Pour the clear resin over the grey band and then pour the blues over the corresponding blue painted areas.
I still had some clear resin left over so I mixed this into the dregs from the coloured containers to create softer shades of blue and then added this to the blue portion of the board too.
Blend the colours together either using your gloved finger or with a mixing stick and pop bubbles with a heat gun and/or blow torch.
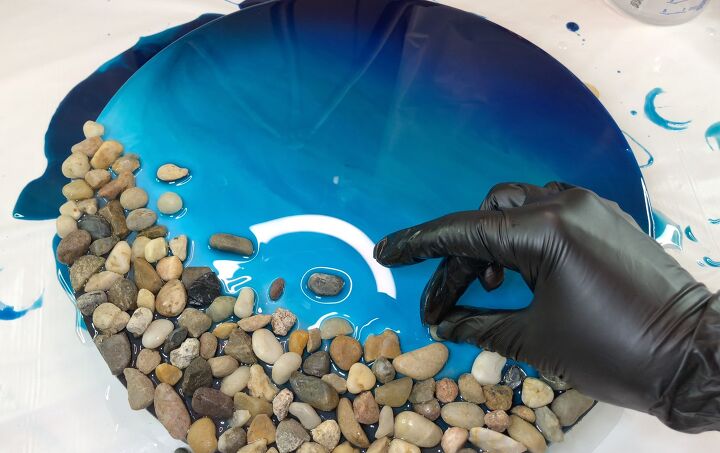
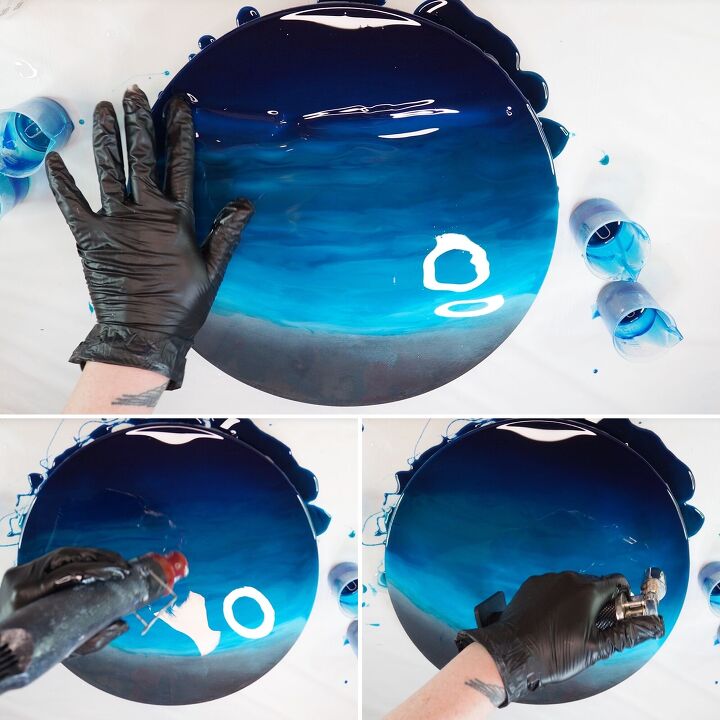
Once the board is fully coated in softly blended resin, start adding the pebbles to the grey painted area.
Try to make one flat even layer of pebbles so that they all come into contact with the resin and try not to have them protrude too far out/up; remember there will be clock hands that need to pass by them.
Separate out a few pebbles an inch or so away from the rest to create a more natural effect.
Once you're happy with how this looks, leave the resin to fully cure.
If your board is anything like mine (and by that I mean not completely flat), it may be worth checking in on it every so often as the resin may want to drift to one side.
If this happens, use your heat gun to push the resin back into place and trying leveling the surface by slipping a small flat object under the appropriate side.
Check in on your board again in a short while to see if this has worked and adjust again if necessary.
STEP FOUR - WAVES LAYER
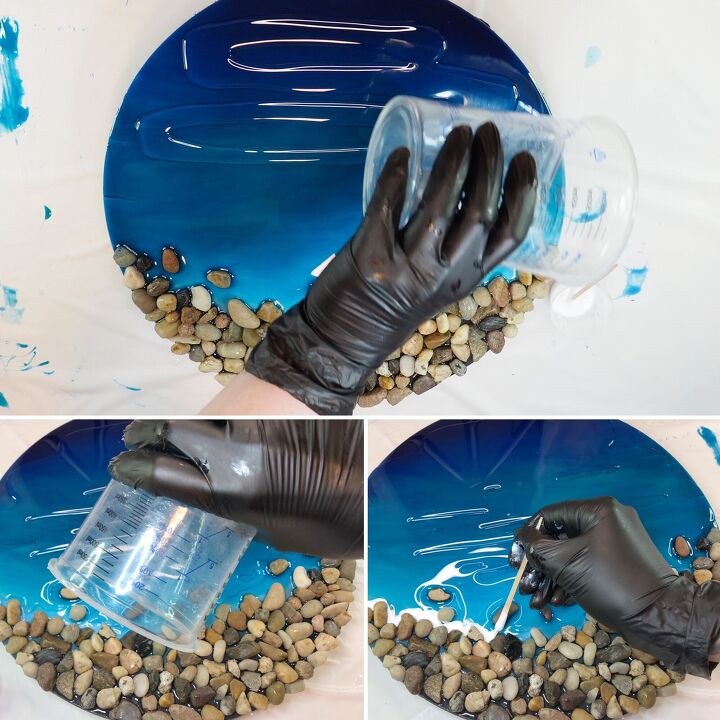
Once your first resin layer has cured, mix together another batch of resin. I mixed about 100mls of resin for this step based on the size of my board.
Separate out from this a very small portion of resin and colour this white. If you don't have white liquid pigment then white acrylic paint will work just fine.
Pour the clear portion of resin over the blue of the board but leave the pebbles be. Spread the resin over the entire pebble-free section and push the clear resin right up to the pebble border.
It doesn't matter if the resin starts to run in between the first couple of rows of pebbles, you just don't want to pour any resin directly on top of the pebbles.
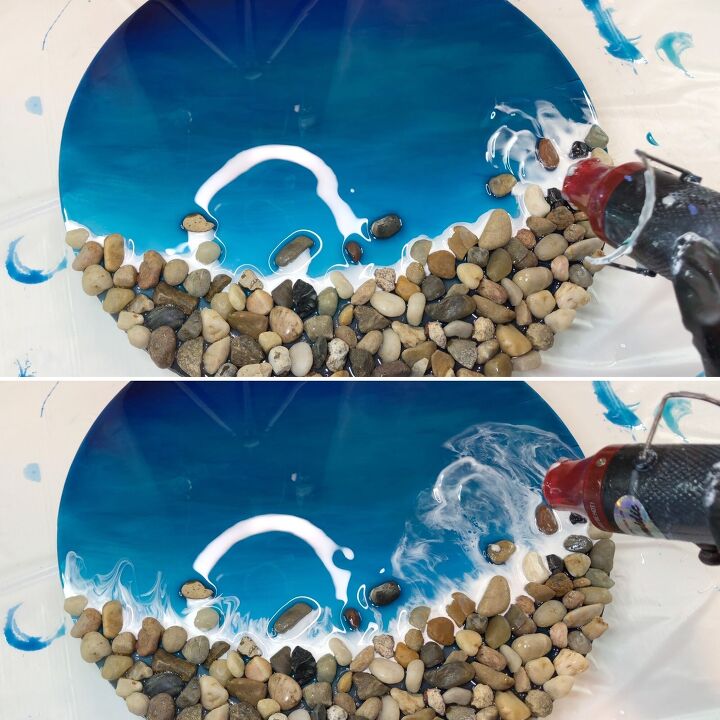
Now apply a line of white resin along the very front of the pebbles so that it's up against the pebbles and touching the clear resin.
Using your heat gun at a low angle, blow the white resin into the clear resin. This action doesn't happen instantly, you have to hold the heat gun in place for a little while.
This is easiest to see in my video in case this step sounds a little confusing.
Keep blowing until all the white has spread upwards and you start to see the little cells appear.
Cells are encouraged with heat, this is why you will see people blasting them with a blow torch at some point. This is of course an option for you if you have a blow torch, but by holding a heat gun at a distance and by using a circular motion for a long period of time, this will also create the necessary heat you need to create cells without burning the resin.
Cells can also appear simply through the curing process as the resin heats up whilst curing.
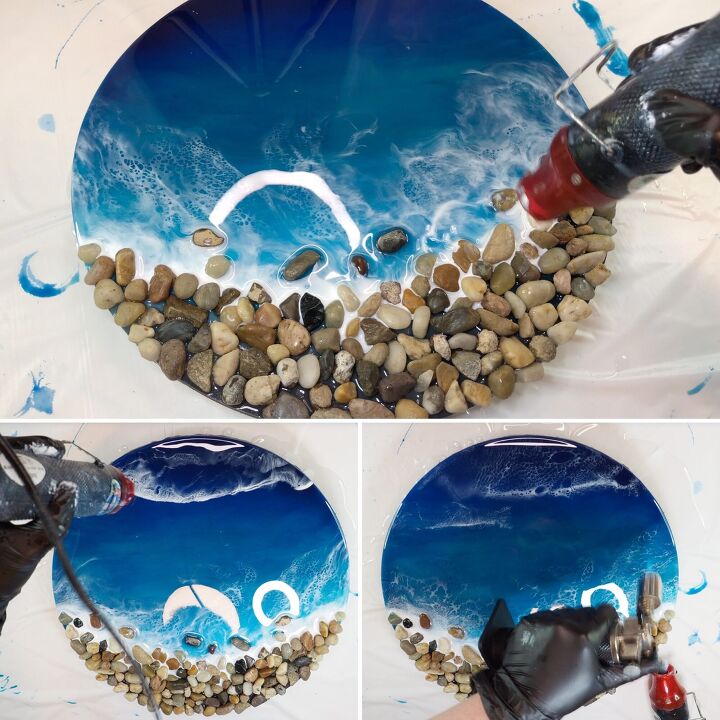
Add white lines further up your board if you like like to create more waves.
Once you're happy, leave to fully cure.
STEP FIVE - FINISHING TOUCHES
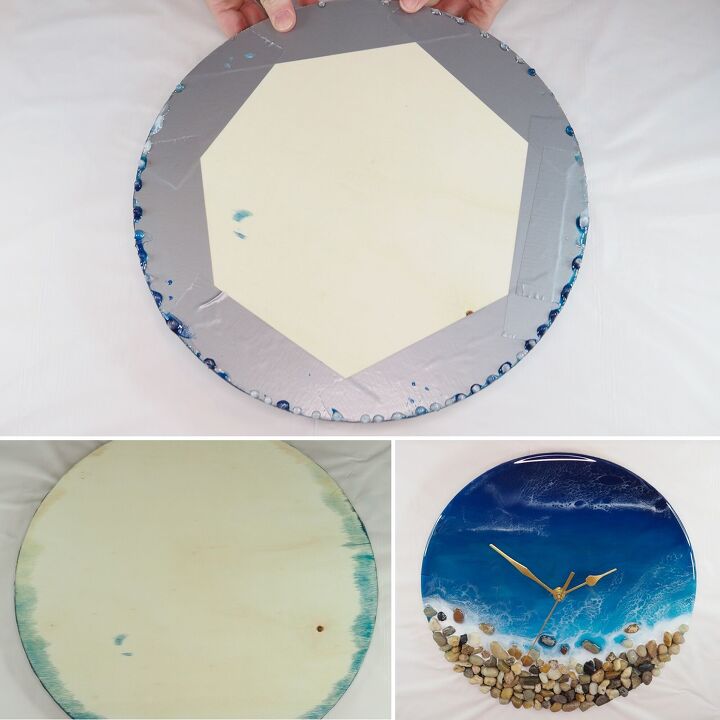
Once everything has cured, removed the tape from the back (which will also remove any resin drips that have formed) and drill a hole in the centre of your board.
Make sure the hole is the same size as your clock mechanism's thread an assemble the kit. I buy the kits that have the wall hanging fixtures built in so it's now ready to go up on the wall.

That's it! I hope you enjoyed this project. If you have any questions about it then feel free to drop them below and I'll get back to you ASAP.
Please remember to check out my YouTube channel and get subscribed for loads of crafty content ☺️
I also have an Etsy store and I've set up a 10% discount code for anyone from Hometalk to use: HOMETALK10. Feel free to check that out for all my handmade goodies.
Thanks again for taking the time to view my post today!
Until next time, happy crafting! x
💙
Resources for this project:
See all materials


Comments
Join the conversation
-
Gorgeous!
-
Perfect for the 'beachy vibe' that is trendy now in home decor.🏝️


Frequently asked questions
Have a question about this project?
I love this project, and I would love to try it!
Was it difficult to add the clock mechanism?
There were no visual instructions on that part of the project. The reason that I ask is because I want to make sure that I don't mess up the art piece trying to add the clock hands.
Thank you for sharing!
Would the resin work on concrete to make a stepping stone?
how do you clean dust off the resin?