Carpet and Linoleum to Faux Wood Floor

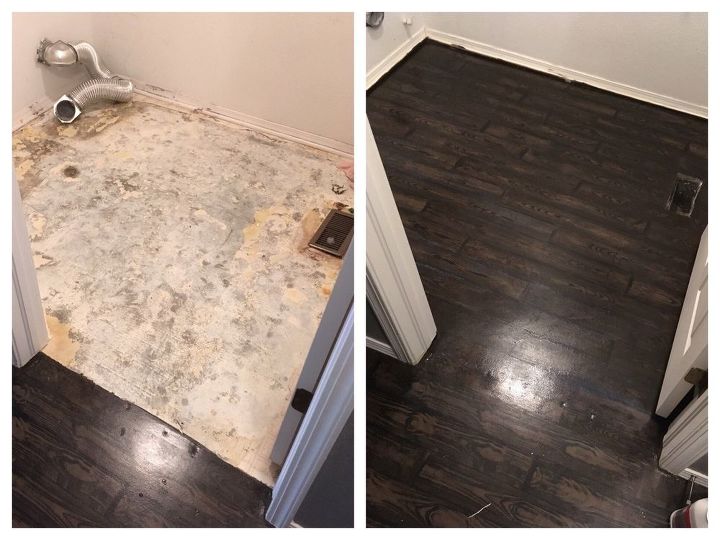
After removing carpet in our living room and main hallway (and later the linoleum from the laundry room), we painted our concrete foundation to look like wood planks. The process is fairly easy, but it can be hard on your knees and back.
We have two large dogs and two small children, so our almost white carpet was constantly nasty. My husband and I both wanted wood floors, but we were already knee-deep in other house projects, so we needed something inexpensive and fast! So, like everything else ugly in my house that needs a quick makeover, paint!
You will need:
-concrete patch
-primer suited for concrete (we used Zinsser, but I don’t remember which one)
-concrete/floor paint (we used Behr’s Porch and Patio Floor Paint - if you get your paint during Memorial Day or Labor Day weekends, you will save a ton of $ because they pretty much always have rebates on paint!!!)
-floor sealer/clear coat
-roller and cover (small cover for graining MUST be FOAM, but we used a standard size roller and regular nap cover for primer and main paint)
-wood graining tool/set (Allway Wood Graining Set)
First we had to remove all the carpet. If you think your carpet looks nasty on top, just wait until you see the underside!
Next step is to remove all the tack strips, glue and other gunk from the concrete. We used a heavy duty scraper and hammer for most of this, just sticking the edge of the scraper under one end of the tack strip or glue and gently tapping it with the hammer to loosen, and then pulling the whole piece up. The nails from the tack strips will pull up chunks of the concrete, so those holes will have to be filled later.
Next you have to clean the floor REALLY WELL or the paint won’t stick. This was the part that took the most time for us. You have to wash it until the water stays clear. We washed the whole floor 5 or 6 times, and we probably should have washed it even more! Our concrete had all sorts of paint and plaster stuck to it from when they textured and painted the walls (without covering or cleaning the concrete AT ALL!), and because concrete is porous, it all seeps in and does not want to come out.
After everything was clean, we filled the tack strip holes and a few other large dimples in the concrete with concrete patch. Then we sanded any rough spots smooth. We weren't concerned with making everything 100% smooth, but you can’t have any super rough spots, or the wood graining tool won’t work.
(If you do want a completely smooth surface, or if your floor is really uneven, you need to use a concrete resurfacer to level everything out, and then you will probably have to use a concrete etcher to add a little bit of texture so the paint has something to stick to!)
Allow everything to dry completely (concrete soaks up water, so make sure ALL water has evaporated). This can take a day or two depending on factors in your area. Ours actually sat for a whole week until we had time to work on it again.
Vacuum really well to make sure all sanding dust, dirt, (and in our case, dog fur) is removed. Finally it was time for primer! I can’t remember the exact one we used, but it was a high quality bonding primer that is acceptable for porous surfaces like concrete.
When the primer dried, we painted our solid base coat. I like the look of darker wood floors, so I chose a fairly dark brown for ours. If you need help picking a color, grab a sample piece of a wood flooring you like and take it with you to the paint counter to match colors.
I cut a long strip of paper from my craft roll that was slightly wider than my room and used it as a guide to mark out my planks. (Rosin paper would work well for this also. Later I used this to walk across the floor To the kitchen.) Because my wood graining tool and roller were 4”, I wanted my planks to be 4” wide. So on my long paper, I measured and marked every 4”, then lined it up in the room, making sure it stayed perpendicular to the side walls, and transfered the marks onto the floor with chalk. I repeated this every few feet for the length of the room.
Using a long straight edge, I connected the marks lightly with pen. After doing a few lines I switched to only marking every 8“. That way, I still had a guide on one side of every plank, but it was much faster than marking every line.
Next, I cut another piece of paper that was 4” wide x 3’ long, as a template for my planks. I put a mark on both sides at every foot to help stagger the planks evenly.
Now, the tutorials people have made using the wood graining tool all say to mix paint with glaze. I had a giant area to do and that would end up being pretty expensive, so I just used water. I mixed around a 3:1 water to paint ratio in a glass jar. The paint color here will depend on how you want your planks to look. I used some of the brown floor paint mixed with a tiny bit of black. You can refer to your wood floor sample again to decide what color you want your grain to be, but it should be darker than your main floor color.
Wood planking time! I did a test on a scrap board before starting on the floor. I tried to upload a short video of how I did the planks, but it never would save. (There are a lot of videos online on how to use the graining tool, just none of them on floors.) I started by placing my paper template next to where I wanted to paint.
Using my 4” roller with a foam cover, I covered the roller in my paint mix, squeezed most of it out on the paint pan, then pressing down gently on the roller, I lined up one edge of the roller onto my pen mark and painted a plank in the floor, starting and stopping at the ends of my template. (You want to push down just enough that a little paint puddles along the edges; this will give you defined planks!) Then, I gently pulled the wood graining tool through the wet paint, slowly rocking it to make knots and straight grain. The more you rock the tool back and forth, the more knots you will have. I moved the template over a space and staggered the end a foot from the first plank, and repeated the process across the room. You will need to wipe the tool off with a rag after every plank or two so you don’t get dribbles and streaks.
When I finished an entire row, I moved back to the other side and started a new one. At first I only did whole planks, so if a plank was going to be obstructed by a wall or the fireplace, etc, I skipped that one, measured where the next plank should start, and kept going.
When I finished all of the whole planks, I went back around the room and carefully did the borders. For this I had to use the brush some to get where the roller couldn’t, and used the smaller wood graining tools that came in the pack to fit all the way up against the wall. This would be less of an issue if you take the trim off your walls or are adding new shoe molding to cover the edges. Again, I was trying to do this as fast as possible, so I didn’t take our trim off, but we do plan to add shoe molding... eventuallly.
Here is where you can see how I used the pen marks to guide my planks and keep them straight. As long as you hold the roller fairly straight when adding the paint, your paint will overlap just barely and your pen marks will be completely covered up. And of course, if you don’t like how a plank turned out, roller over it and try again while it’s wet, or if it is already dry, carefully paint over it with the main floor paint first.
Here is the floor completely planked! It took me less than 24 hours to plank all of it. I did one side of the hallway and about half of the living room at night after putting the kids to bed, and the rest during nap times the next day. You want to make sure you leave dry areas to move around, especially if you are painting a main living area that connects bedrooms and bathrooms to kitchen and exterior doors!
Have fun with the wood grain! Twist the tool a little and vary the direction you pull it. Wood grain isn’t perfect, so your planks shouldn’t be either!
After everything has dried, add a few coats of a high quality floor sealer. We hadn’t bought a rug for the living room yet, but we had bought this one for our patio, so I relocated it until I could find the right one for the living room.
I did have a number of supplies already, so all we had to buy for this project was the wood graining set, primer, paint, and clear coat - 1 gallon of each was enough for us. Because of sales and rebates we spent right around $50!
Total time frame was about 2 weeks, but most of the work was done on weekends. The painting-only part could easily be done in about 3 days with leaving proper time for paint to dry. (A few months later when I did the laundry room, I did the whole thing in one day. I set up a fan and didn’t leave much dry time in between washing, primer, and paints. Most of it would be covered by the washer and dryer, and we couldn’t survive without them for very long. Also, because it was linoleum instead of carpet, the concrete wasn’t as dirty, I just had to scrape off the left-behind glue.)









Frequently asked questions
Have a question about this project?
How did you paint up close to the wall edge? Like when you are going back and forth. Most rollers don't fill in that space.
If this is concrete. . . is it cold in the winter??
Can this also be done on plywood or subfloor?