


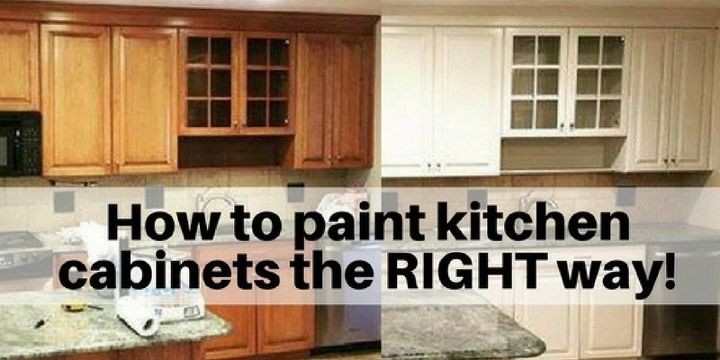
How to Paint Your Kitchen Cabinets the RIGHT Way
4 Materials
$500
4 Days
Advanced
The RIGHT way to paint kitchen cabinets and how to do it yourself
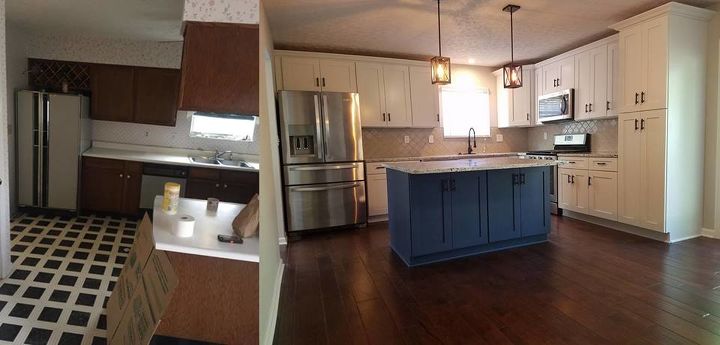
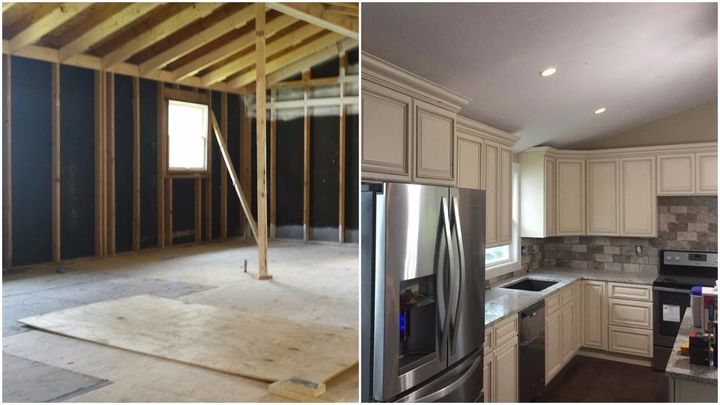
These days many new homeowners are opting to paint their dated kitchen cabinets rather than replace them. It's much less expensive and way faster as you don't need to worry about the cost of new cabinets, rip up nor ordering materials and living without a kitchen for 8 to 12 weeks. I'm going to show you how to paint your cabinets the right way.
The RIGHT way to paint kitchen cabinets and how to do it yourselfThese days many new homeowners are opting to paint their dated kitchen cabinets rather than replace them. It's much less expensive and way faster as you don't need to worry about the cost of new cabinets, rip up nor ordering materials and living without a kitchen for 8 to 12 weeks. I'm going to show you how to paint your cabinets the right way. You can read my original full article here. In the full article, you can see all of the tools and products (and you can even order them online if you'd like to.
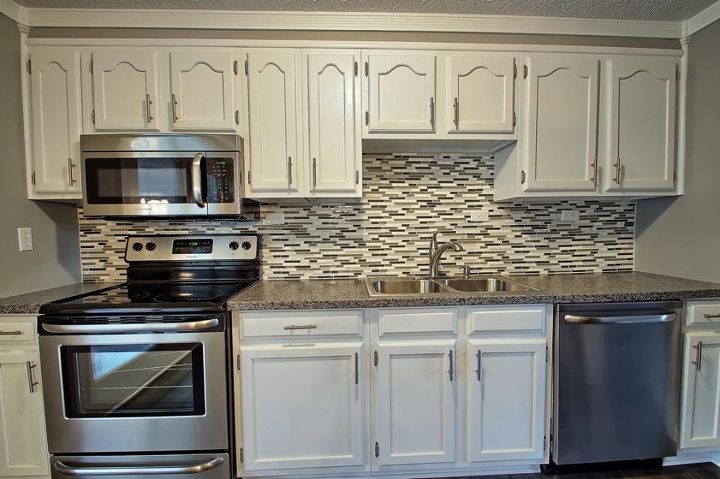
While painting your cabinets can have a dramatic effect on your space, it's important to paint them the RIGHT WAY. And, I've been finding that there is a LOT of poor and misleading info in the Big Box stores and on the internet (especially on pinterest and some of the DIY sites). By the way, I love these sites and use them often, but most of the info provided about painting cabinets is incorrect. They make it sound easier than it really is, imply that you can paint with just one coat (and this is ABSOLUTELY WRONG), and recommend inferior products and methods. So, I'm not here to tell you to hire a professional or to do-it-yourself. Either way is fine, and only you can make the call on which is better for you based on your skills and budget. Regardless, I want to help you get this done the right way and with the right products, regardless of who is doing the work. So, I'm going to provide tips on the best methods, best equipment/tools and best products for painting your kitchen cabinets. This is how the professionals paint cabinets (and I've been working with professional painters for the last 10 months), and yes, I'm spilling the insider secrets.
Best methods for kitchen cabinet paintingThere are really 2 methods for painting cabinets: 1) use a sprayer or 2) use a paint brush. The better method (which is the one usually used by the pros) is to spray them. When you spray them, they come out smoother and you can use the higher quality lacquer paint. The lacquer paint is stronger and more durable. It holds up MUCH better to cleaning products and chemicals. And, lacquers dry much faster. The issue with this method is the cost of the equipment. A sprayer is expensive, so usually only professional painters or contractors have these and most do-it-yourselfers don't (and don't want to invest in one). Sometimes, there is an option to rent one locally, and if you can, that's ideal so you can use the best paint possible. Go to original post to see the one we recommend.
So, that brings us to Method 2 - the brush method. This is what most DIYers choose to do (and most handymen and non professional painters will do). The brush method isn't bad, but it's not as durable as the spray option as you can not use the lacquer paint. When you're using a brush, we recommend this Corona Chinex 2.5 inch bristle brush. This is the right size and type of bristles for cabinets. Please note that you CAN'T use the lacquer paint with the brush method as the lacquer dries super quick, so as soon as you are ready to brush upwards, the paint is dry/partially dry and will get all gunky. So, use either a water borne or oil based paint for this method (see below section).
How to paint your kitchen cabinets - step by stepThe steps for painting the cabinets are similar in both the spray and brush method. Drying times between coats vary a bit, though based on the type of paint you're using. The general flow for painting kitchen cabinets goes as follows:PrepSand, then PrimeBuff, then 1st coat paintBuff, then 2nd coat paintReplace cabinets/clean up See original post for the paints and primers we recommend for both methods. 1. Prep the cabinetsRemove all the hardwareRemove all doors and drawers. Be sure to label each one so you'll know which one goes where afterwards. (You can usually use a pencil and number these and place the number in the hole where the hardware was.Move all doors/drawers to a clean staging area where you'll be painting (usually a garage - set up a table or bench for the painting.). Make sure the area is clean and you have plastic down beneath and plastic all around so that dust won't blow.Also, cover all areas in the kitchen that won't be painted. Use plastic and double sided tape.You will then need a degreaser to clean the cabinets. See original article for the degreaser we use.
2. Sand and primeThis is a step many would prefer to skip, but it's probably the most important and most overlooked step. (And, many DIY tutorials tell you it's not necessary). I'm here to tell you that you NEED to do this step. It's important for proper penetration and adhesion. And, if you don't do it or don't do it properly, everything else will fail. This is the foundation of you work. If the foundation of your house isn't even, not on top of it will be...and it's the same here. So don't skip this critical step. First, sand the cabinets. This will be much faster and easier (as well as even) if you use a hand sander. You want an orbital sander - one that's round and spins in place, and I'd recommend this one from DeWalt that is very reasonably priced. (Please note that if you find one for much less, it most likely doesn't spin in place and that will make your life very difficult. For this step, you'll want to sand with 120 grit sand paper. (For later steps, you'll need 220 and 600 grits). Note: the 600 grit for the final buffing needs to be done by hand as it's a very fine buff. After you sand, you will want to vacuum the dust. Any shop vacuum will work, including this one that you can buy inexpensively on Amazon. Then, you will need some tack cloth (we use Super Tuff) to clean off the finer particles. You will use this in the next 2 steps as well. Add the primer. Start with the back first. Then, flip over and do the front. For most primers, you will need to wait 24 hours drying time for each side. (Check the label on the primer you use, and remember that there is never a danger of waiting longer, especially if it's humid). Generally 24 hours is sufficient. LET DRY FOR 24 HOURS. See original article to find these items.
3. Buff and apply the 1st coat of paintBefore you add the 1st coat of paint, buff the doors using your hand sander and 220 grit sand paper. Then, use the tack cloth to remove the fine dust particles. Then paint. Paint the back first. Then, if you are using the brush method, you'll want to wait 24 hrs before flipping the door to paint the front. (Note: the paint can may tell you that it will dry faster, but it's safer to wait 24 hours. If you are using the spray method with lacquer, you can flip the doors sooner - often in a few minutes to 30 minutes per side. WAIT 24 HOURS BEFORE THE NEXT STEP 4. Buff and apply the 2nd coat of paintBefore you add the 2nd coat of paint, do a super light buffing the doors using 600 grit sand paper. You will need to do this by hand Then, use the tack cloth to remove the fine dust particles. Then paint. Paint the back first. Then, if you are using the brush method, you'll want to wait 24 hrs before flipping the door to paint the front. (Note: the paint can may tell you that it will dry faster, but it's safer to wait 24 hours. If you are using the spray method with lacquer, you can flip the doors sooner - often in a few minutes to 30 minutes per side. Note: You do NOT need a sealer after this. Chalk paint requires a sealer, but this is high durability paint and you do not use a sealer with this (just as you don't seal the walls). Generally, these paints take 7 to 10 days to fully dry and cure, but generally after 24 hours, they are good to reinstall and use in your kitchen. (But, do be careful during the 1st week and try to wait 7 to 10 days before cleaning them). This curing process for paint is very similar to the polyurethane curing process for hardwood floors (except it doesn't take quite as long). WAIT 24 HOURS BEFORE PUTTING THE CABINET DOORS BACK

5. Reassemble and Clean upAfter waiting 24 hours, you'll want to reinstall the cabinet doors and the hardware, or more likely new replace with new and updated hardware (see below for some hardware ideas). And, of course, you will also want to clean up. See original article to find most popular colors and finishes, as well as best brands/types of paints and tools. You can easily buy these items online if you don't have them on hand.

Want more details about this and other DIY projects? Check out my blog post!


Frequently asked questions
Have a question about this project?