


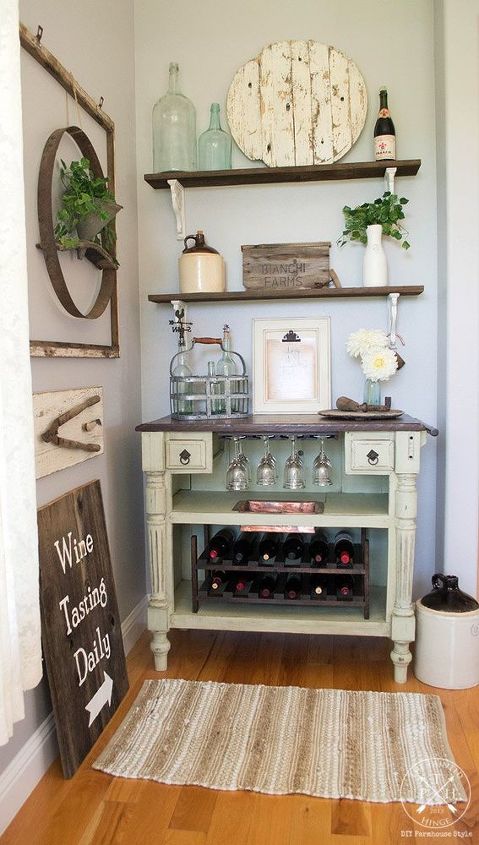
Old Beat Up Cabinet Transformed Into A Wine Bar
$100
5 Days
Medium
Hey there!  This project has been a very long time in the making. It took me a LOT longer to finish than what I thought it would! It didn’t help that we went on vacation for two weeks in the middle of the project. And of course I had a ton of stuff to catch up on around the house once we got home. I had planned to have it finished before we left, but you know what they say about the best laid plans.
This project has been a very long time in the making. It took me a LOT longer to finish than what I thought it would! It didn’t help that we went on vacation for two weeks in the middle of the project. And of course I had a ton of stuff to catch up on around the house once we got home. I had planned to have it finished before we left, but you know what they say about the best laid plans.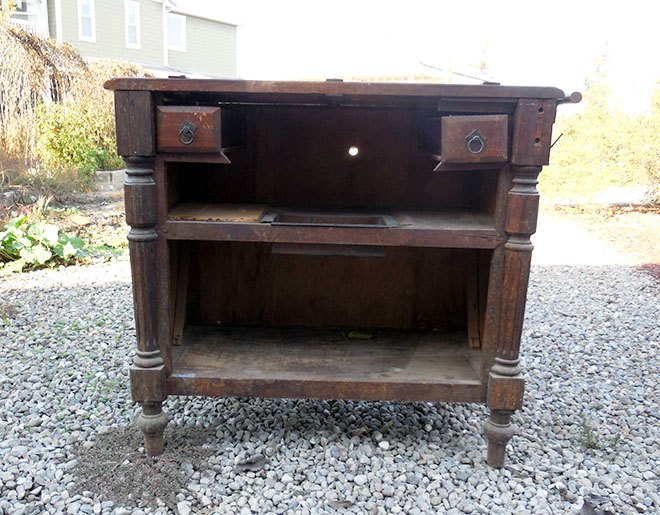
This cabinet had been in my parent’s garage for as long as I can remember. (I’m pushing 50, so that’s a pretty long time.) My dad used it as a gun shell reloader. He had all his reloading equipment mounted to the top of the cabinet. I wish took a picture of it with all the reloading equipment still attached, but when we dug it out of my parent’s garage after my dad passed away last year, I had no idea what to do with it. I just knew I wanted to keep it because since it was my dad’s it would be really nice if I could repurpose it someday.
First thing I did was to wash the cabinet thoroughly. This cabinet had been sitting in my parent’s garage for 40+ years, so it was covered in dust, cobwebs, grease, spray paint, and grime in general. I know it’s not always the best idea to use water on wood furniture, but since this was going inside my home eventually, I wanted it really clean. I used a power washer and dishwashing soap to get it as clean as possible.
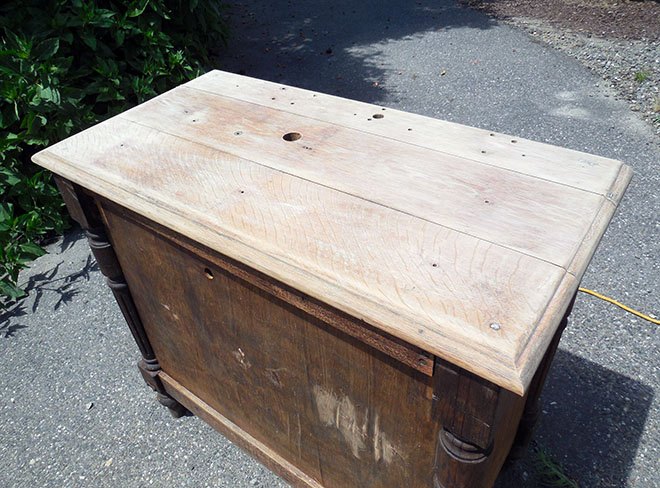
I bought wooden dowels in different sizes, and my husband cut and glued them into the cabinet top. He also replaced the missing trim on the drawer frames.
I was so excited about the progress I was making that I totally forgot to take a picture of the refinished top before I started painting the rest of it! I applied two coats of Varathane Premium Fast Dry Wood Stain in Kona and then finished it off with two coats of Varathane Ultimate Polyurethane in Semi Gloss.
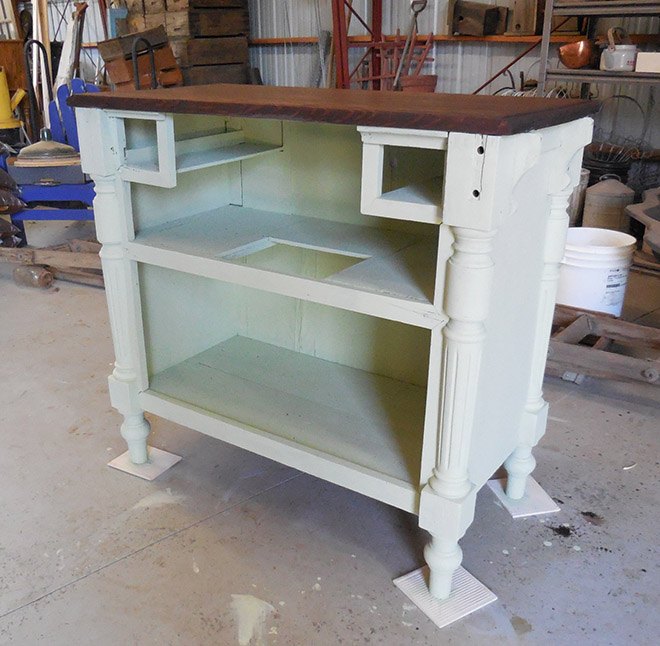
I used old tile to put under the legs so I wouldn’t get (too much) paint on our shop floor. I used a quart of Renaissance Chalk Furniture in Terre Verte and a half pint each of Renaissance clear wax and dark wax. This is the first time I have used Renaissance products and I have to say that I’m pretty impressed! The paint applies easily and smoothly, and the waxes are a good consistency and are very easy to use.
I used a quart of Renaissance Chalk Furniture in Terre Verte and a half pint each of Renaissance clear wax and dark wax. This is the first time I have used Renaissance products and I have to say that I’m pretty impressed! The paint applies easily and smoothly, and the waxes are a good consistency and are very easy to use.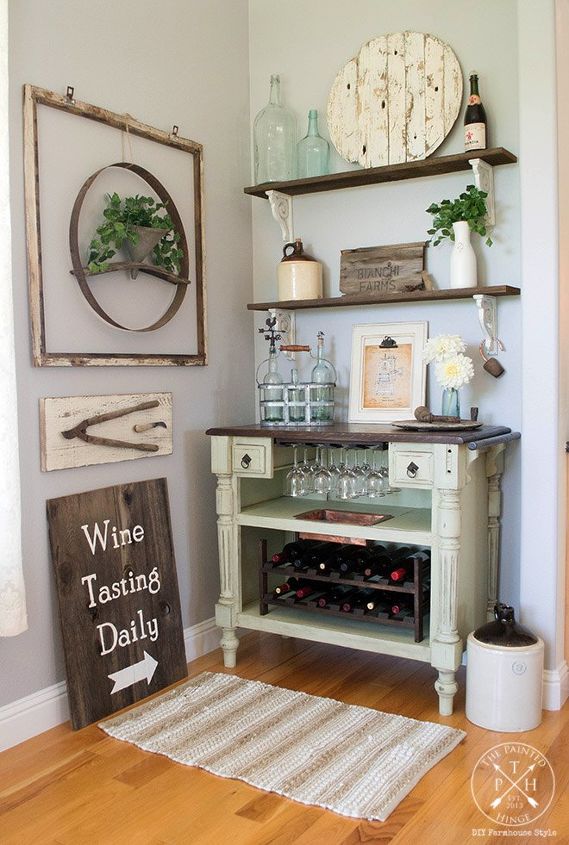
The finished wine bar! I'm very happy with how it turned out :)
For more detailed instructions, complete supply list including where to buy, and more before and after pictures, please visit my blog The Painted Hinge Farmhouse HERE!

Want more details about this and other DIY projects? Check out my blog post!
Comments
Join the conversation
2 of 72 comments
-
Lovely idea!
-
Absolutely gorgeous!!!!!


Frequently asked questions
Have a question about this project?
Was the pan an original or was it something your dad added? If it was original I was just wondering what the piece of furniture was used for. Beautiful job and you should be proud of it!!
I too would like to know what the copper pan was used for? Love how this piece turned out and I know your Dad would be so proud that your using his antique in your home and how pretty and useful you've made it! Added benefit is you will always think of him and have fond memories of him reloading shells on it all those years every time you look at your beautiful bar. I love how you've displayed everything around it as well and am going to copy your pretty hoop planter picture! I've got two hoops I had no idea what to do with but didn't want to throw them away. Soooo pretty! Thanks for sharing!
Hometalker please answer what the copper pan is used for?