


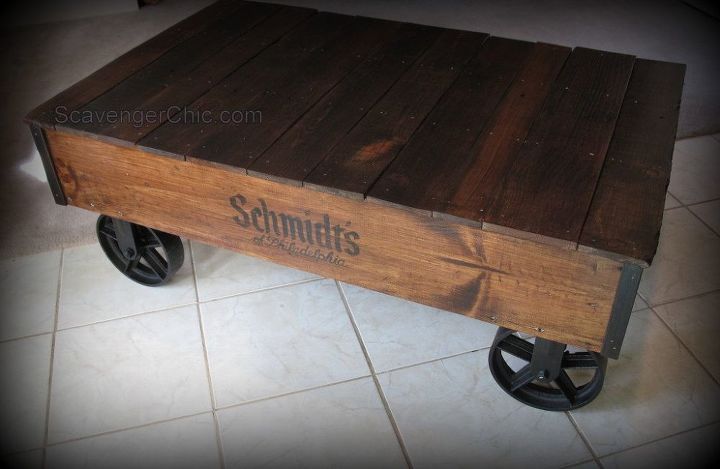
Industrial Cart Pallet Wood Coffee Table
I first started to work with pallets back in 2013 and this industrial cart was one of my first projects. While it looks involved, the construction is actually really easy. At the time I couldn’t find a decent tutorial for what I wanted to make and I took forever to find wheels that would go with my cart.
I have now made 3 of these coffee tables…one for my son in Philadelphia, one for my sisters in Front Royal, Virginia and another for a friend who saw the coffee table in Front Royal.

My overall construction followed plans I found online, but instead of buying cross supports I used the side rails of pallets. I also used scrap pieces for the bottom that left me with only having to buy the side pieces. The smaller of the coffee tables I made was 27″ x 44″ (that was for an apartment) so I only had to buy 2 pieces of 1 x 8 x 6ft pine lumber.
From those pieces cut 2, 44″ inch pieces for the long sides and 2, 25″ pieces for the short sides. (feel free to make your coffee table larger or smaller depending on your space).
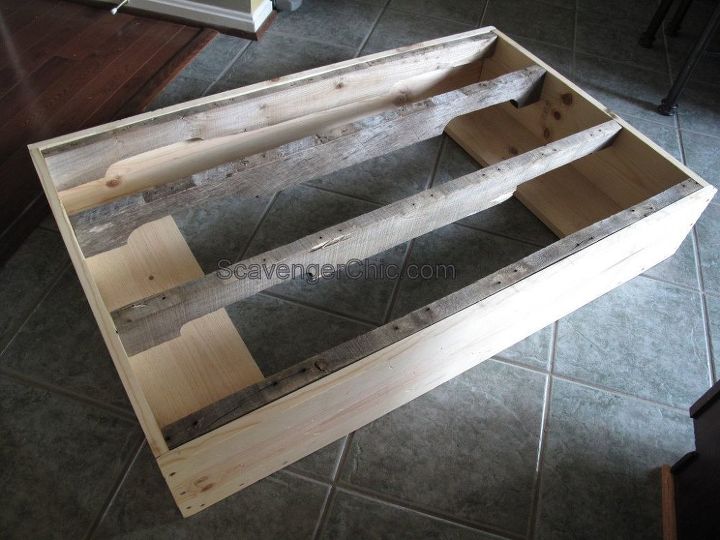
Time to start making your box, this is done with wood glue,and screws. Once the box is completed, measure the inside length of your box for the cross supports and cut your pallet wood. You will need 4 pieces of pallet wood side rails.
Measure the interior bottom width and that will be the length of your bottom supports. This piece is cut from a scrap piece of 1×6 or 1×8 pine, whatever you have available. Attach all your supports with wood glue and a couple of screws on each side. Take the pallet supports and space them evenly across the width of the table with the outside supports against the pine sides. For this project I like the black drywall screws just because the color goes along with the project. Silver ones would be too shiny. Hopefully, you now have a box that looks like the one above.
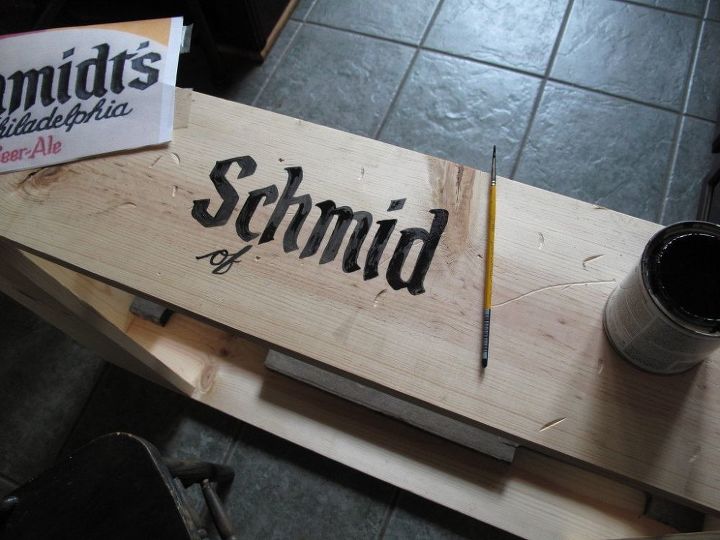
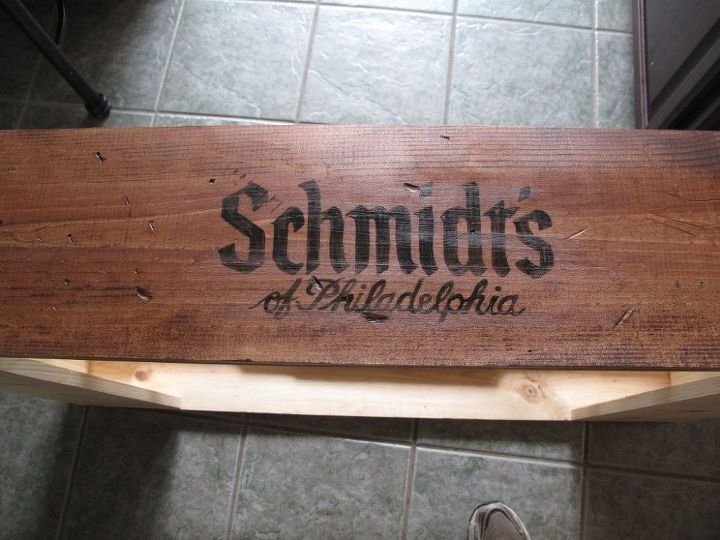
Next step is to add a logo of your choice. This one had the Schmidt’s of Philadelphia logo since my son lived in Philly overlooking the old Schmidt’s Brewery. I was able to find a great logo on the internet, downloaded it to my computer then resized it to the size I wanted. After that it was just a matter of transferring the image to my side pieces using a bit of carbon paper.
Finish your logo with black paint and a fine paint brush. Sort of like paint by number.
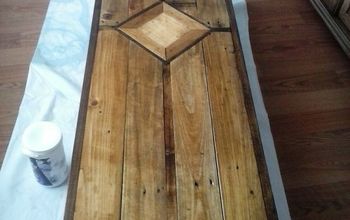
Time to gather your wood for the top. For this project the pallet should be in fairly good shape since you’ll need a bunch of long pieces. The heavier the pallet is, the better the wood is generally. I have actually found some beautiful oak buried under the graying outer coat on a couple of pallets. Once you’ve assembled all your wood, cut the pieces to about 2 inches longer than the length of your box and 2 inches wider than the width of your table which will give you an inch overlap on the sides. The number of pieces you use will vary on how wide your wood is. Pallet wood varies pallet to pallet and while you can use varying widths, try to find similar thicknesses to make a flat top.
With a sander, sand each of your pieces to remove bumps and splinters and to make a nice smooth finish. Lay out all your wood on your table top and attach with finishing nails to the side rail supports.
Finish your coffee table with stain, followed by a semigloss varnish.
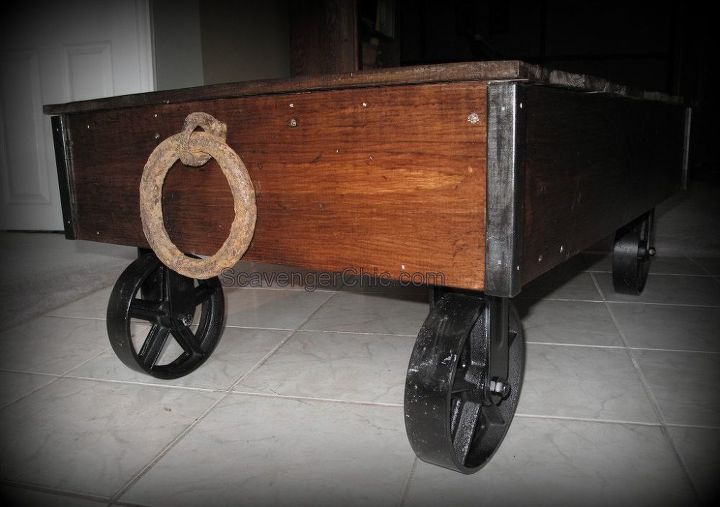
The corners are a wood trim corner piece painted black. Fairly inexpensive since you’re using less than a yard. Tack or glue them into place.
The wheels are from the Wholesale Tool Company. (link is on my blog)
This handle was found buried in dirt near an old abandoned house. Since I only have found one of these , my other coffee tables used handles from Hobby Lobby which had a sufficient amount of a rusty look to them.
Need more ideas for recycled coffee tables, you may want to check out my chicken coop coffee table here.
http://scavengerchic.com/2015/08/16/chicken-coop-coffee-table-diy/
Or a coffee table made from half of an old door...
http://scavengerchic.com/2015/10/16/vintage-door-coffee-table/
For more tips and tricks make sure you visit the blog link below.

Want more details about this and other DIY projects? Check out my blog post!
Comments
Join the conversation
2 of 26 comments
-
Love it!
-
I love this, it looks incredible, love the personalization!


Frequently asked questions
Have a question about this project?
Show underneath how the wheels are attached to the frame or are they individual wheels