DIY Patio and Garden Bench and Chair

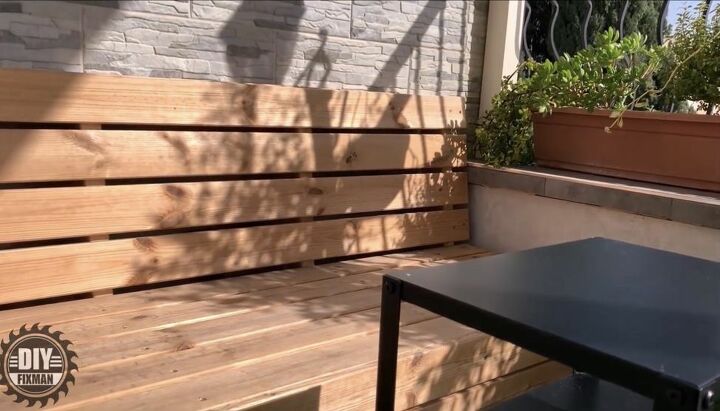
When I was ready to start furnishing the patio space I had trouble finding furniture that was the size I wanted. I was looking for a bench that would fit perfectly against my back wall and decided that in order to find just the right size to maximize my space, I would have to build it. My DIY patio bench was so incredibly simple to build, adds so much enjoyable living space to my home, and looks amazing! One of the best parts of the building project was that I was able to make use of the leftover cut boards to build a matching chair.
You Will Need:
- Lumber for Bench:
- (3) 2x4x8
- (3) 2x6x8
- (8) 1x4x8
- Box of 2-inch deck screws
- Drill/Driver
- Saw (or pre-cut boards)
- Outdoor Rug or Carpet
- Plants and Flowers
Step 1: Gather and Prepare Wood
I gathered all of my materials and wood which I cut to fit the width of my space. I cut three 2x6x8s into six 2x6x4s. I cut three 2x4x8s into six 2x4x3s. I also cut twelve 1x4s to five foot lengths, leaving twelve 3-foot pieces that I would use for the chair. Cut with a saw or ask for these cut pieces at a home improvement store.
Step 2: Build Bench Base and Back Frame
I joined four 2x6x4s together with four 2x4x3s with screws and a drill at approximately a 100-degree angle. You want to angle the boards slightly so that your back pieces are not straight up and down to make it more comfortable to sit on.
Step 3: Arrange Base Pieces
I stood my constructed base and back frame pieces up against the wall in the space I wanted my bench to fit. Evenly space your base pieces to fit the width of your cut boards.
Step 4: Install Seat and Back Boards
I began attaching the seat boards starting at the end of my seat and worked my way back to the joint of the back and seat base frame. I used five boards for the seat surface. Evenly space the boards apart at whatever distance you prefer.
Step 5: Add Boards to Bench Front
I added two 1x4s to the front face of the bench seat to the floor. This helps conceal the base frame and underneath the bench.
Step 6: Attach Boards to Bench Back
I started with the top board and attached it flat down on top of the four vertical frame pieces. After attaching the top board, I began working my way down from there and attached the remaining four front-facing boards. Use a drill to screw the boards in place.
Step 7: Construct Chair Frame
I used the remaining cut ends of my boards to build the frame for a matching chair. Just as I had for the bench, I joined two 2x6x4s together with two 2x4x3s with screws and a drill at approximately a 100-degree angle.
Step 8: Build Chair and Finish Wood
I constructed my chair using the same process as the bench. After I made two base frames for the seat and back, I added my boards. I started at the end of the seat and worked my way to the back and up. After you have finished building the bench and the chair, use an all-weather paint or stain to protect the wood from the elements and add whatever color or tone you like.
Step 9: Add Indoor Outdoor Carpet for Faux Lawn Look
I rolled out a grass-look indoor/outdoor carpet. If you are creating your bench for a patio area, choose any rug or carpet suitable for outdoor use and if you are using the bench on your lawn, find a level area.
Step 10: Accessorize Patio Area
I finished the patio space by adding a small table between the bench and chair. I used several plants to add privacy and beauty to my new seating area. Decorate the area around your bench and chair with whatever accessories or decor you like.
Have you used DIY patio projects like this one to create or transform an outdoor living space? Don’t be afraid to turn whatever space you have into livable and enjoyable space. Share your ideas for building outdoor furniture and find inspiration for how to maximize the outdoor living space you have but aren’t using at Hometalk!
Enjoyed the project?
Comments
Join the conversation
-
 Bobbi Taylor-Moore
on Feb 27, 2020
Beautiful and so inspirational. It makes me want to get to work and build one. Oh but I can't I think I will have to build an ark instead. It has rained rained and rained this winter here in Georgia. Great job. Thanks for sharing.
-
-
 Eliza
on Mar 01, 2020
Decided sides of my home will be reappointed as "corridor" cafes with bench like seating against a fence with wood running horizontally affixed to 'ballasters' of brick both red & overfired {clinkers} ... private relax spaces with seating & creative small tables perhaps suspended from the brick so walk / movement space will be at a premium. Exposure of home to everybody Walking by just doesn't make sense anymore & by adding my handmade solar lamps sprinkled about the 'cafe corridors', nighttime will present resting areas to look at stars & just let the outside become so much added 'living' area.
I do everything by hand & will use a hand drill...love to use...🌖🌌and perhaps attach a rain chain which will give 'rain music' & secretly water plants with diverters from base collection vessel from rain chain water collecting {hose will be discreetly run over roof and placed in roof gutter[ at point removed at point where detached gutter is replaced with attached 'rain chain'}, traveling to various plant beds like then roses🌹
~~~~~ Eliza ~~~~~
-












Frequently asked questions
Have a question about this project?
I love how easy it is. How much more wood should I use to make the bench higher?
Why didn't he add cushions...that wood would get pretty tough on the bum after a while?