How to Stencil a Mexican Talavera Tile Table

by
Royal Design Studio
(IC: professional)
4 Materials
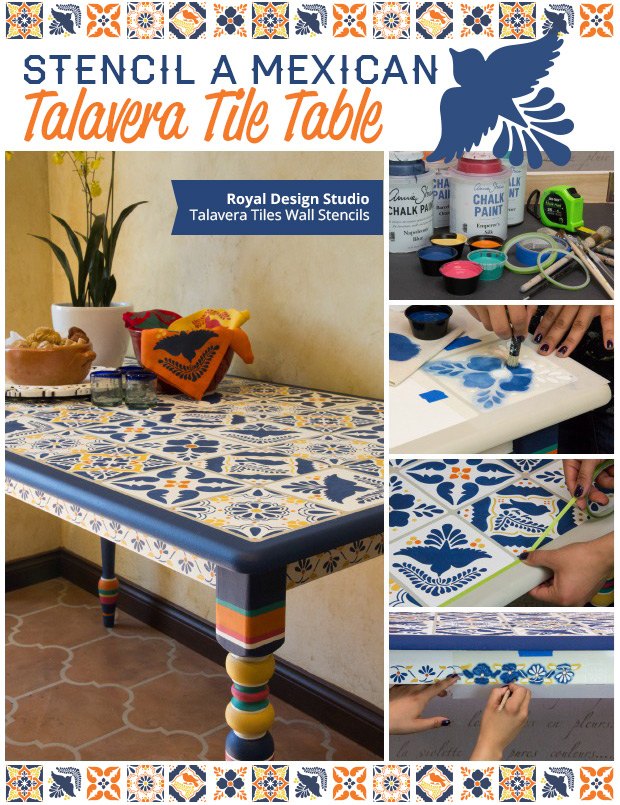
You don’t have to go south of the border to bring home a colorful Mexican Talavera tile table with a fun, folk art flair! We show you how to create your own with zero tile-laying experience required.
But first, a little info on the original tiles…
Talavera is the most highly regarded of Mexican pottery. It involves an elaborate process that has not changed since the 16th century. Genuine Talavera tiles and pottery are only made in and around the city of Puebla, Mexico due to the naturally occurring fine sands and high-quality clay of that region.
After the clay is formed and fired, the decorative process begins with a milky white crazed glazed background. Then, it is hand painted with only natural pigments in a limited range of permitted colors: blue, yellow, black, green, orange and mauve. Authentic Talavera pottery is always inscribed with the initials of the artisan who created it.
You may not be ready to try your hand at creating an authentic Talavera Tile, but you can certainly recreate the look with the help of stencils and bold and bright paint colors. We created our Talavera tile table on an old kitchen table and you can easily find this same type of table yourself at thrift stores or garage sales, making this a low cost project with a LOT of style.
{
"id": "3630238",
"alt": "",
"title": "",
"video_link": "https://www.youtube.com/embed/VyjXboIAc24",
"youtube_video_id": "VyjXboIAc24"
}
{
"width": 634,
"height": 357,
"showRelated": true
}
Video Tutorial!
Stencil Supplies
Use your Chalk Paint® custom color mix of 1pt French Linen + 1pt Country Grey to paint your entire tabletop. This will end up being your tile “grout” color. Allow it to dry.
Find the center of your tabletop and begin the Ceramic Tile stencil with one tile centered there. For our 31.5” x 53.5” table top it worked out for us to repeat the tile pattern fully at 9 tiles across and 5 tiles deep. Depending on the size of your project surface, you may need to end with partial tiles at the edges. In that case, you would want to run the tape around the edge to create a “frame” for your tiles-approximately 1” in from the edge.
Now switch to the Talavera Tile stencil designs. This set includes 6 different Talavera tile patterns. Each tile will be stenciled with a combination of Napoleonic Blue, Barcelona Orange, and the Custom Yellow Chalk Paint® mix. Alternate the repeat of the designs to avoid having the same motifs next to each other on your overall design. You can also rotate the bird designs to get more variety. Use smaller Stencil Brushes so that you can isolate the different colors in the separate elements without having to tape off areas.
Once you are finished stenciling all the tile patterns use the ¼” Striping Tape to create an outer “grout line”. Add 1” tape over this to fully protect your tile patterns.
If you have pretty turned table legs like we did it’s fun to use the painters tape to tape around the table legs to create different colored lines. You can either follow the carvings and the shape of the legs to create the lines or just use the tape to create a visual effect – or both!
You can use these same Royal Design Studio stencil tile patterns on other projects and surfaces. Stencil abacksplash, floor, around a door, or even the lower portion of a feature wall! It would also look great to alternate the patterned tiles with solid colored tiles of the same color, as is often seen in Mexican décor.
Enjoyed the project?
Suggested materials:
- Talavera Tile Stencils (http://www.royaldesignstudio.com/products/talavera-tiles-wall-stencils)
- Ceramic Tile Stencils (http://www.royaldesignstudio.com/products/ceramic-tiles-trompe-loeil-stencil)
- Annie Sloan Chalk Paint (http://www.royaldesignstudio.com/collections/annie-sloan-chalk-paint)
- Royal Stencil Brushes (http://www.royaldesignstudio.com/collections/stencil-brushes-rollers)
Published August 22nd, 2016 6:34 PM
Comments
Join the conversation
2 of 123 comments







Frequently asked questions
Have a question about this project?
Will stenciling work on a glass patio table?
Would this work to cover a old counter top?
Did you deal the paint for protective purposes? If so with what