PAINTING A ROOM LIKE A PRO

by
Linda
(IC: blogger)
3 Materials
$150
6 Hours
Easy
Painting a room the right way and having the right tools can make the process 100 times easier. So, give your room a whole new face lift this weekend with these easy steps on how to paint a room.
Step 1: Select a Color
Painting a room is probably the most significant and cheapest transformation you can make to any place.
Color can change the mood, style, and character of a space. And you don’t have to be a pro to transform a room with paint.
Before you begin your painting project, you have to decide on a paint color.
I have two posts that will be most helpful in making your selection.
Popular Sherwin Williams Paint Colors is a list of what is trending across America in Sherwin Williams paint colors and Selecting a ‘Fixer-Upper’ Paint Color assists you in finding just the right farmhouse Magnolia Paint color.
Step 2: Paint Supplies
The next step in your painting adventure is to check your supply inventory or if you have never painted before you will need to create your very own paint crate full of supplies. My post What’s in my Paint Crate will help you get all the supplies you need to begin.
Step 3: Prep your Space
Now begin by removing all switch plates and outlet covers.
Place them in a ziplock bag along with the screws, so you don’t misplace any pieces while you work.
Next, remove any nails in the wall, patch the holes and cracks with painters caulk or painter putty. Then lightly sand over where you repaired, any trim or areas of the wall that need smoothing down.
Once all the walls and trim are ready, make sure all the walls are clean of any soil, oil or residue.
Now place your drop cloths, old sheets or towels down on the floor to protect your floor from paint spills and drips.
(If your home is older than the early 80’s be mindful of paint with lead in it.)
Step 4: Paint Edging
The next step is cutting in the paint along the edges and corners. I like using a brush with an angled end but if you don’t have a steady hand try using an edger instead of taping.
Taping a room can have its challenges of its own. So I recommend the edging tool.
The key to this tool is just a tiny bit of paint on the bristles. Then place it flat on the wall about an inch away from the edge you want to run it down.
Next drag it up again the trim or edge and move it along the trim or edge.
Here is an additional tip.
I find it looks better to edge one wall then roll the wall before going on the next wall.
Last, use a brush for those inside corners. It works the best.
But give a brush a try.
I think a short handle brush with angled bristles is easier to use.
Press down on the wall away from the edge and then move towards the edge of the trim and drag the brush along keeping your wrist straight. After you run one line of paint go back and some more paint about the width of the brush.
Make sure you have plenty of paint up there so when you roll the paint onto the wall you have plenty of paint along the edge so don’t run a chance of hitting the trim with the roller.
Step 5: Trim
Many times I have painted the walls and not the trim, but honestly, sometimes you will have to paint the trim.
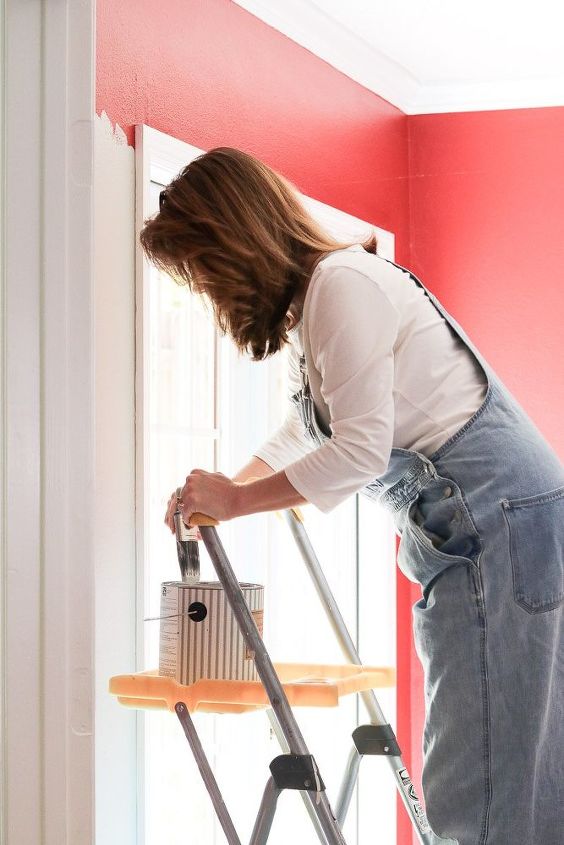
To paint the trim I usually us a brush.
The best tips and tricks on how to do this are to purchase an angled brush and mainly a short handle brush like the Wooster brand.
Next, apply some paint to the tip. Only about half an inch then tap it on the inside of the bucket or paint can.
Tapping draws the paint down on the brush instead of up.
Now just drag the brush along the trim holding your wrist stiff. Keeping your wrist stiff helps you to get a straight line when painting.
Continue this process until your finished with the room.
Step 6: Cleaning
Once you have finished painting your room, all you have to do is some cleanup.
I recommend going outside to clean your brushes and rollers with little soapy water.
Rinse your brush where the water is moving down instead of up inside the bristles. It is better for the brush to keep the paint from settling up inside close to the handle.
After you have rinsed out all the paint, place the handle between both hands and twist it back and forth so that the bristles are spinning and the water will move downward.
Next, hang the brush up so as it dries the bristles will lay straight.
As far as the roller I usually trash them but not the frame. They are pretty inexpensive, so I don’t mind trashing them after each use.
Step 7: Sit back and Enjoy!
Here is our dining room in the color Cupola by Magnolia Home. It really brightened up the space.
After a short break it is time to do some accessorizing!
If you would like to see a video on how to paint a room click the link to see how easy it really is.
Enjoyed the project?
Resources for this project:
Any price and availability information displayed on [relevant Amazon Site(s), as applicable] at the time of purchase will apply to the purchase of this product.
Hometalk may collect a small share of sales from the links on this page.More info

Want more details about this and other DIY projects? Check out my blog post!
Published April 9th, 2018 9:31 AM
Comments
Join the conversation
4 of 13 comments
-
 Ava Karafiatova
on Apr 21, 2018
Wow, you are a genius!
-
-
 Mikie
on May 02, 2018
Like the Bib-overall's. Very cute. Look's like you did one smack up job with the paint job there. Very nice & soothing.
-












Frequently asked questions
Have a question about this project?
Ideas to paint a bathroom tiles with dark gray?
What does it mean to "roll the wall"?
What color did you use? I love it! Great job.