


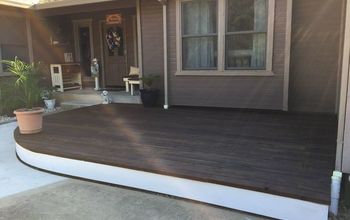
How to Build a Floating Deck

A simplified steps on how to build a floating deck close to the ground for your backyard oasis.
A floating deck is a platform that is not attached to any structure. To build a ground-level deck, you need to follow some prerequisites, like using ground-contact wood if the deck is within 10” off the ground and making the substructure high enough to allow ventilation for the ground to dry out. You also need to check your local building code to see if a floating deck is allowed in your area and if you need a permit to build one. Creating a plan, preparing the foundation, setting the blocks, and building the outside frame are the steps to building a floating deck.
But lets quickly walk you through the steps:
If you want to see the full details plus materials used in building a floating deck, be sure to click the link to the full project tutorial.
Check your local code.
Be sure to check your local building code to see if a floating deck is allowed in your area and if you need a permit to build one. Usually, if the floating deck is under a certain size, no permit is needed.

STEP 1: Create the plan
Before you start, you need to create your plan for the floating deck.
For my plan, I measured the area where we wanted our deck. Then, I used a program called Sketchup (they have a free online version) to design the layout.
STEP 2: Prepare the foundation
There are many ways to create the foundation of a floating deck.
We used a system called TuffBlocks because they are easy to install and low-profile. It would allow the deck to be inches from the ground.

We also decided to place a 2” gravel base for the foundation to allow for water drainage from the deck. This would also make it easier to level the TuffBlocks.
To begin, we removed 2” of dirt from the area, placed landscape ending, and weed barrier.


STEP 3: Setting the blocks
The next step is framing the floor of the deck. While you are doing this, you will also need to place the blocking.


STEP 4: Apply a sealant tape
This tape helps protect the joists from moisture. Although we are using pressure-treated lumber, it doesn’t hurt to take one more step to ensure that the framing will last for many years.


STEP 5: Install the fascia

STEP 6: Create a picture frame border

STEP 7: Install the deck boards

If this is a project you're interested in, view the blog post How to build a floating deck or watch the YouTube video.
Resources for this project:


Comments
Join the conversation
-
Beautiful. Thank you for all the information.


Frequently asked questions
Have a question about this project?