


Stenciling a Winter Pillow Cover

The more I learn about my vinyl cutter the more fun I have.

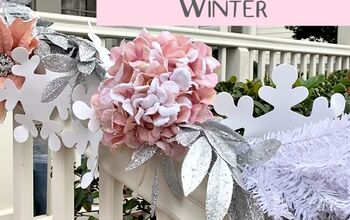
As an alternative to a red and green holiday season, I turned my mantel into a winter wonderland using my favorite decorations and my Mason Jar Collection. If you missed it you can read all about it by visiting this post.

The next step was to decorate the room with that pretty Mason Jar blue color by adding teal blue pillows and throws.

I used my Silhouette machine to cut winter themed vinyl stencils to add decorative pillow covers.
The winter themed cut files can be found at the online Silhouette store.

I used a black and a teal blue chalky paint to stencil the design onto a blank pillow cover.
Before I started painting I put a piece of parchment paper between the pillow layers so it wouldn't leak through.
I used a stencil brush and off-loaded the paint onto a scrap piece of wood so the brush wouldn't hold too much paint and leak under the vinyl.

I gently pounced the color inside the stencil. I created a lighter blue snowflake by using less paint.

When the paint was dry I peeled off the stencils and removed the parchment paper.

The color is perfect and they look great in my winter themed living room! See below for more ideas using the cutting machine.
- Personalized galvanized tray
- Great gifts using the Silhouette machine
- Decorative Christmas window


I'm really not a big fan of winter but while in it, I'm going to rock it!
You can follow Homeroad on Pinterest using the icons on the sidebar and sign up for emails so I can send my latest DIY tutorial straight to you! Please visit the GO BOX below for more winter projects at Homeroad.net!


Frequently asked questions
Have a question about this project?