


How To Turn Any Light Into A Wireless Chandelier

Learn how to make a DIY Wireless Chandelier! Follow me along on the blog for more tutorials! Add a light anywhere without electricity, using a portable LED light bulb that runs on batteries. These battery-powered LED bulbs are designed for this purpose and can be used in various scenarios where traditional electrical lighting is not available. I was able to take an indoor pendant light and turn it into a battery-operated outdoor chandelier in just minutes, with no hard wiring involved.

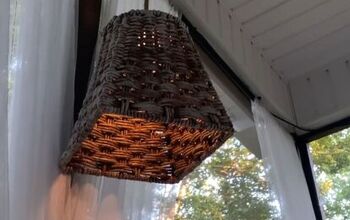
I”ve been adding a few updates on the back patio over the last few months. The last time I did much of anything was 2 years ago for my mom’s celebration of life. I ran across some wicker basket pendant lights on our FB community page and I knew I had to have them. Most start at $100 for this size so I thought $20 a piece was a steal!

Here is the before of the pendant. I believe this was originally purchased at Ikea. So if you are not having any luck finding them online or at a thrift store, hopefully, you have an Ikea around you.
Another option is it shop a home goods store, they usually have hundreds or baskets for you to choose from that would work for this project.

Materials Needed:
- A Basket Chandelier (or any light fixture of your choice)
- LED light bulb run on batteries Found at hardware stores, amazon, or lucky me the dollar store for $2.99
- Wire Caps (Optional)
- Polyurethane (Optional)

Step-by-Step Guide:
Waterproof your basket if leaving it outdoors during the winter.
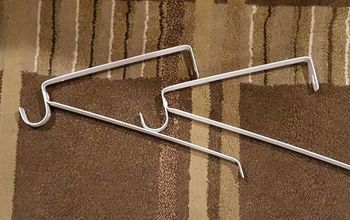
Since our wires were camouflaged within a Fabric Cloth Covered Round Wire, no electricity is being used here whatsoever, we simply reused the original socket.
You might get lucky and the bulb might fit into the socket but my bulb was not compatible with the existing socket and I had to get a little creative. By adding fishing wire/string between the battery pack and the part that screws on, I then threaded the fishing wire into the socket holes.

Note: I’m showing red and white string in the pictures so you can actually see it, the fishing wire disappears in pictures
Once you screw the top of the light bulb on, the string will not budge.

Once you thread it through the socket holes, and knot, simply cut the wire/string.

Step Three: Mount your outdoor pendant light by the cord, we simply wrapped it around the planks of our patio cover.
Some other options would be to use a swag hook, or adhesive strips.

I love how it looks during the day but is even more beautiful at night with all the outdoor lights on!

Other areas where you could use this idea
Wall sconce
Schoolhouse sconce
Cordless lamp
Floor lamps
Overhead lights

This is such an easy way to make a beautiful center point outdoors. You now look like you have a beautiful and expensive outdoor pendant from a high-end store. This is also the perfect lighting solution for renters who need something that can be easily removed when they move out of their rental. It's also a great alternative for homeowners who don't have electrical running to an area where you would like to place a pendant light. Or maybe you are just not prepared to spend money on an electrician or it is just not in the budget at the time.
Other different options for outdoor Cordless Light Solutions
A puck light, named for its hockey puck shape is so versatile and can also be a great choice for outdoor wireless lights, with no light switch involved, many times you can adjust the brightness levels. These disc-shaped lights come with a battery pack and remote control. They are great for indoors as well as floor lamps in your living room where no electrical outlet is near, cordless lamps, table lamps, pendant lamp on bookshelves, wall sconces in the dining room, an old light, overhead lights in a kitchen and a pictures light so no wires can be seen.
Another great idea is to use outdoor Solar lights
Portable light bulbs powered by solar provide a convenient and safe way to add light to areas without access to electricity. They are versatile and can be used in various situations, making them a practical lighting solution for temporary or emergency lighting needs.

Additional Tips:
- Battery life: Keep in mind that battery-powered lights will have limited runtime based on the battery capacity and the power consumption of the LED light source.
- Consider keeping spare batteries or a portable battery charger on hand for longer usage periods.
- Recharging: If you’re using a rechargeable battery, you’ll need to make provisions for recharging it periodically. Consider adding a charging port or removable battery pack for easy recharging.
Let me know if you have any questions, you can also head over to the blog for more tips on this project and as always I'm happy to help.


Frequently asked questions
Have a question about this project?