


How to Paint IKEA Laminate Furniture: A Step-by-Step Guide
I’ve done what I wasn’t sure was possible…I painted IKEA laminate…with SUCCESS!!! I think I’m still pinching myself over this one. I’ve wondered for a while if I could in fact paint some of my favorite IKEA purchases to give them a more custom look. I was skeptical because of the infamous slick surfaces, but after reading several articles online (here’s looking at you, Bob Vila!), I decided to go for it. It’s definitely do-able, but be sure to read my complete guide below!

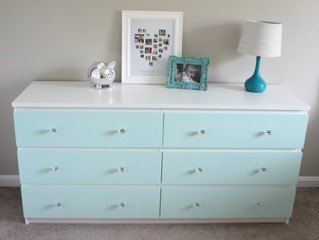
This transformed IKEA dresser is my entry into the August edition of The Fab Furniture Flippin’ Contest. This month, the theme was “Class it Up” and the contest was sponsored by D. Lawless Hardware. When I found out the sponsor, I got so incredibly excited. D. Lawless Hardware is a family-owned company that I’ve had the pleasure of working with quite a few times in the past. They offer a huge selection of knobs, pulls, and other project essentials. I feel like their prices are unbeatable and their customer-service is top-notch!
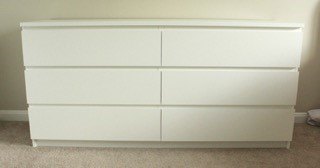
I decided I wanted to give just the fronts of the dresser drawers a new look with paint and hardware. I started by sanding the drawer faces with my power sander and 100 grit sandpaper. Although I did see some sawdust flying, I was still very skeptical at this point in the process because the surface still felt very slick.
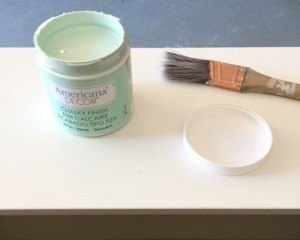
Feeling much more confident, here came the fun part. I opted to use DecoArt’s Americana Decor Chalky Finish paint in Refreshing. It’s the prettiest, subtle minty-blue/green shade. I like the that the chalky texture is somewhat forgiving and went over the primer nicely.
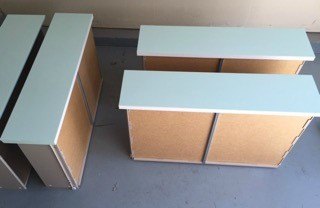
It took two coats of the chalky paint. I then used DecoArt’s Ultra-Matte Varnish to seal the drawers. This gave the drawers a really great protective coating, but didn’t give them a shiny look.

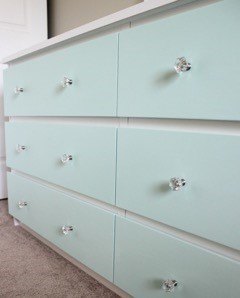
Finally, it was time for the icing on the cake. Addy kept asking us when we were going to put the “diamonds” on. We attached these fabulous little crystal-clear, acrylic knobs. I LOVE the way this dresser turned out.
For more pictures and details, check out my blog post!

Want more details about this and other DIY projects? Check out my blog post!
Comments
Join the conversation
2 of 3 comments
-
Amazing job! Thanks for sharing.
-
I love the personalized touch you gave this piece!


Frequently asked questions
Have a question about this project?