


HOW TO BUILD A PHOTO LIGHT BOX

by
Glen
4 Materials
$70
9 Hours
Medium
Light boxes are a great way to capture top-notch photos. My goal is to capture the best images so I can display my work and I needed something durable and dependable. I didn’t want to compromise and make it too small, the overall size of it is 32.5in (L) X 21in (D) X 18.75in (H). Below are the steps to make this Photo Light Box. You can find the cut list under the cut list tabs down below.

Step 1: Making the Cuts
I cut all the lumber down to size using a miter saw. The cuts can also be achieved using a miter box with a hand saw, circular saw or a table saw. With all the parts cut down to size, it’s time to assemble. To keep things simple, I built a bunch of frames and joined them using pocket holes screws. Since I will be repeating this process, I made a quick jig to speed things up. It’s really awesome because this helped me keep everything aligned while I focused on installing the screws.

Step 2: Building the Box
After all the frames are put together, you should now have 6 frames and one opening frame along with two loose pieces of lumber. One of the small loose pieces of lumber will be added to the back for structural support. The other piece will be used to cover the loose ends of fabric along the front. This will be covered in a later step.
Now it’s time to assemble all of the frames together. When securing the sides to the back make sure to pocket holes are facing out. Refer to the pictures. Apply wood glue in between the joints. You can use a nail gun or you can use screws to secure these.
Install the front, and make sure to pocket holes are facing in. Next, secure the top.
One thing I noticed was the pocket holes actually landed on the inside of the trim that will be added later. You can use plugs or wood filler to cover. This is so the holes don’t show through the fabric.
I sanded down the entire frame then slightly rounded the corners with the orbital sander.

Step 3: Adding Fabric
I’m no expert with the fabric, but here’s what I did. I guessed on how much fabric I would need to wrap the entire box. Since I’m only doing the sides and the top, I started with the smaller sides first. I cut the material so that it was slightly bigger than the opening. Then I stapled it down and stretched the fabric in different direction until I was able to get it flat. I flipped the box over and did the same thing on the opposite side then the top.
As a way to hide the loose ends of the fabric, I attached the final piece of the lumber. This piece was not glued, it was only nailed in place. Finally, I attached the trim on the sides. Again, these were also not glued in the occasion that it would need to be pulled back off to replace the fabric.
I used wood filler to fill in the gaps and also to hide the nail heads.

Step 4: Building a Backdrop
At some point in the future, I’ll create some customized backgrounds. The goal is to make them interchangeable so that I can have more options when I take photos.
In this step, I put together a really quick and simple temporary background. This was made from a few pieces of scrap wood and some recycled pallets.

Step 5: Adding a Back
I added a piece of 1/4 in. thick white hardboard for the back of the photo box. This allows me to use it as a backdrop and it creates the option of standing the light box on its back in the occasion I need an overhead shot.

Step 6: Setting Up
The lights I’m using are studio lights and can be used alone to take photos. At some point, I’ll probably make some LED panels to stick to the side so I can have a permanent lighting solution.
To easily switch the backdrop, you can use pallets, craft paper, poster boards or fabric.
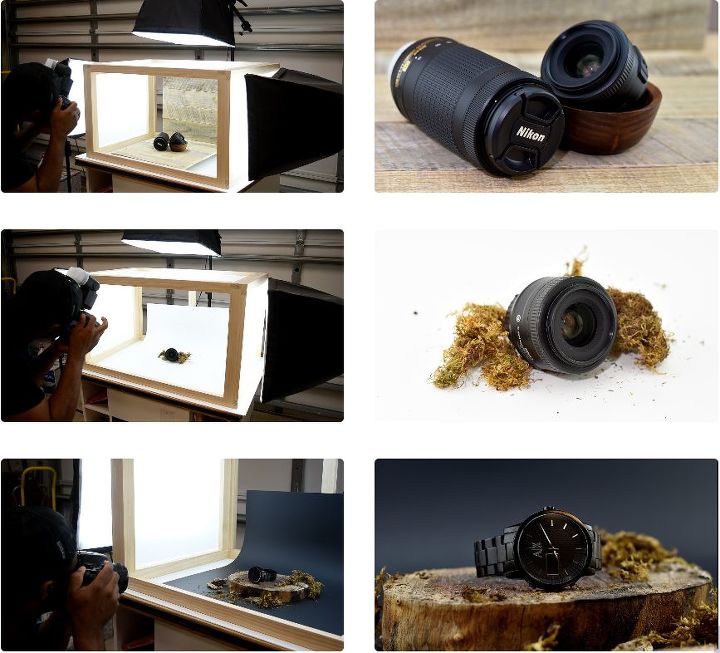
Final Step: Setting Up
Photo capture and photo results.

Visit website: https://diycreators.com/
Youtube: http://www.youtube.com/c/DIYCreators
Instagram: https://instagram.com/diycreators2015/
Facebook: https://www.facebook.com/diycreators
{
"id": "5081048",
"alt": "",
"title": "",
"video_link": "https://www.youtube.com/embed/dS-COIQzHS0",
"youtube_video_id": "dS-COIQzHS0"
}
{
"width": 634,
"height": 357,
"showRelated": true
}


Frequently asked questions
Have a question about this project?