


Dollar Tree DIY Halloween Wreath With Skulls
Learn how to make this Dollar Tree DIY Halloween wreath with skulls to decorate your home this holiday season! This Halloween skull wreath offers a beautiful take on a normally macabre element and utilizes Dollar Tree Halloween supplies to save you money.

Your neighbors will love this chic Halloween decor idea for your front door! Made using Dollar Tree pastel skulls, this Dollar Tree DIY Halloween wreath is not only pretty, it’s also not too scary for young trick-or-treaters.
I remember when my son wasn’t quite yet four and went trick-or-treating with me in the neighborhood. At the very first house a man opened his front door and jumped out wearing a scary mask. My son, obviously, was terrified. He spent the next 15 minutes sobbing, less than thrilled over the end goal of free candy. We were more cautious about where we went trick-or-treating after that incident. It took some gentle coaxing the following year. Ultimately, my son came around and was able to enjoy his Halloween outings after that initial adverse incident.
Not only did my son enjoy trick-or-treating later on, he also grew to love decorating for Halloween. In addition to spending (or rather overspending) on Halloween decorations, we also made our own! We’ve made everything from American Horror Story inspired DIY Halloween decor to upcycled DIY Halloween tombstones together over the years. These Halloween crafts provided a unique opportunity to create something together, while also enjoying one on one mother and son time.
I love to decorate for Halloween with skeletons, especially now that my son is grown and off at grad school. However, you may want to tone down your own Halloween decor if you have young children at home. Or perhaps you simply enjoy Halloween decorations that are slightly more girly than terrifying. If either of these scenarios is the case, then you’ll love this Halloween skull wreath! It’s the the perfect DIY Halloween wreath for your front door this holiday season.
Here’s how to make your own pastel Halloween skull wreath with Dollar Tree materials.

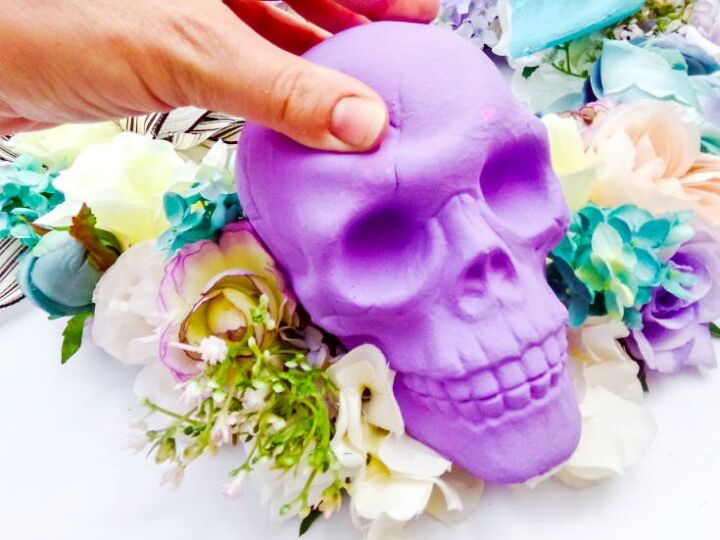
To craft this Halloween skull wreath, you’ll first paint each of the plastic Dollar Tree skulls with a different color of pastel acrylic paint. I used pink, blue and purple paints for this step. You can use chalk paint first, should you have issues with the acrylic paint adhering to the surface.
Once painted, allow the painted skulls to fully dry.
While the paint on the Halloween skulls dries, paint the plastic insects with pink and yellow acrylic paints, or the paint colors of your choice. Then allow the paint to dry completely.
Once you’ve painted the skulls and insects for your DIY Halloween wreath, you can move on to the next step.

To begin decorating the wreath form with flowers, first cut off the tops of each of the flowers you selected to craft the Halloween skull wreath.
Next, thread a piece of floral wire through each of the flower heads.
Using the floral wire, affix each flower head onto the wire wreath form.
Add the flowers to wreath form, mixing the colors together as desired, until you have filled the entire wreath. In addition to the flowers, you can also add a decorative bow to your Halloween skull wreath if you like, made from wire ribbon.
Now use the hot glue gun to glue the insects you painted onto the pastel painted skulls. Randomly affix the insects over the skulls or in the flowers of your DIY Halloween wreath using hot glue to hold them in place.
Once you’ve glued the insects onto the wreath and skulls, you’ll create “hooks” on the back of the skulls. These will be used to attach floral wire to the Halloween skulls so they can then be attached to the wreath.
To do this, use the hot glue gun tip to make two holes, one inch apart, on the back top of each skull.
Make sure to be watchful of how the skull will face when you create the holes on the back of the skulls. Holes created lower on the back of the skull will make the skull look down, whereas holes higher up on the back of the skull’s head will make the skull look up. So be sure to position accordingly, depending on how you want your Halloween skull wreath to look.
Now thread a piece of floral wire through the two holes (one wire, curved in a hook threaded through one hole and out the other) on each of the pastel painted Halloween skulls.
Using the floral wire in the back of the skull, attach each of the skulls to the wire wreath frame on your DIY Halloween wreath.

Your completed Halloween skull wreath is now ready to hang and display on your front door! I hope you loved making your own DIY Halloween wreath with Dollar Tree supplies for your Halloween decor.
Resources for this project:
See all materials


Comments
Join the conversation
-
Oh so cute. Darker colors for Díos de Los Muertos Day. 👌🏼


Frequently asked questions
Have a question about this project?