282K Views
Updating That 90's Bathroom Continued!

by
Elizabeth Fencl
(IC: homeowner)
Last week I shared how I changed the hunter green counter top into a concrete counter top.
This week I am going to show you how I painted my bathtub, surround and faucet and shower head.
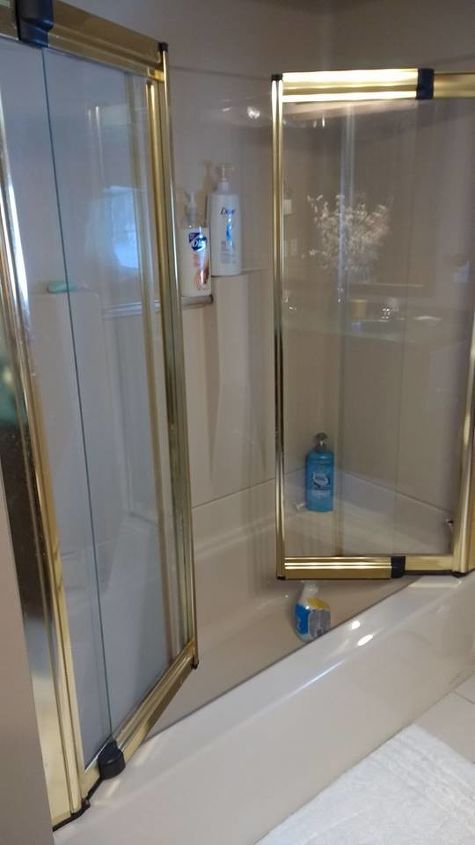
Confession time...when I get started on these jobs, I tend to forget to take before pictures of some things. Number one, I am not a photographer, number two, I get excited and just jump in and start the project, number three, I am a menopausal mess that can't remember ... wait, what, where was I going with this... oops - ok, the bathtub... no actually the faucet... I forgot to take a before picture of the faucet. Just picture in your head, a bright shiny gold faucet and shower head, like the shower doors you are going to see.
It is really hard to see, but this is an almond color tub. I told the hubster the almond is going to get painted and the doors are going to the curb. WHAAATTT?? Oh and honey, the gold faucets are getting painted! Yes, menopausal madness has set in, everything is getting painted!
I took out the shower doors and went to an Automotive store and bought, "Bondo" Professional Glazing and Spot Putty. Clean the tub first. You mix up this putty (follow directions on package) fill in the holes where the doors were and then sand until smooth. This stuff was unbelievable! You would never know that I had doors on this tub. It ended up so smooth, I couldn't believe it.
I cleaned up the faucet, shower head and drain. Removed the caulk around them and then sanded them really well.
I completely blanketed the entire area with plastic.
WEAR A MASK WHEN YOU START PAINTING!
First I primed with the Automotive primer, waited 24 hours, sprayed the Oil Rubbed Bronze, waited 24 hours, sprayed another coat of Bronze, waited 24 hours, then sprayed the Lacquer. Apply all these in a light coat and keep moving the cans as you spray. Don't hold the can in one spot or you will have runs.
From what I have read, Lacquer will darken the lighter spray paints, so I opted to go with the Oil Rubbed Bronze for my color. I love it!
After removing the plastic, there was some over spray that still managed to get under the plastic. My nail polish remover cleaned it right up.
Check this out-Honestly, you would never know that I spray painted my fixtures!
These turned out so awesome!!
Now take note, that is a WHITE TUB AND SURROUND!!
This is the product that I used to paint the entire almond tub and surround. I bought this at Home Depot for around 37.00. Again, WEAR A MASK and have good ventilation. This stuff smells nasty.
Before starting this painting project, I cleaned the heck out the tub with TSP and then sanded it. You want to rough it up good for the paint to grip onto it. Then you have to clean again to get every bit of dust and dirt cleaned up before painting. Read the instructions on the box. The prep work is the most important part of project.
Here is where this job started to seem to take forever. I had to apply 3 coats of this white paint, because again, you have to apply light coats. I wouldn't have thought it would have taken 3 coats to cover the almond but it did.
I never worked with epoxy paint and this stuff is like painting paste onto the surface.
After applying each coat of paint, I would have to wait 72 hours before applying the next coat of paint. I used a really good paint brush to apply this paint. This stuff is like painting paste onto the surface.
I absolutely love my newly painted tub...it is so much cleaner looking and with my newly painted faucet, I couldn't be happier. The before pics of the almond color are pretty hard to see, but trust me, the almond color wasn't doing it for me anymore.
I will warn you, this is very slippery when you get soap on your feet. My hubster bought those white grips that stick to the tub at Menards and they work great.
Now, for all you people that are going ask me how long it will last...I can't tell you. I literally just finished this a few weeks ago and we just started using it. I have read some bloggers that used the Rustoleum product and it held up great for them.
If you are thinking about doing this project, do your homework. I initially found this product at a local paint store in town and the gal that works there told me her friend used this product and it has lasted 10 years. So we will see. Time will tell...in the meantime, I finished my shiplap and will be painting soon.
Thanks for reading!!
Enjoyed the project?
Published May 10th, 2017 10:55 PM
Comments
Join the conversation
4 of 150 comments
-
 Nancy
on Feb 12, 2019
Thanks so much for for showing both Primer and Top Coat for changing house hardware. I plan to do some door knobs and did not even think about Primer! I was unsure of what type of top coat to use, now you have a place that you!
-
 Elizabeth Fencl
on Feb 14, 2019
Thanks Nancy!!
-
-
-
 Nancy
on Feb 12, 2019
And I too love the bronze color. I have used it for ceiling light fixtures and a spitoon for holding the toilet brush in my master bath.
- See 1 previous
-
 Liz, HomeTalker
on May 27, 2019
"spitoon for holding the toilet brush". Love that idea. So incredibly creative.
-









Frequently asked questions
Have a question about this project?
What is the floor painting process
Mine is plastic is yours I have an old ugly shower and the caulking is basically gone between the plastic wall and tub
Wow! I need a refresh but didn't want to completely demo my tub! Thank you for this informative DIY! How is it holding up after use?