


Giving An Old Dresser A Makeover Using Transfers, Moulds And Paint

Ok, so this dresser was in desperate need of some TLC. It was being thrown out, and if you love old furniture like I do, that's a big No No! So I took the lovely lady home, fixed her up, and gave her a new life ♥️
**Now, this dresser needed a TON of fixing. The entire thing needed to be tightened and reglued. All of the drawers were falling apart, chipping and needed wood filler/Bondo.
This piece was completely unusable as she was and was being thrown in the trash, never to be seen again. So please, don't criticize me for painting it 😁
I took an unwanted piece of furniture and created something that will be loved for many years to come 🥰
Let's find out how to refinish a dresser!
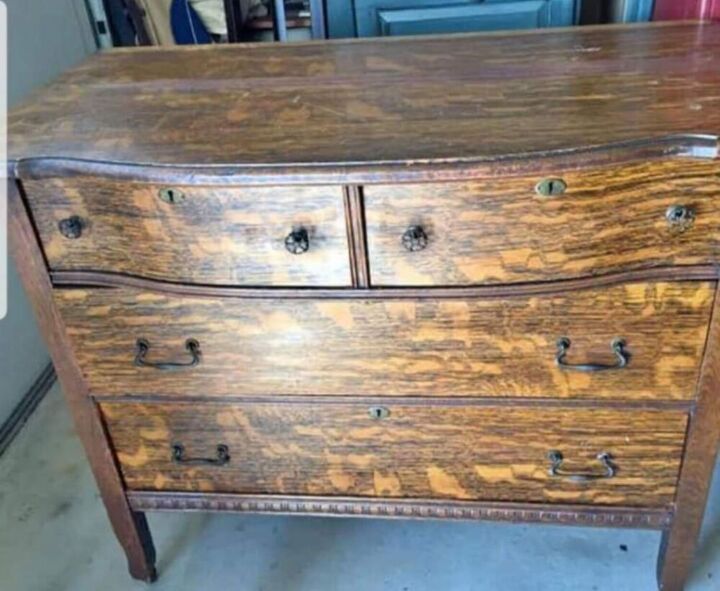
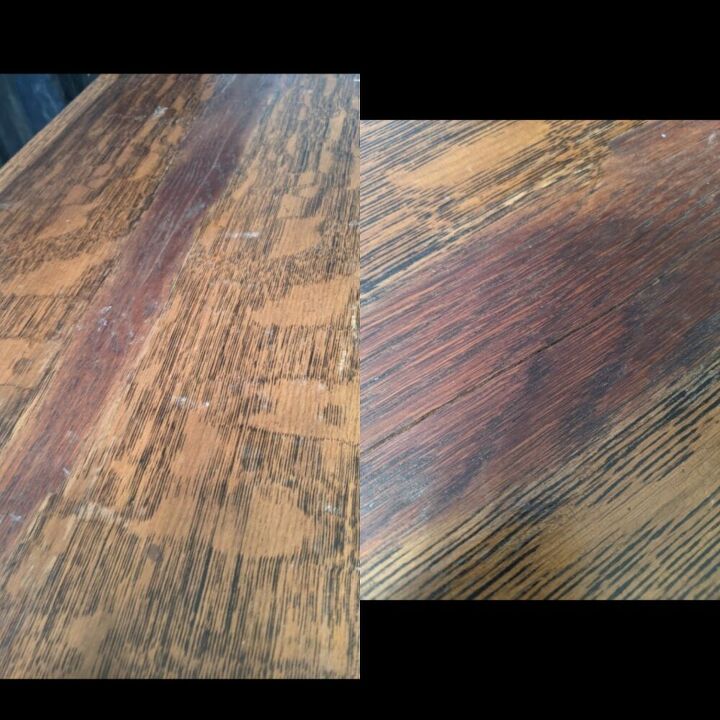
Before
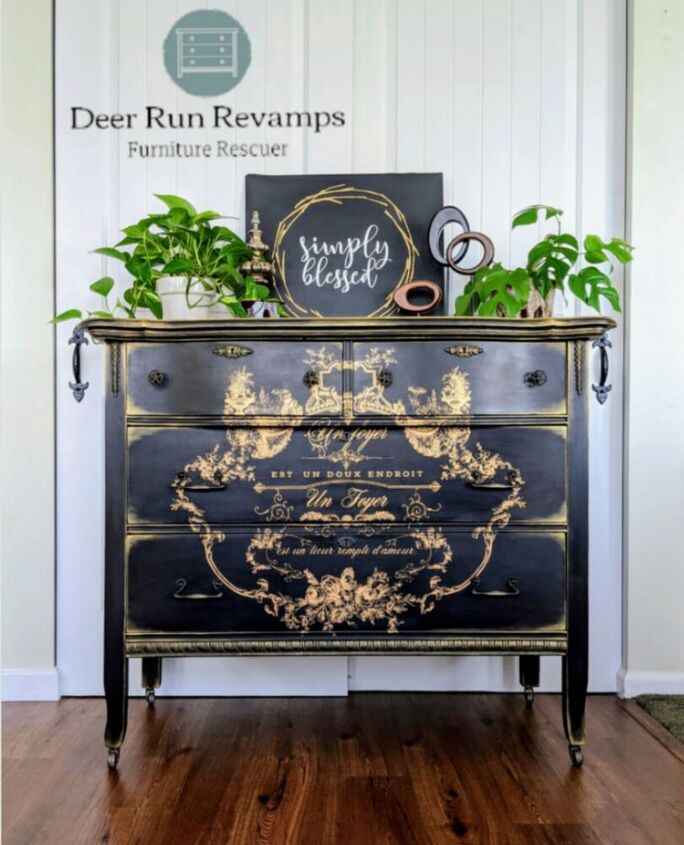
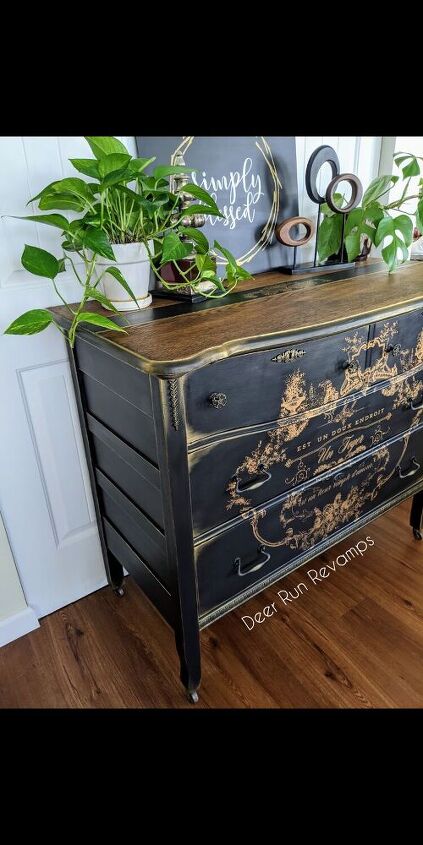
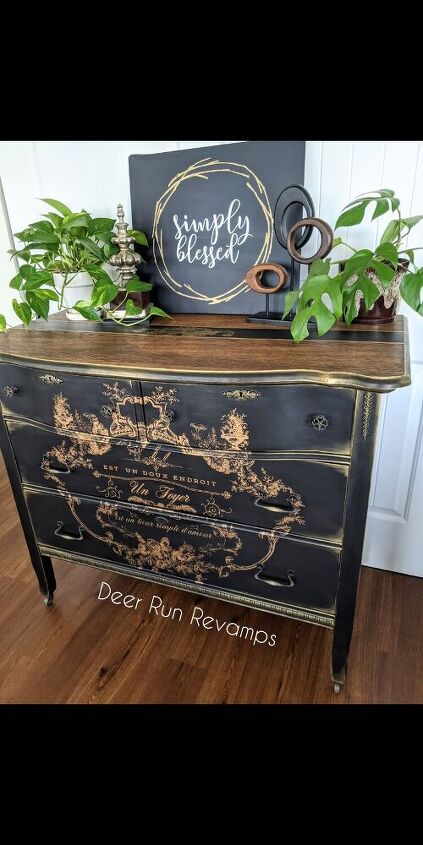
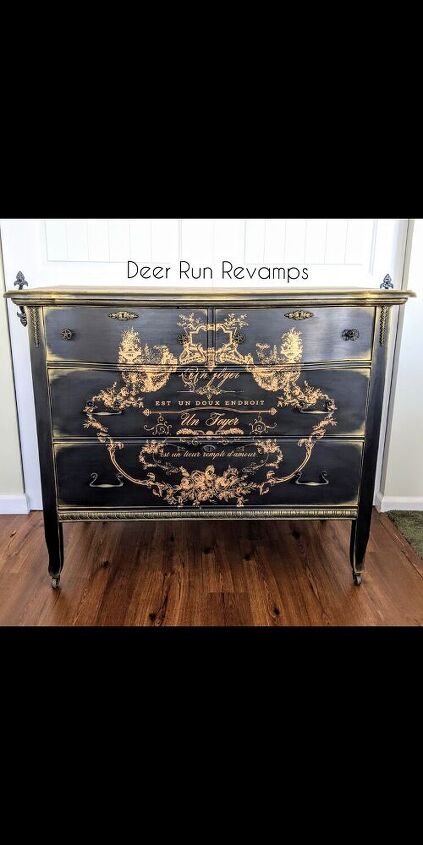
After 😍
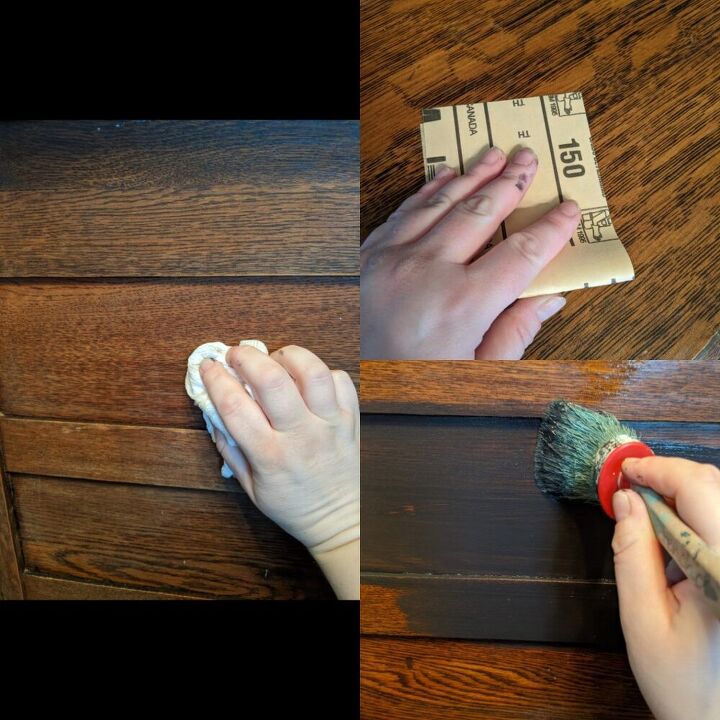
Always clean your piece first. I prefer Frenchic's Sugar Soap, but any degreaser will work. Then you want to make any necessary repairs, sand out any scratches and fill any deep marks with wood filler. Then take 150-220 grit sandpaper and scuff sand anywhere that you'll be painting. Then wipe down with plain water and remove and dust.
Then, paint away! I used Frenchic Furniture Paint's color "Loof" from their Lazy Range. It's a matt black with a built-in sealer 😍
Now the fun part, details!
Making appliques is super easy. There are a few different mediums that can be used. Here are the most popular....
*Paper Clay - easy to use, great for an antique/aged effect. The clay does crack as it dries, and some brands tend to shrink. It can chip if banged around.
*Hot Glue - A lot of people like this method, but I'm personally not a fan. The hot glue will not crack or shrink, but it does have a more rubbery texture.
*Resin/epoxy - This is what I used in the video and on this piece. It does not crack or shrink and cures rock solid.
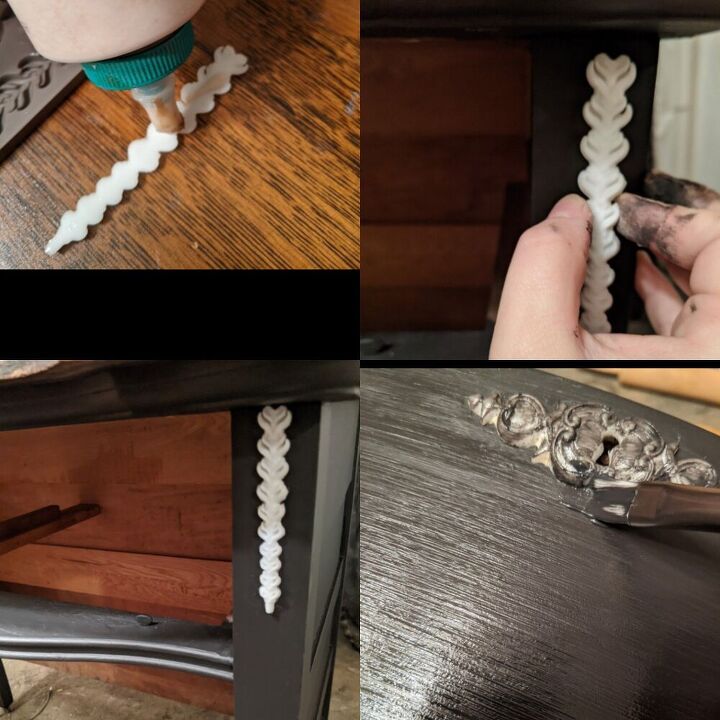
After the appliques have been popped out of the mould, using wood glue, glue them into place. If the appliques slide down, or if they are on a rounded area, tape them securely into place.
Only the glue has dried, paint them in your base color.
If you prefer, you can paint them before glueing to the piece. This is the best way especially when you want them a different color.
I just prefer to paint them in place because it helps to adhere the applique to the piece even more.
Let's work in the top.
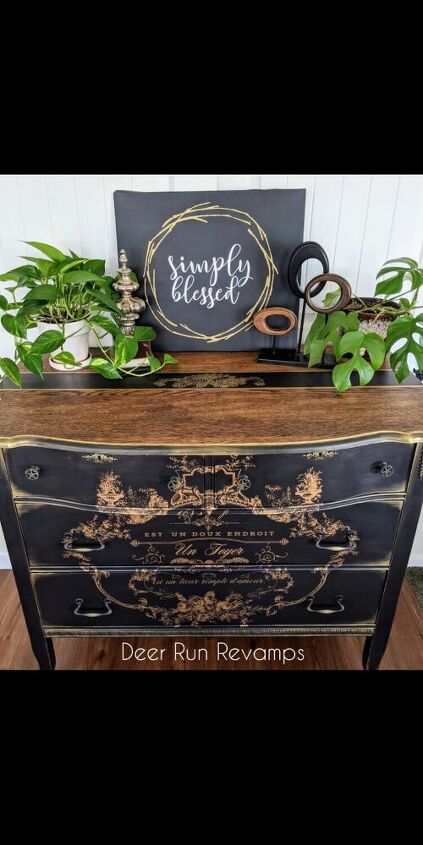
Usually, you'll just need to sand down to bare wood, stain and seal. But, this piece is different.
The top came apart into 2 pieces and the previous owners tried to fix it. It dipped down quite a bit from over sanding and the color didn't match, making the crack even more noticable and the top uneven.
But.... the rest of the wood was salvageable and beautiful. I never paint over gorgeous wood in good condition! So, I needed to figure out a way to hide the repairs I needed to do on that crack 🤔🤔🤔
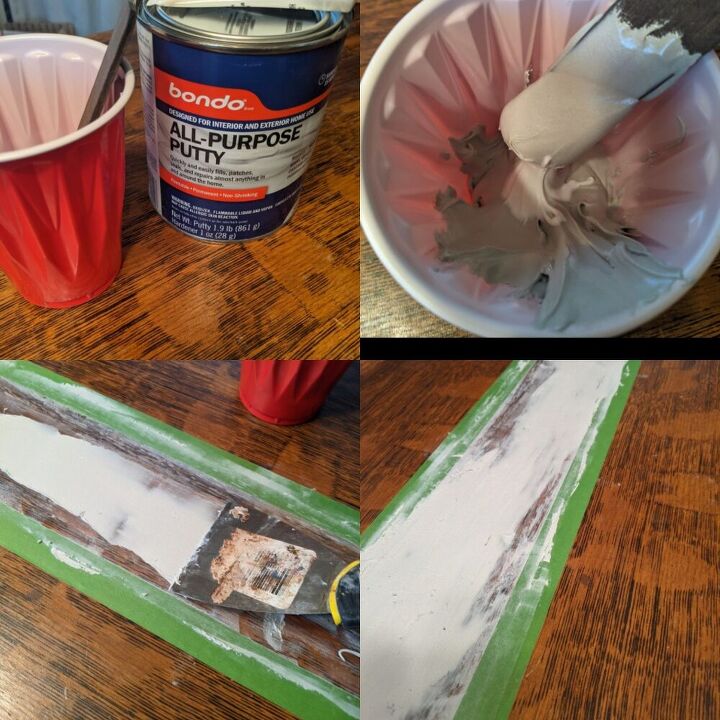
First, I taped off the section.
Then, I grabbed a disposable cup and a popsicle stick, and mixed up the 2 part Bondo (this stuff dries quickly, so only mix a small amount at a time). Using a drywall spatula, I applied a thick layer to the crack being sure not to get any past the tape.
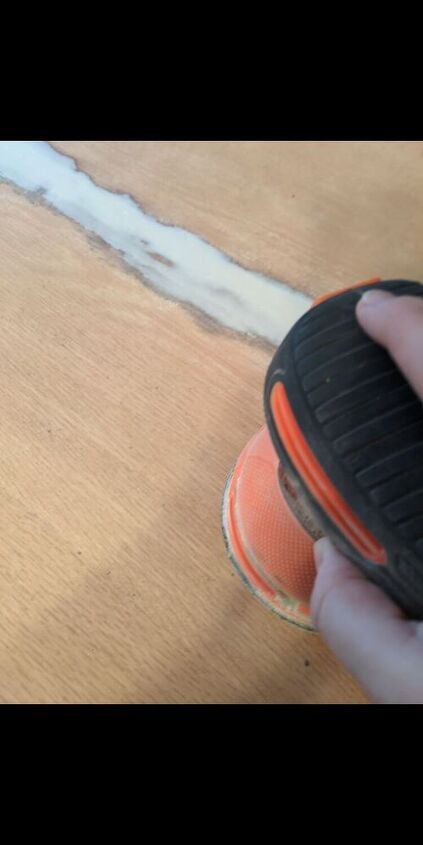
I truly do not like sanding, but the end results are always so beautiful ♥️
Starting with 120 grit sandpaper, I sanded the entire top removing any varnish, stain and leveling out the bondo.
Then I switched to 150 grit sandpaper, continued on removing any leftover stain and extra bondo
Now, use 180 grit to smooth it all out
Finish with 220 grit
*Tip
When sanding wood, allow the sander to do the work. I'm an extremely impatient person. And sanding takes patience 🤦♀️
Don't add much pressure to the sander. When you press down on the sander, it will leave swirl marks on the wood.
Always go through the numerous grits. It's the only way to get that perfectly stained, smooth wood
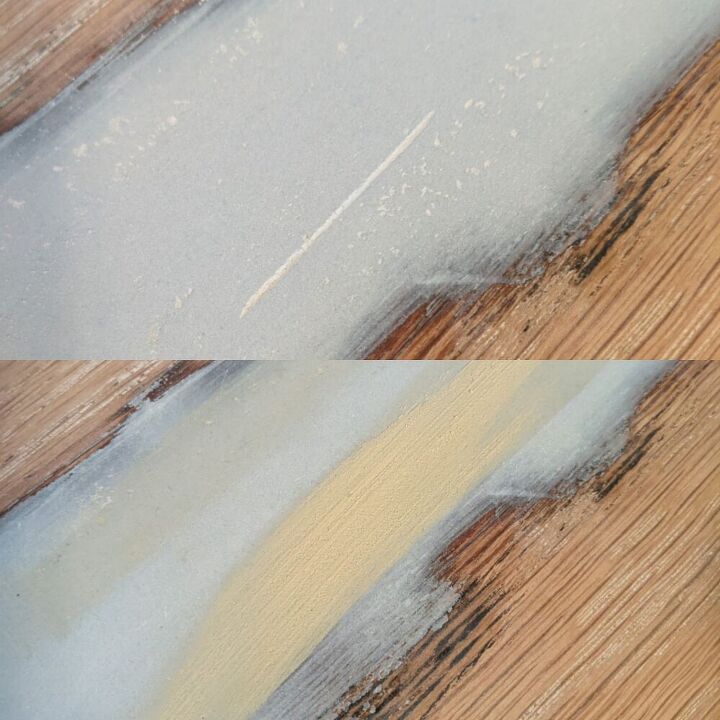
Sometimes, you're left with little marks in the bondo. Fill those with wood filler, and again sand smooth with 220 grit
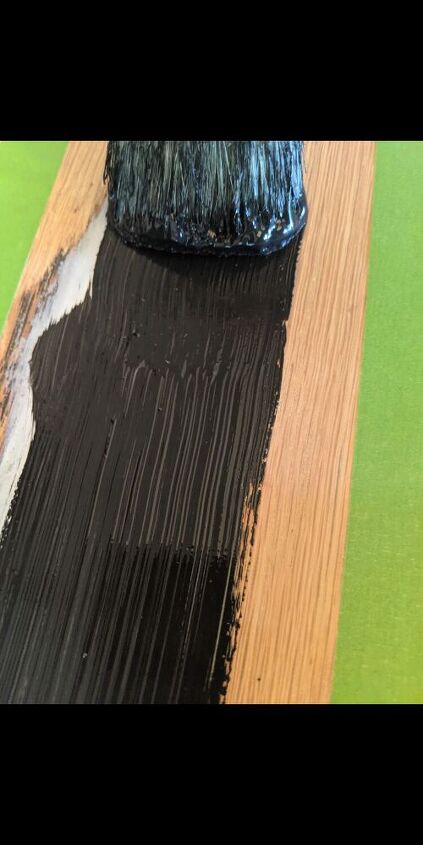
I again taped off that middle section and painted my large stripe using my base color

Prestain is a great product! It helps the wood absorb the stain evenly
Using a dry rag or paper towel, apply the prestain according to the directions in the can.
Then, using a clean rag or paper towel, apply the wood stain according to the directions on the can
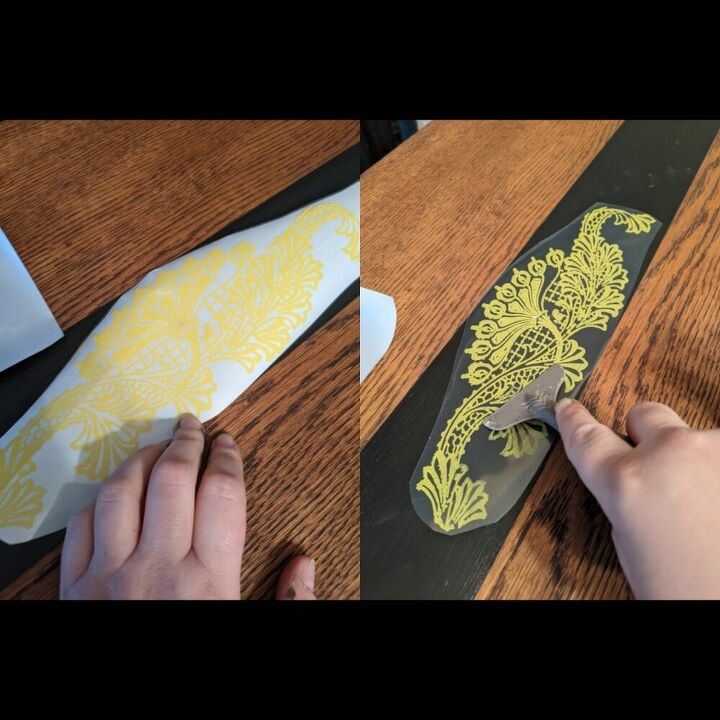
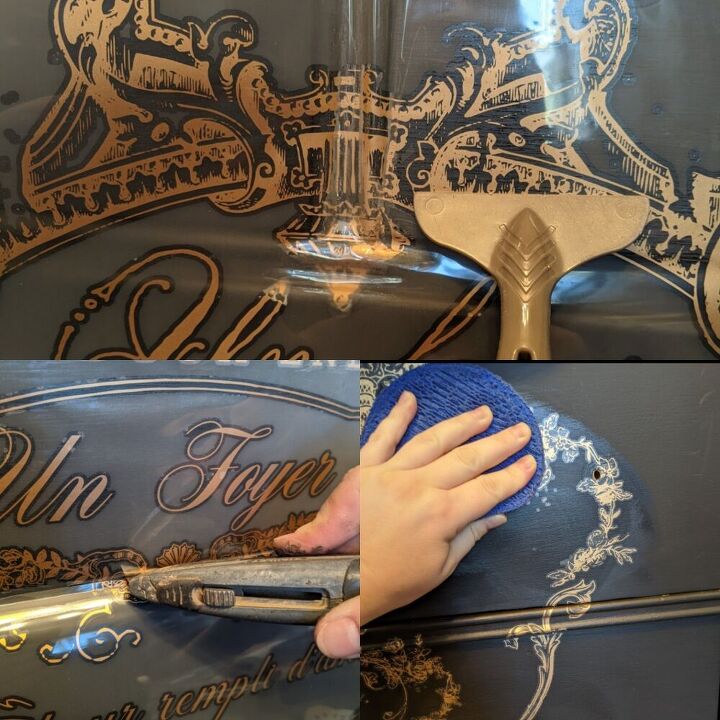
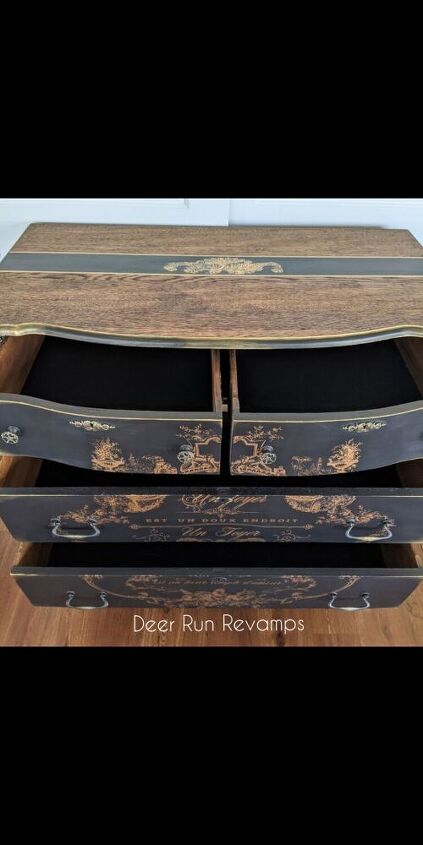
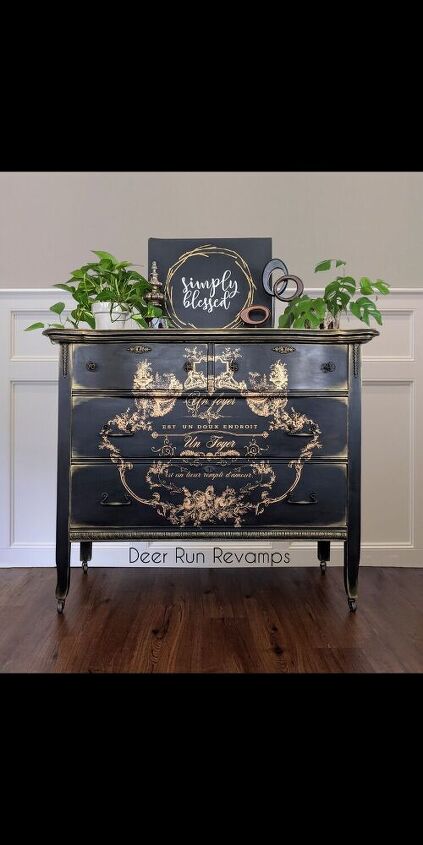
I wasn't happy with just the stripe, so I used a piece of the "Rustic Elegance" adhesive transfer from Redesign With Prima.
These adhesive transfers are really cool.
Cut out the piece that you want, remove the white backing and place it down into place. Using either the wood stick included with the transfer or the transfer tool, press down over the entire deisgn, adhering it to the piece.
Remove the clear protective layer.
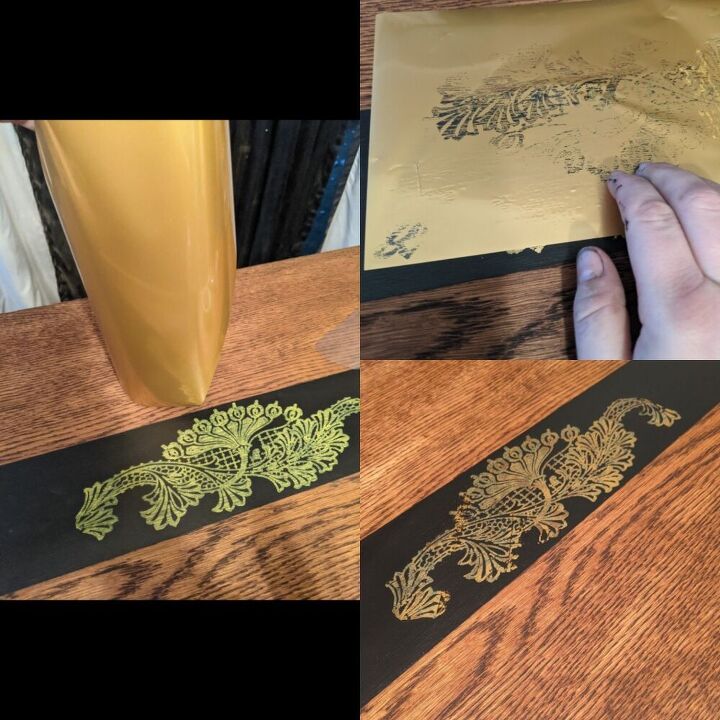
You'll notice the top is sticky.
Take your gold foil sheets (these are also from Redesign With Prima, called Decor foil sheets), and press the white side against the transfer, you want the shiny gold facing up.
Then remove the foil sheet. Just like ripping a bandaid 😆
Repeat this process until the entire transfer is covered in gold. You can even use different color foil sheets. I added some copper in there too 😍
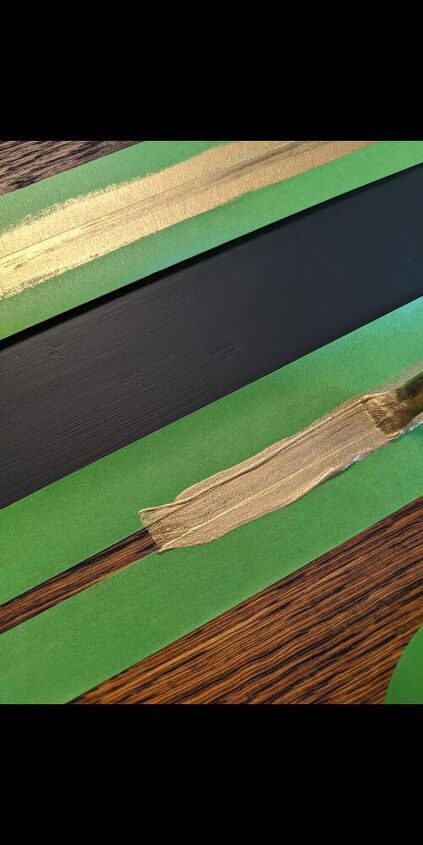
I still wasn't completely satisfied with the look, so I added 2 thin gold stripes in either side of the black stripe.
I taped off my stripes, and then painted on the gold. The gold is Frenchic's Gold Frensheen. It's a metallic powder that you mix with any waterbased sealer to form a glaze (I prefer Frenchic's Finishing Coat) Or you could mix it with wax, even paint. It's great to brush onto details
Redesign With Prima's Decor Transfers can really bring any piece to the next level. There are dozens of deisgns in many different styles.
The transfers come in 2-6 sheets depending on size.
They can be cut into pieces and layered for a truly unique look.
The transfer that I used for this project is called "Lovely Script". It's a coppery gold color.
When working with numerous pieces of transfer, you want to cut the edges where they will butt up against each other. Just cut off any extra right up to the design. This allows for a seamless design
Transfers are extremely sticky. They can roll up and stick to themselves, or anything that they touch. Do be very careful when handling them.
Once you have figured out where you want the transfer placed, carefully remove the white backing and press it into place. Once it touches the piece, it can not be moved. Using either the wood stick included with the transfer or the transfer tool, apply pressure and go over the entire transfer, really focusing on edges. If the transfer overlaps a drawer space, take a razor and do a straight cut so that it matches up perfectly.
Once you think the transfer is adhered, slowly peel back the clear protective layer. If at anytime, a piece of the transfer didn't adhere, lay the clear layer back down and go over it again with the tool.
Repeat this process with each piece, lining them up correctly
Once it is applied, take a clean dry rag and press down over the entire transfer. This is called burnishing the transfer. You want to be sure the entire transfer is adhered, no edges sticking up, and that there Are no air bubbles.
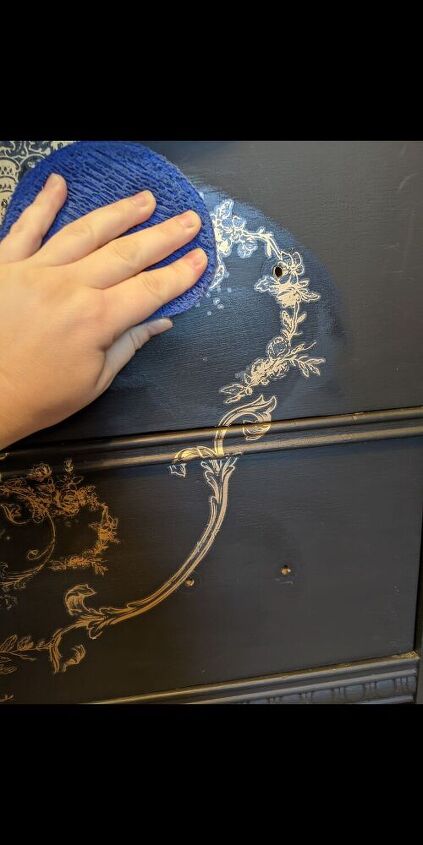
Now that the pieces is painted, transfers are applied, and details are on, we can seal it all up. Usually, when using Frenchic's Lazy or Al Fresco range, you don't need to seal the paint since the sealer is built in, but since we added transfers, we need to seal it. I love Frenchic's wax. It's creamy and very easy to apply. It doesn't even have to be buffed and you don't need to reapply, ever! But, it isn't as durable as a poly, so I wouldn't use it on high traffic pieces such as dining tables.
I prefer cloth sponges meant for car wax, they are from Amazon. They work wonders with all topcoats and waxes.
Apply a small amount of clear wax to the sponge and in circular motions, apply it to the entire piece, including the top. And again, really press down over the transfer, make sure the edges are adhered completely and that there are no air bubbles either
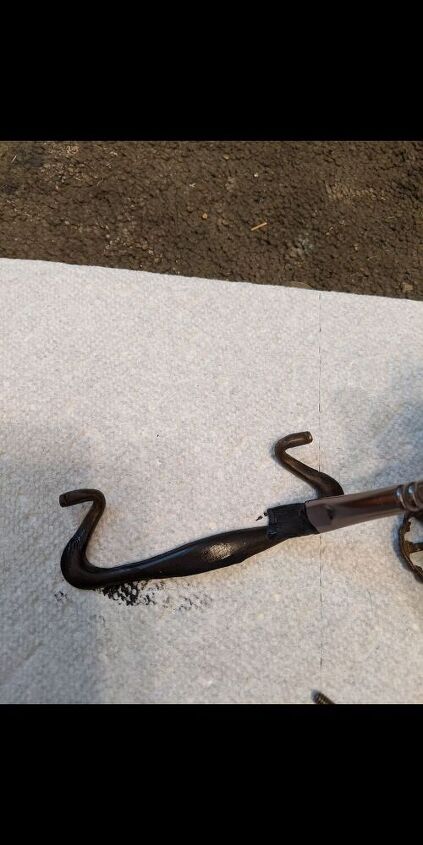
I cleaned the original hardware, and then painted them the same base color
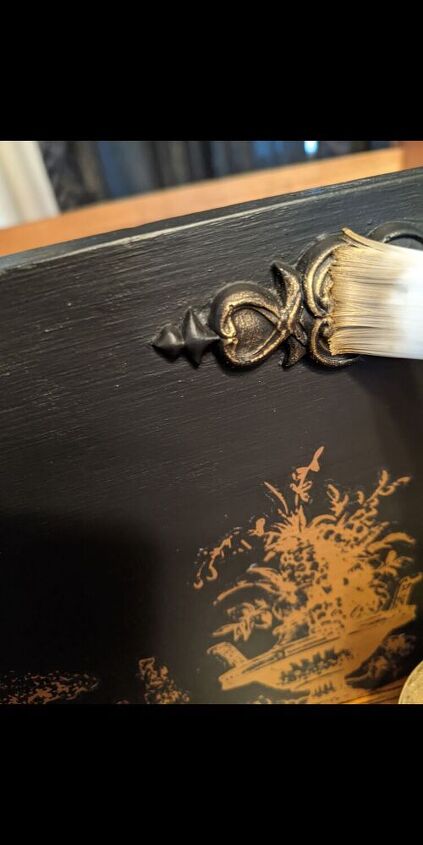
I then took Redesign With Prima's decor Wax in Eternal and brushed over the appliques, hardware, and edges of the piece (I used my finger to get thin lines over the edges).
I'm all about the details 😍
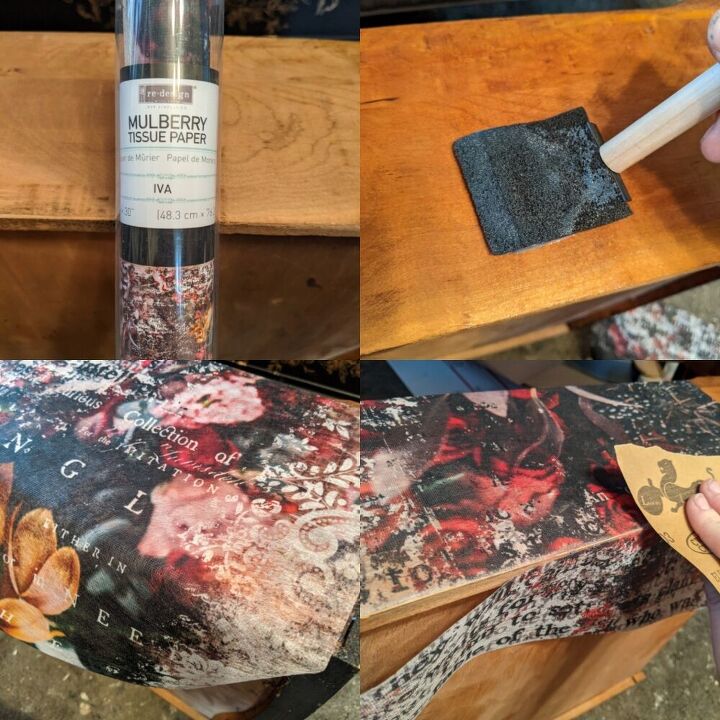
I used Redesign With Prima's Decoupage Decor Tissue Paper in "Iva" for the drawer sides. I first applied a layer of Frenchic's Finishing Coat to the drawer side, then put the tissue paper down over that and applied another layer of finishing coat on top, then allowed to dry. Once dry, I took 220 grit sandpaper and sanded the edge to remove the excess paper and get a crisp clean line
Then I used a plain black faux wood contact paper to line the drawers
Now you can sit back, and enjoy you're creation 😍
There are so many different looks you can achieve with these products. The price I have listed is based off of the amount of product used for this piece. Most of these products will last you quite a long time 😁

The decor wax makes the details and curves POP 🎉
I love how the top came out 😍

These appliques add just the right amount of detail
You can find all of these fun products as well as this piece and many others for sale in my Etsy shop
You can follow us on Facebook to see more refinished pieces and unique home decor
Thank you so much for reading! I do hope this tutorial has Inspired you to create something beautiful
Resources for this project:
See all materials


Comments
Join the conversation
-
Beyond my ability or patience, but finished product is GORGEOUS!!!
-
Perfection


Frequently asked questions
Have a question about this project?
Do you know what tiger stripe is and what makes it so special?
Why - it was beautiful before. Why not use a dresser of unfinished wood? Cheaper and you are not destroying history.
Cover Tiger Maple...really?