How to Build a Hairpin Leg Table

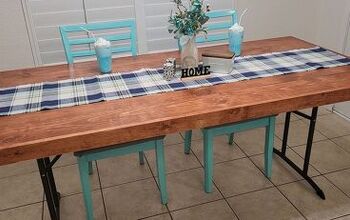
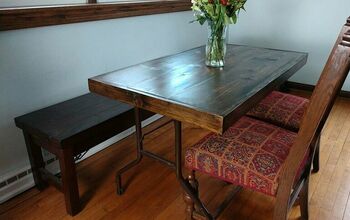
We loved the look of the natural wood hairpin dining tables in our favorite store but just could not stomach the idea of paying thousands of dollars for furniture that we knew we could make. We also did not want to buy a more affordable but cheaply made table only to have to replace it someday with better quality. After going without a table for a long time, we finally decided to build one! This project was easy to complete, saved us hundreds of dollars on the look we wanted, and taught us that patience and effort—not power tools—are the key ingredient to building your own table.
We are so happy with the result. Being able to choose each board by hand and join them into such a beautiful table makes it that much more special to us. Take a look at how we designed and built our table and see how easy it is to create exactly what you want instead of paying retail for it.
You Will Need:
- Wood Planks (I used 4 knotty alder planks for the table and two for a matching bench)
- Steel 3-rod Hairpin Leg Kit
- Clamps
- Pipes
- Wood Glue (high strength)
- Water-Based Polycrylic
Step 1: Choose Wood
We went to a lumber yard and chose the boards for our table. You can find wood at home improvement stores but we wanted thick high-quality wood for our tabletop and knew that we could ask for help with the sanding and finishing from the same lumber retailer. We chose 4 knotty alder wood planks that looked great together for our tabletop and then another two for a matching bench project.
Step 2: Build Pipe Structure to Brace Wood
We purchased three pipes at the home improvement store and asked that they thread the pipes to fit our pipe clamps. The clamps would act as legs for the pipes and also be used to tightly join the glued boards.
Step 3: Glue and Clamp Boards Together
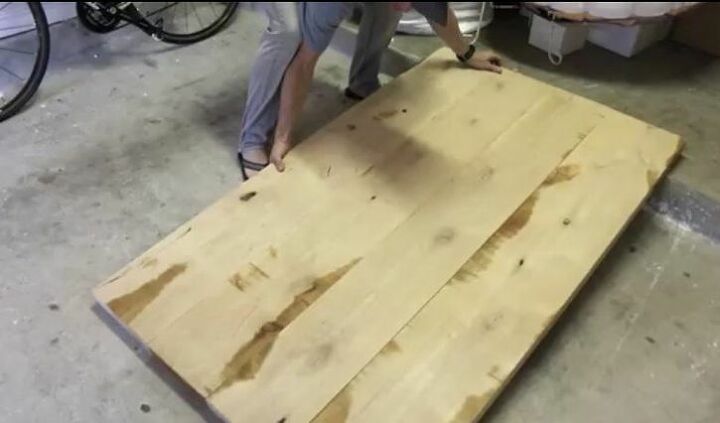
We set two boards side by side on the pipe set-up and glued them together with wood glue. Apply a generous amount of glue to the inside edges of the two boards and push them together. After applying the glue, clamp the boards tightly. Glue two planks at a time to each other and let each pair dry. I let them dry overnight but refer to the directions on the glue you choose to use. After the two pairs are dry, attach the two pairs using more wood glue and clamp. Do not worry about excess glue seeping from the boards because it will be removed in the upcoming steps.
Step 4: Sand Tabletop
After building the tabletop, we brought it to the lumber yard that we purchased the wood from and had them adjust the thickness and smooth out our table with a planer. This step ensures that the seams where the boards were joined are no longer visible and that the table is ready to be stained or sealed. You can choose to sand your glued boards yourself but if you don’t have a planer or woodworking skills, you might want to do what we did in order to achieve a high-quality finish with smooth, precise edges.
Step 5: Attach Legs to Table
We purchased 3-rod hairpin table legs for each corner of the table and used screws to attach them to the underside of the tabletop. Measure and mark where each set of hairpin legs will be attached and then mark with a pencil where to drill. You can find the hairpin legs online and purchase whatever size fits your DIY project best.
Step 6: Seal Knots and Holes in Wood
We identified all of the knots and areas on the table surface that might be prone to collecting food and sealed them in order to prevent bacteria from forming in crevices in the table. We taped the area around each knot to keep it from spreading and applied clear epoxy with a popsicle stick to coat the knots and holes. Fill in all of your holes and let the epoxy sit for a few hours.
Step 7: Sand Epoxy Residue
After the epoxy hardened, we lightly sanded the surface around where it was applied to remove any residue that is raised and completely smooth the surface. Remove the tape and sand any areas that need it. Run a vacuum or use a tack cloth to remove any dust, dirt, or lint from the surface of the table before sealing it next.
Step 8: Seal the Table
I applied a water-based polycrylic with a satin finish to seal and finish the surface of the wood. I wanted to keep the natural color and shade of the wood that we hand-selected but definitely wanted to protect it. I applied three coats, and after each coat, I lightly sanded the surface to create a satiny, smooth tabletop.
So many homeowners make the mistake of settling for furniture they don’t love simply because they can’t afford or don’t want to pay retail prices for high quality. We did not want to settle and so to get the look and quality we knew we would be happy with, we made our table ourselves! Building the table was such an enjoyable experience for us and it is really rewarding to sit at and admire something we built from scratch that looks so beautiful. This same style in a high-end retail store would cost hundreds, if not thousands, more than what it cost us to build it and shows how building projects can be done without a garage full of tools. Don’t be afraid to build it yourself!
Have you built a table or other furniture for your home to recreate a designer look for less? Share your best results or tips for how to build instead of buying the style you want and get inspiration for designer knock-off styles at Hometalk!
Enjoyed the project?
Resources for this project:
See all materialsComments
Join the conversation
-
 Linda Abate
on Feb 19, 2022
A beautiful piece of furniture. A job well done and one to be proud of.
-
-
 Miss Daisy
on Feb 20, 2022
Just wondering cause I would like to do it but am on limited income.
-








Frequently asked questions
Have a question about this project?
How much weight can hair pin legs hold?
What cost so much ??