Take Your Bed to the Next Level With This Farmhouse Pallet Headboard

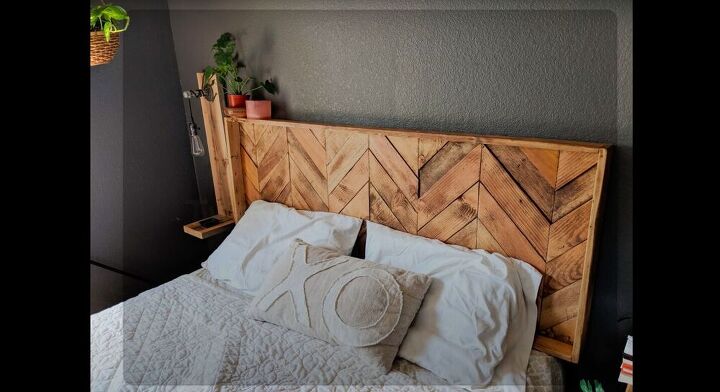
Take some old pallets you have lying around and turn them into a stunning DIY headboard! It’s quick, easy, and only requires a few tools to get it done. In this tutorial I’ll show you how to create your own herringbone or chevron pallet headboard. Most people have a few pallets just waiting for that perfect project in their backyard, and if you don’t they aren’t difficult to find. So grab a few and follow this tutorial to create a stunning farmhouse wooden headboard sure to impress!
Tools and Materials:
- 1”x4” pine boards
- ¼” plywood
- Two or three pallets
- Wood glue
- Hand saw
- Sandpaper
- Angle ruler
- Tape measure
- Nail gun
- Nails
The first thing I needed to do was create a backing for the headboard. Plywood is a great choice because it’s cheap and easy to come by. I cut the plywood into a 62”x30” rectangle. If you need a different sized headboard, adjust accordingly. In order to create a straight line I measured 32” from the top of the board with a tape measure, and then marked a line 62” long using an angle ruler.
Then I cut along the line using a hand saw. It didn’t have to be super precise because I was going to be covering all of the board with pine boards and pallet wood later on.
Now I needed to break down the pallets to salvage as much wood as possible. I had a hard time finding the right way to do it. First I tried cutting off the ends of the pallet and pulling the planks up.
Once I realized that this wasn’t going to work, I decided to cut down the middle, around the nails holding the center of the plank to the pallet. Then I could simply pull the other side off as well.
This proved to be successful and provided me with a stack of nicely sized pieces of wood. Be careful of the nails, as there are a ton of them on pallets.
Using a tape measure, I found the center of the plywood and marked it. It’s important to find the exact center because even if it’s a little off, the pattern will be lopsided.
Then I used a level to draw a line down the center of the board. This step is very important as this line will be used to properly line up the boards while we’re making our patterns later.
I cut my first piece of wood at a 45 degree angle on each end, facing the same direction. Now that I had the first piece cut, I could use it as a guide for the rest of my pieces, cutting down on time and effort.
Then I lined up two pieces, meeting at the center line I had drawn on the board, with the bottom tips touching the bottom of the plywood.
Next I lined up two more pieces below that and marked where I would need to cut them to be flush with the bottom edge of the plywood. They don’t need to be super exact because I’m going to go back later and straighten everything up. I also really liked the look of different colored woods next to each other, so I alternated as I went.
If you’re more comfortable using a straight edge to mark your cuts you can go ahead and do that.
By the end of this row, I was left with a bunch of triangles, which was perfect to fill in the bottom of the chevron.
Once I had one section laid out to my liking, it was time to glue. I applied a good amount of glue to the piece of wood and then glued it in place. I did this until all of the pieces I had already placed were glued down properly.
Then I continued with the pattern. On either side of the pattern I had glued in the center, I placed two pieces of wood touching the top of the plywood board. This staggered the pattern a bit and I love how it turned out.
For the herringbone pattern you don’t need to cut the wood at 45 degree angles. I used straight pieces and lined them up at 45 degree angles to create the pattern. First I made sure that all of my pieces were cut to the same size.
Then I lay them out at a 45 degree angle with the bottom edge touching the bottom of the center line on the plywood. As in the chevron pattern, try to vary the colors to create visual interest.
Next I lay a piece perpendicular to the first piece, with the ends lying flush to each other.
I continued laying more pieces of wood in the same pattern until I had a good chunk done. Then I went back and glued them down before moving on to the next section.
Tip: If you are using different sized pieces of wood, you may need to trim a piece or two. Just mark the part you need to remove and cut it with a hand saw. This is why I chose to lay it out in sections and then glue, rather than gluing each one as I go.
Once the glue had dried, I flipped over the headboard and trimmed along the plywood. This removed any pieces of pallet wood that overlapped the edges. This is easily done with a hand saw.
Then I took my electric sander and sanded the entire headboard. Pallet wood can be particularly rough, so don’t be shy here. Make sure that there is nothing that can snag your duvet or rip a hole in your pillow.
I cut two of the 1”x4” pine boards to the length of my headboard and then attached them with a nail gun. Pay attention to how I do it in the video as you wanted it to almost be like a shelf.
Then I cut and attached the other two 1”x4” pine boards to match the width of my headboard. If you choose to cut these ahead of time, make sure to take into account the added width of the two boards you just attached.
Now I gave the pine boards a good sanding. Once you’re done sanding them you can finish however you desire. Paint them, stain them, or just seal them to retain the original color of the wood, it’s really up to you!
Which one of these two patterns is your favorite, the chevron or the herringbone? Let me know in the comments below!
Enjoyed the project?

Comments
Join the conversation
-
 Carol Chawner
on Jun 15, 2020
No, it's a little too hard for me. I like the Herringbone the best, but would have someone else make it. It's beautiful though! Thanks for sharing


-
-
 Jamie Haas
on Jul 09, 2020
Herringbone is more visually interesting and easier than cutting all those 45 degree angles. Nice work on both!
-











Frequently asked questions
Have a question about this project?
how did you get the different colors of wood? Is because they came from different pallets?
I live in Fl and am looking for some kind of “unique” headboard for guest room that doesn’t take a lot of space. It’s a queen bed. Furniture is what. Any suggestions anyone?
Hi Heather! What length are the pallet boards and how many in total is needed for the herringbone pattern? Thank you! ;)