


How to Build a Beadboard DIY Drying Rack

Love the look of the Ballard Designs Drying rack, but not the price tag? Learn to build a custom DIY Drying Rack in a weekend!
For more simple and budget-friendly DIY project ideas, be sure to follow us on HomeTalk and visit our blog!
From the very first time I opened a Ballard Designs catalog, I fell in love with their style of laundry drying racks.
It’s been close to 15 years that I’ve been drooling over them!
Pinning pictures of them to my Pinterest boards.
Wishing I could replace the inexpensive accordion-style plastic drying rack in my laundry room.
But I could never swallow the price tag.
Their medium drying rack is $224.
Two hundred.
And twenty four dollars.
And that, friend, is just not my style.
Even if the money tree in the back yard did start producing!
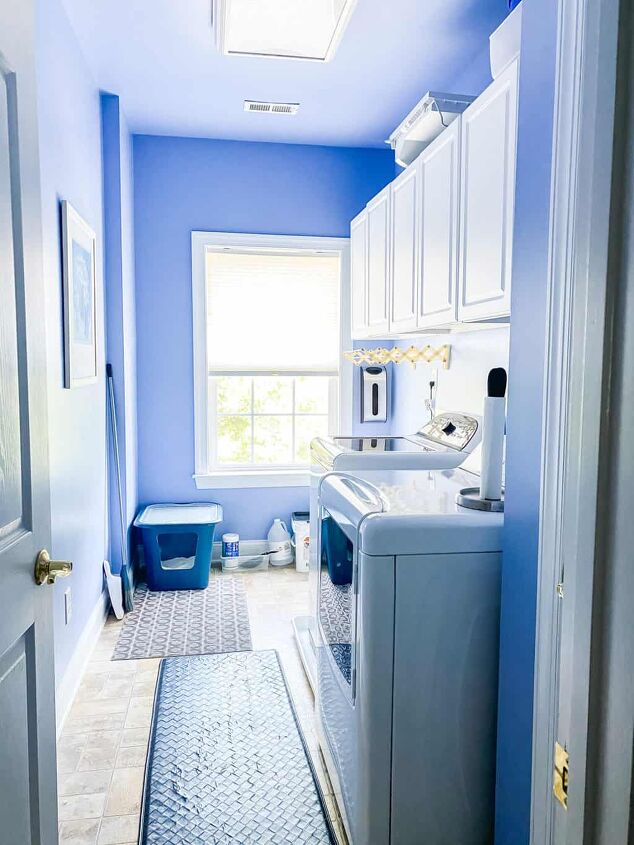
So when I put together the plan for my French country laundry room makeover, I asked my husband if he thought he could make a wall mounted bead board drying rack.
And he said yes!
I’m gonna break my rule and show you how pretty it looks before showing you how we made it.
Because to say I love my new DIY drying rack would be an understatement!
In fact, I think I might love this bead board drying rack even more because it’s an inexpensive DIY.
The best parts?
It only cost us $49 and a few hours of time.
And we were able to make it the exact size that was available in my laundry room.
What Supplies Are Needed to Build a DIY Drying Rack?
I’m going to share the exact measurements for my folding wall-mounted drying rack.
You can use them as a guide if the space in your laundry room is different from mine.
- Bead board
- cut to 45″ x 34″
- 1×2 poplar boards
- 2 cut to 32.5″
- 2 cut to 40″
- 1×3 poplar boards
- 2 cut to 43.5″
- 1 cut to 34″
- 1 cut to 35″
- 1/2-inch dowels
- 6 cut to 29″
- 2-inch hinges (you’ll need 3)
- 2-inch barrel bolt lock
- powder-coated steel chain
- cut two 28″ lengths
- 2-inch wood screws
- 1/2-inch pan head screws (you’ll need 4)
- sandpaper ( 80 grit, 120 grit, 220 grit)
- wood glue
- caulk
- wood putty
- primer
- semi gloss paint or paint made for cabinetry
- 3-inch wood screws (for hanging)
You’ll also need some tools to get the job done:
- circular saw or table saw
- impact driver
- caulk gun
- nail gun
- stud finder
- carpenter’s square
- level
- putty knife
- paint brush
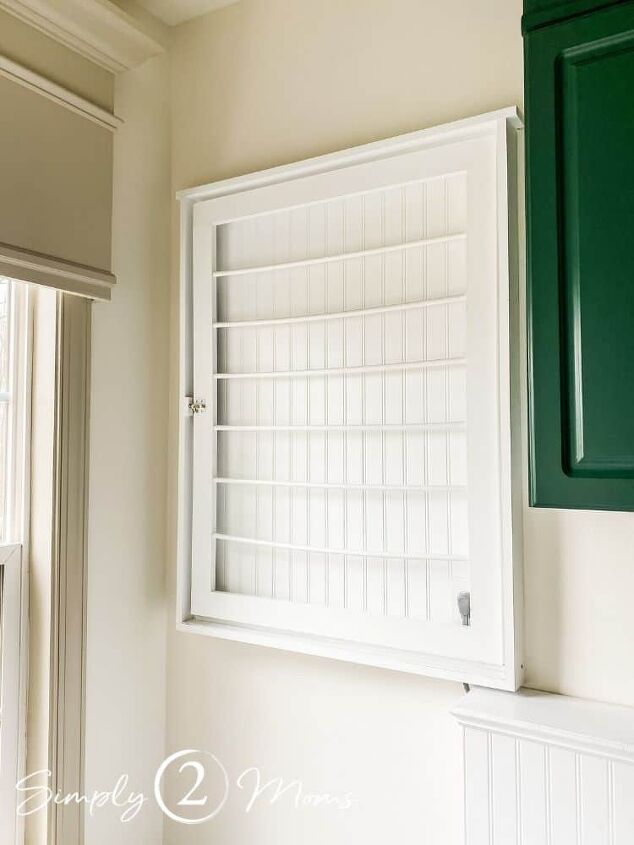
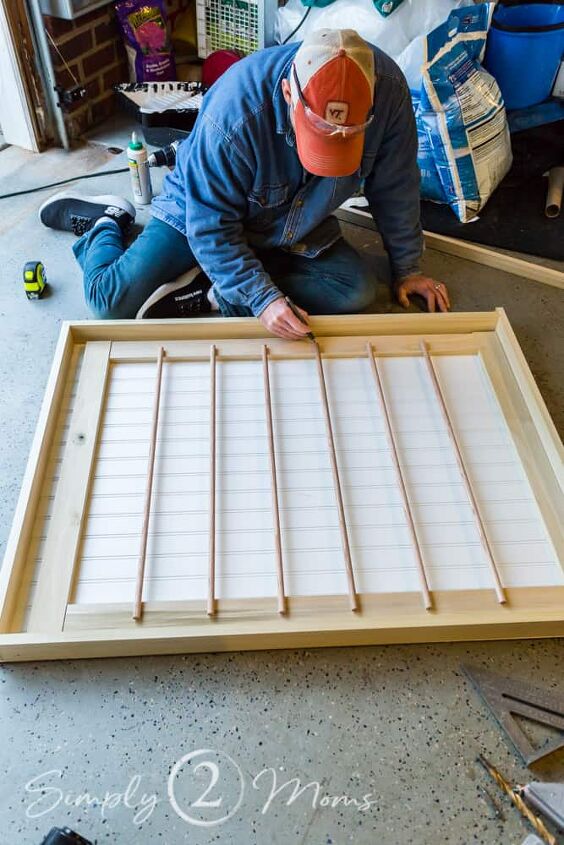
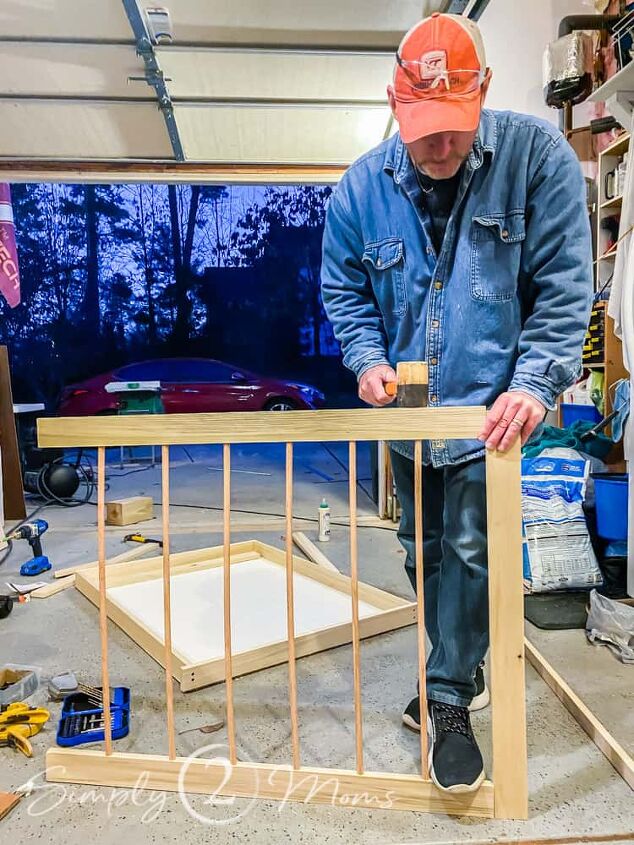
First, Build the Wall-Mounted Bead board Frame
Measure the space where you want to hang your laundry drying rack.
If your space is larger or smaller than mine, you can make your custom rack to fit your space!
We didn’t use mitered joints for our rack.
You can see how the boards are put together in the image below.
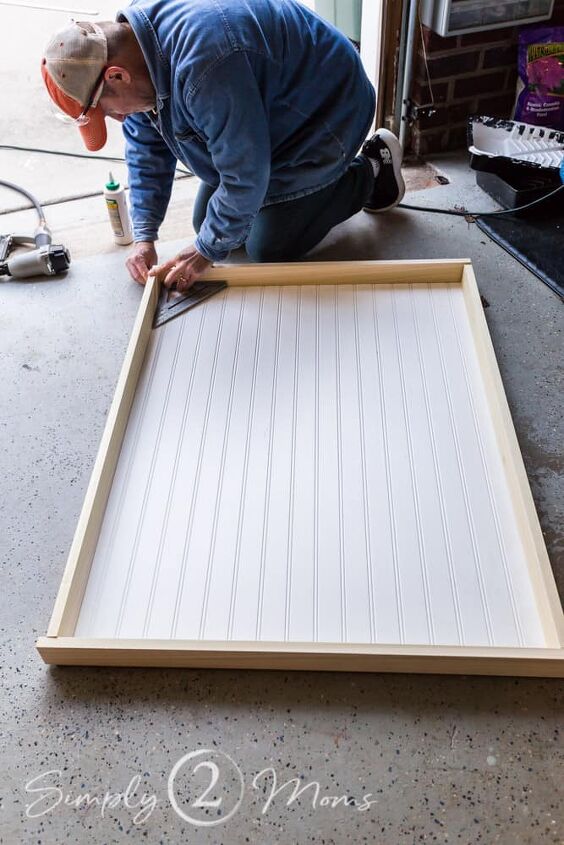
The outer frame for the part of the rack that gets mounted to the wall is constructed of 1×3 poplar hardwood boards.
We actually built it on top of the beadboard.
Place the slightly longer 1×3 board along the top so the edges hang over by about 1/2-inch on each side.
Place the shorter 1×3 board along the bottom flush with the beadboard.
Use wood screws to attach the horizontal boards to the vertical boards.
We used two wood screws for each vertical board along the top and the bottom (8 screws total).

Use a finish nail gun to attach the beadboard to the back of the frame.
Next, you’ll make an inner frame using the 1×2 boards.
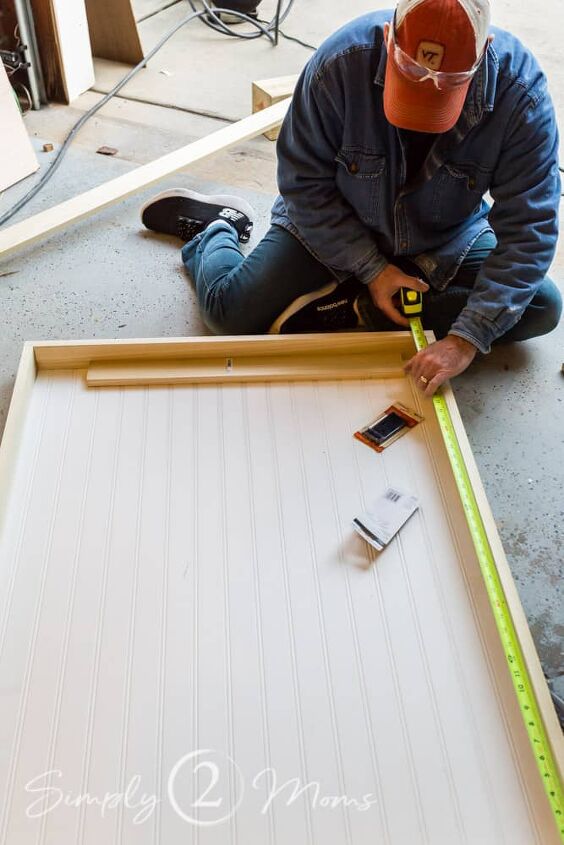
Measure inside your frame to get the inner vertical and horizontal measurements for your drying rack.
Once again, the horizontal boards should run the full length of your rack and the vertical boards will be attached inside them.
Important!!! Do not attach the bottom, inner piece to the frame yet! This piece is what the hinges are attached to for the rack. You will need to attach the hinges before it’s attached to the rack. But, it’s much easier to paint your drying rack when it’s not completely assembled.
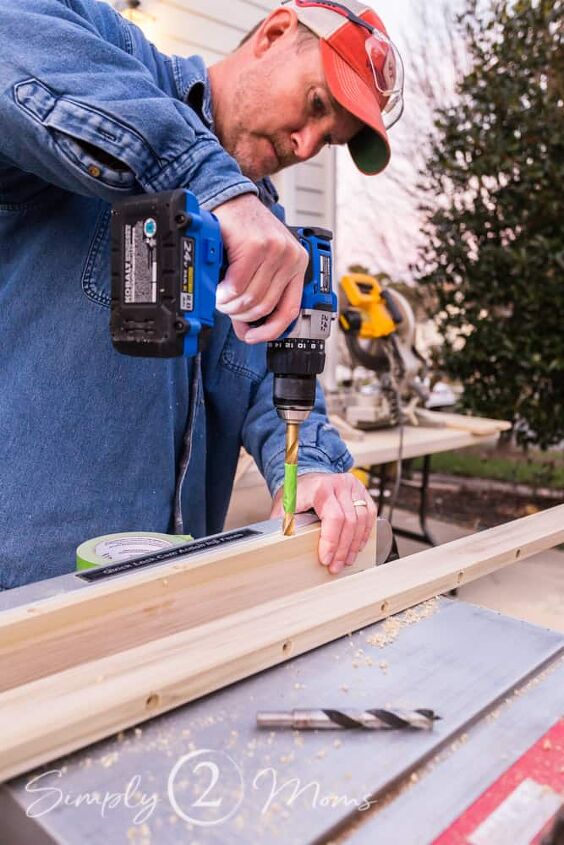
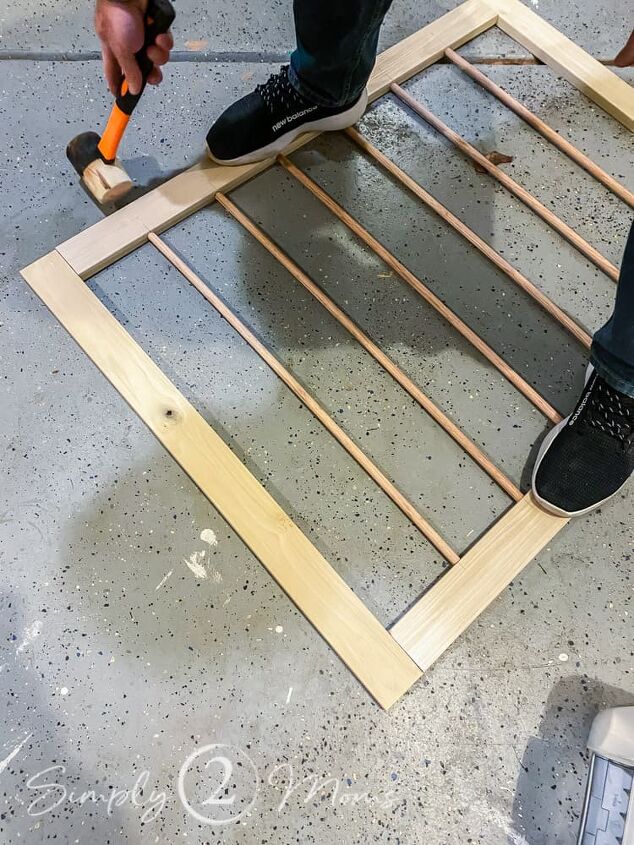
Next, Cut the Wood for the Folding Drying Rack
The fold-out part of the drying rack is made from 1×3 boards.
This frame will need to be shorter than the inner frame you made from the 1×2 boards to allow clearance at the bottom for it to open.
It’s also gonna need to be a little less wide to make sure it opens smoothly.
I wish I could say there’s a specific way to calculate how much shorter and narrower it should be, but my husband says he just eyeballed it.
The frame for our rack is 3-inches shorter and 1-inch narrower than the inside of the drying rack.
Once you’ve cut the pieces for the frame, you’ll need to also cut the dowels that your clothes will hang on to dry.
The dowels should be about 2-inches longer than the inside of the frame (see the image below).
How to Drill the Holes for the Dowels
You’ll be drilling holes in the frame for the dowels.
Once you have the dowels spaced the way you want, mark their placement on the wood.
We found it was easier to make the initial hole for the dowels using a pilot drill bit.
You’ll need the holes to be deep enough for the dowels to fit, but I’ve got a trick for you to do that!
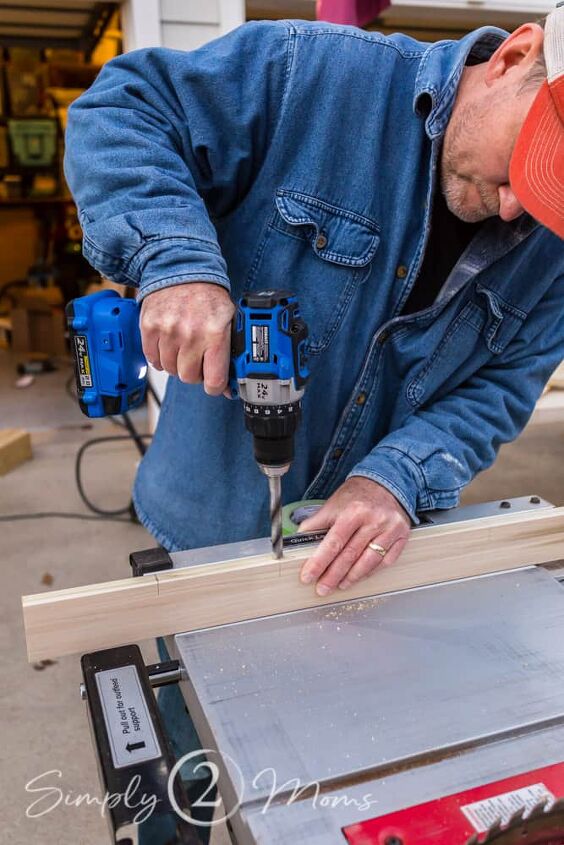
We cut our dowels so that they would be sunk one inch into the frame on both sides.
Get a ruler and measure one inch on your drill bit, then wrap tape around the drill bit so you can see where to stop!

When you have the pilot holes, it’s easy to drill the holes exactly how deep you need them to be using the tape guide.
For best results, hold the wood that you’re drilling against the fence of your table saw or something else that’s fixed in place to keep the wood from moving.
If you prefer, you can use clamps to hold the wood in place too!
Assemble the Fold-out Drying Rack
Now that the holes are all drilled, it’s time to assemble the fold-out frame of your drying rack.
Even though the holes are drilled to the right size, you will probably need to use a rubber mallet to get the dowels to go in all the way.
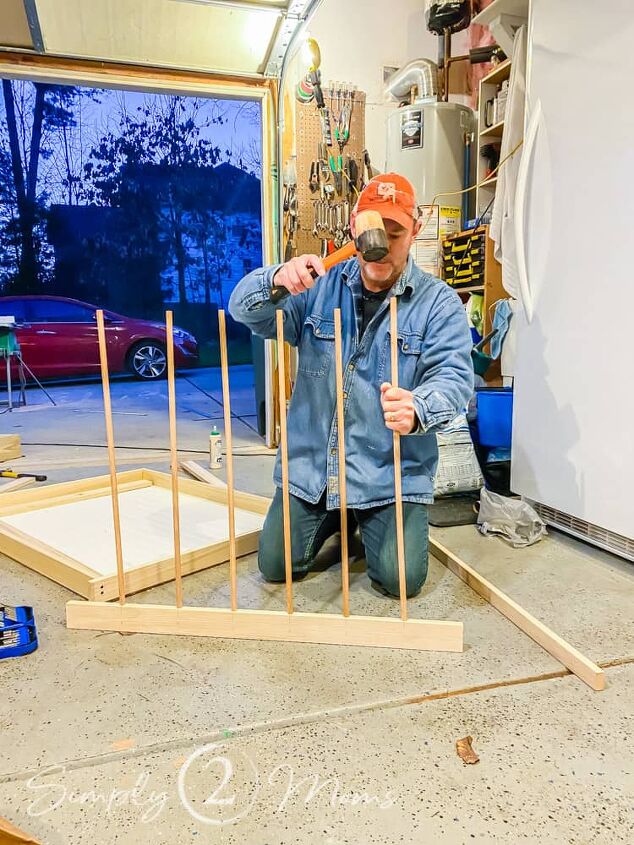
Once all the dowels are in place on one side of the frame, flip it over and set the dowels on the other side.
This time you’ll use the rubber mallet on the outer edge of the frame.
Use the top and bottom pieces of the frame as a guide to make sure you’ve set the dowels all the way in.
Then use a pocket hole jig to attach the top and bottom pieces of the drying rack frame.
This lets you hide the wood screws and also creates a stronger joint.
Once the frames are all assembled, use wood putty to fill any noticeable seams and screws.
Then sand the entire project starting with 80 grit sandpaper, then 120 grit sandpaper, and finish with 220 grit sandpaper for a smooth finish.
We like to keep it real here on Simply2Moms and share what we learn along the way.
For instance, all the things not to do when installing picture frame moulding boxes!
I wanted to paint the two parts of the drying rack before they were assembled.
But.
My husband thought it would be a good idea to hang the base of the drying rack before painting it and before painting the room.
After all, that saves some of the painting for the wall, right?
But it made painting both the drying rack and the wall more difficult.
It was really hard to paint the edges of the drying rack that were close to the wall and the cabinets!
So I recommend painting before hanging.
You’ll want to prime the drying rack first, and then two coats of paint.
Since you’ll be hanging wet clothes on the rack, I recommend either using a semi gloss paint or paint that’s recommended for cabinets (like Benjamin Moore’s Advanced).
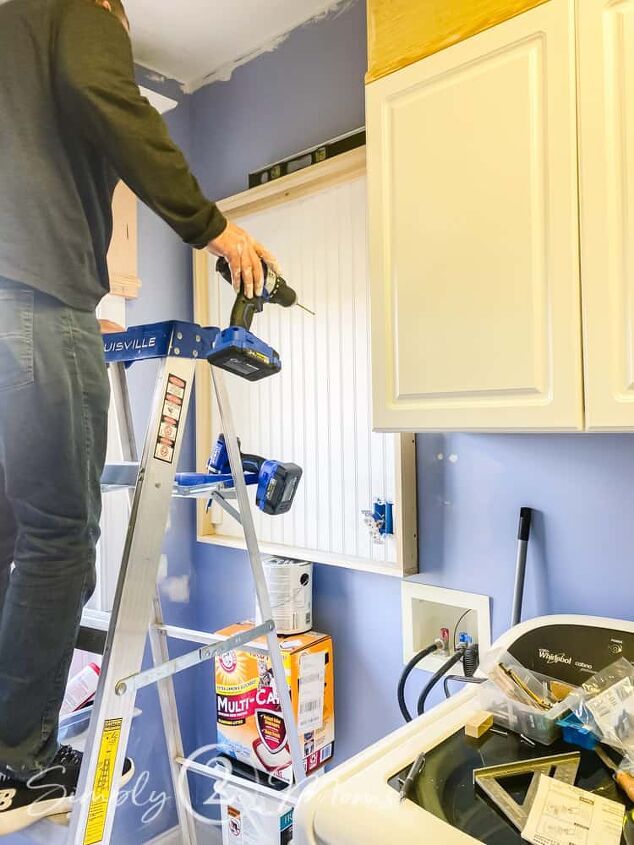
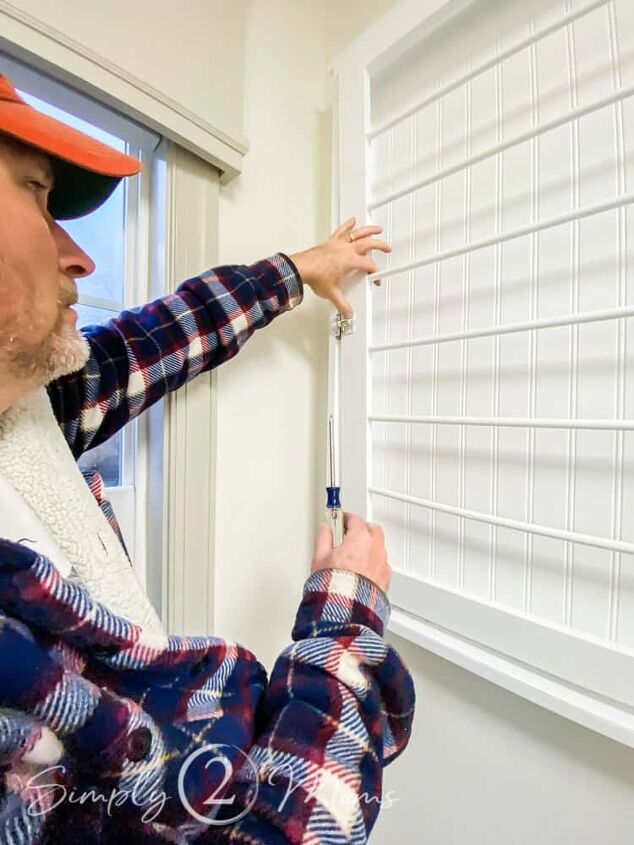
How to Hang the DIY Drying Rack
You’ll want to use a stud finder to locate where to screw the drying rack into the wall.
And also use a level to make sure it’s straight.
You should not balance the drying rack on top of a tower of containers of litter and a paint can.
Even if it’s the perfect height.
Because odds are the tower will fall…
Thank goodness we did what AnnMarie did and waited to install our new flooring until after all the painting!
And thank goodness it was just the less expensive primer that spilled all over…
Once you’ve located the studs, use a drill to make pilot holes for the wood screws.
Then use 3-inch wood screws to secure the drying rack into the studs at both the top and the bottom of the rack.
Attach the Folding Drying Rack
Remember the inner frame made with 1×2 boards?
It’s time to attach the bottom part of the frame!
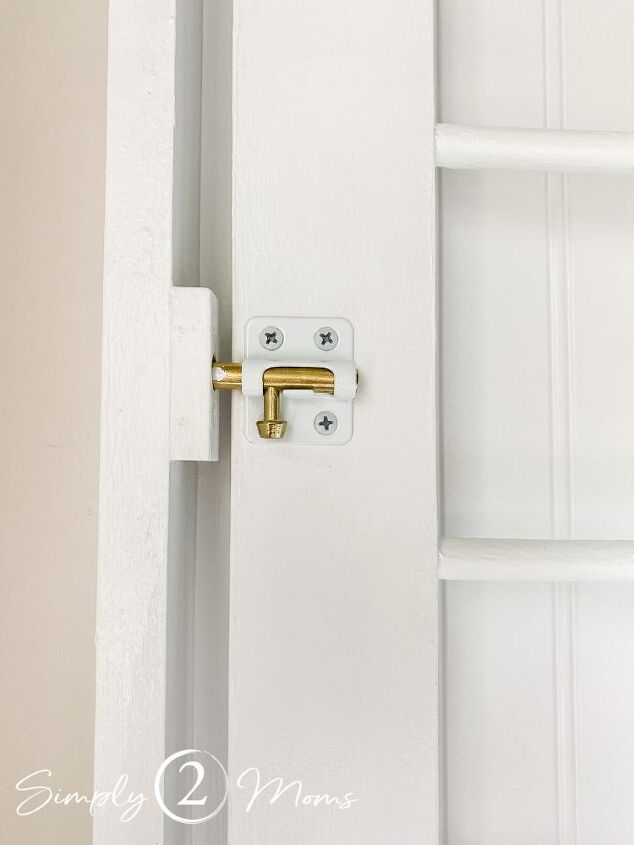
We used these 2-inch hinges and attached the bottom piece of the 1×2 frame to the bottom of the fold out drying rack frame.
In the picture below, you can see that the hinge is positioned so that it’s edge is flush with the upper edge of the 1×2.
You can also see that I painted after the hinges were attached.
I would definitely recommend painting all the parts before attaching the hardware!
Use woodscrews to attach the bottom part of the frame and screw it through the base of the rack and into the wall.
How to Install a Latch or Lock on a DIY Drying Rack
Next, install a latch to keep the beadboard drying rack closed when it’s not in use.
We chose to use a sliding barrel bolt.
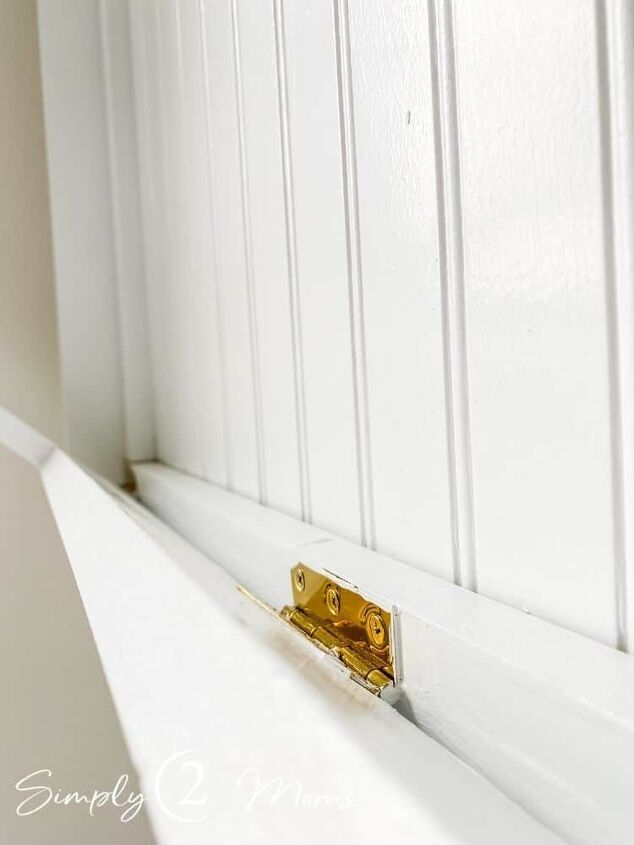
We got a 2-inch barrel bolt, and discovered that if we used the little piece that the barrel slides into, the drying rack didn’t close completely.
If you look closely in the picture below, you can see how the top of the rack sticks out a little bit.
So my husband took a small piece of scrap wood and drilled a hole in it to hold the barrel bolt.
Then mounted the wood flush with the frame.
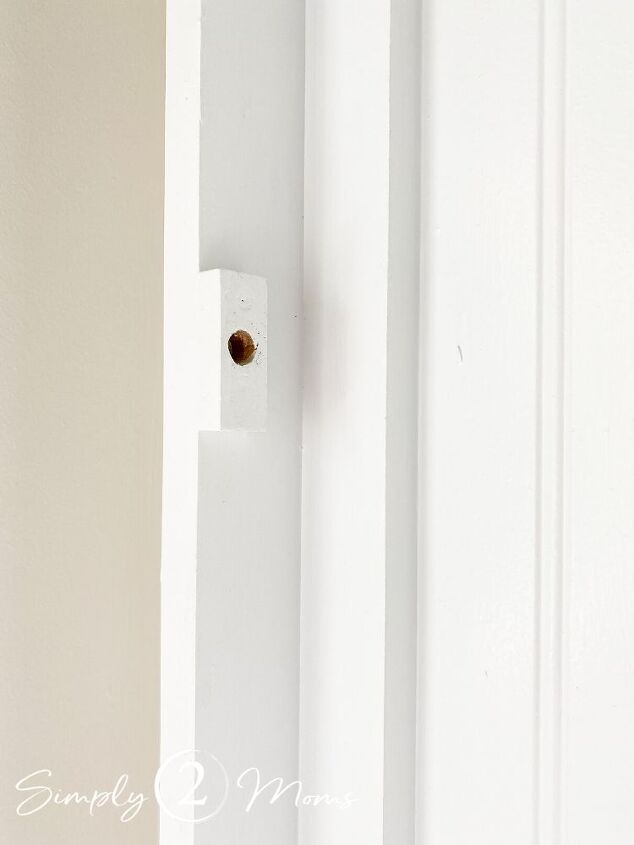
So now, the drying rack closes completely when it’s not being used.
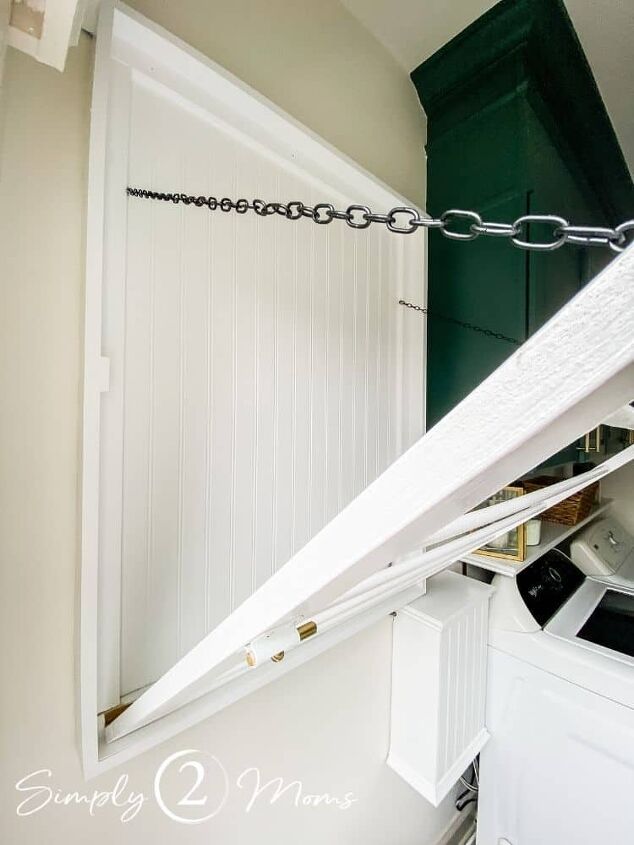
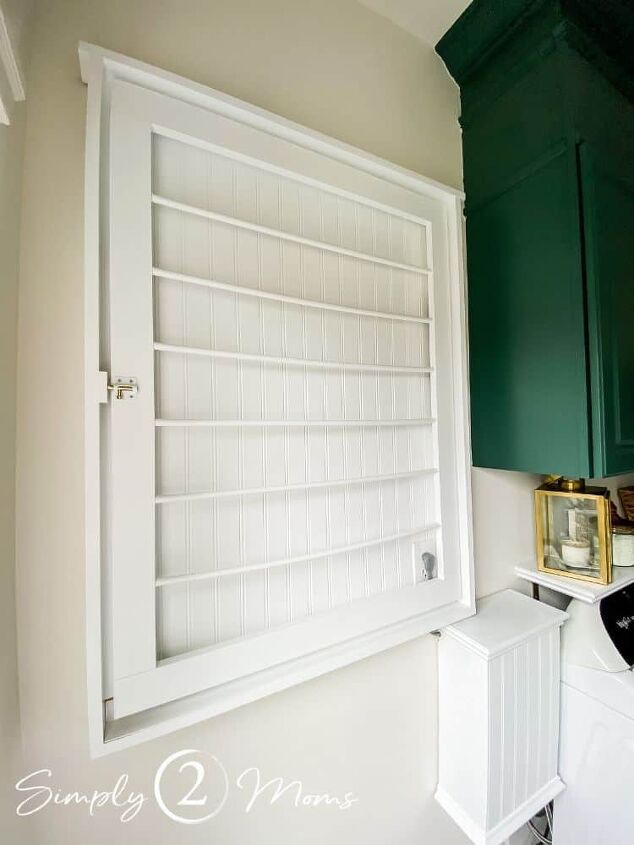
You’ll also need to attach something to hold the drying rack open.
The lid support hinges used in the Ballard Designs drying rack don’t open very wide.
My husband was concerned that the wet clothes would be hanging too close together if the rack didn’t open wider.
So we chose to use powder-coated black chain attached with black pan head screws.
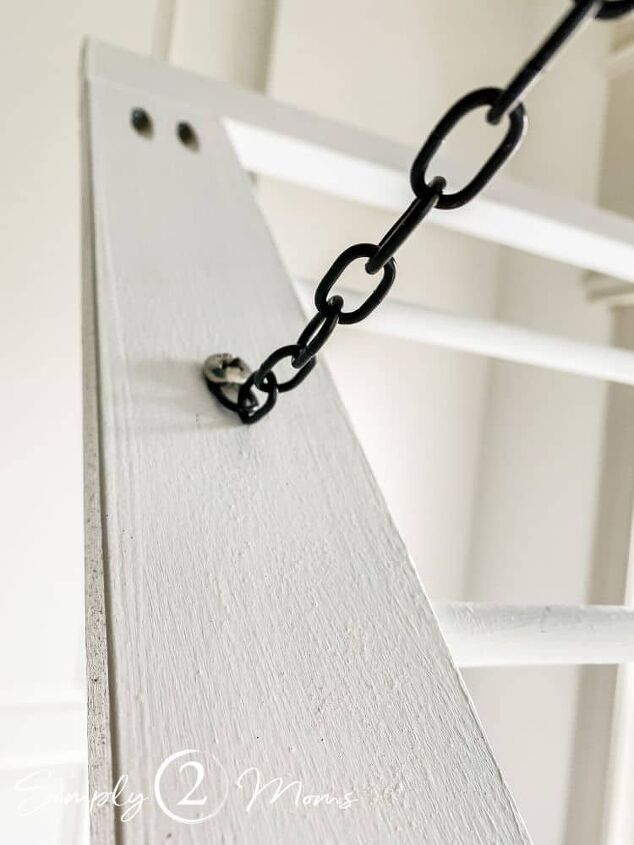
It’s a fine linked chain and is completely hidden when the drying rack is closed.
But it allows the drying rack to open much wider so clothes aren’t touching while hanging to dry.
The outlet for our washing machine was located on the wall where the drying rack is hung.
We simple cut a hole in the beadboard and another hole in the bottom of the frame to allow the cord to plug in and lie flat.
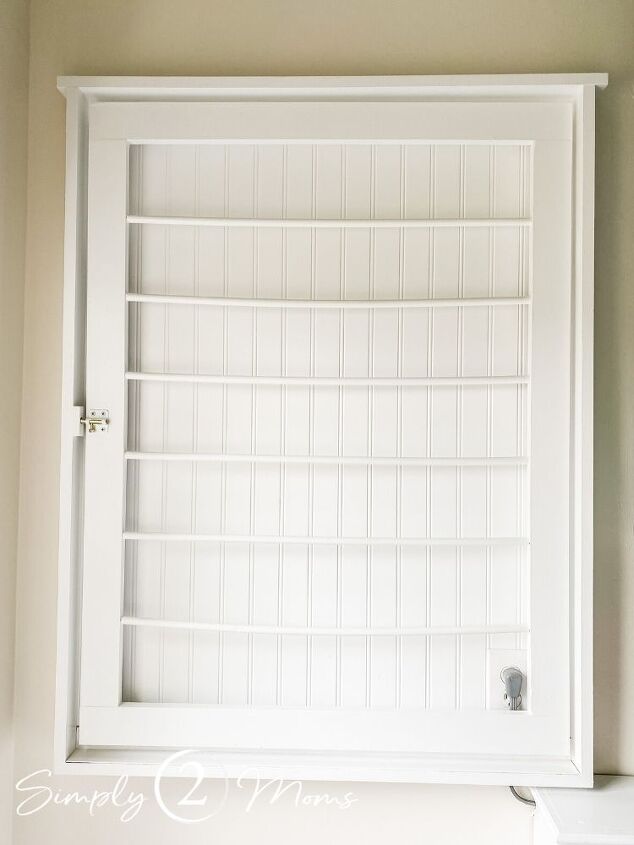
I absolutely love the style that my new DIY Ballard drying rack adds to my laundry room!
Not to mention how much more hanging space I have with this rack compared to my old one.


Comments
Join the conversation
-
I love the idea but I would have liked to see it in use. I’m having a problem visualizing what it looks like then.
-
Nice, but I don’t think it’s a two hour build and paint for most people


Frequently asked questions
Have a question about this project?
How do you hang the clothes?
The rack is amazing but I do have one question; may I borrow your husband?
I’d like to see it in use. How does it work?