Surely, Shibori – A Tutorial of DIY Shibori

Shibori by any other term is tie dye. It’s an ancient Japanese technique using indigo dye extracted from indigo plant. Taking a piece of natural fiber cloth, folding it in an accordion fashion, fastening with rubber bands, among other things, and dying in indigo. I’ve wanted to attempt DIY shibori tie dye for years, and recently I took the plunge, grabbing inspiration from how to videos and books.
Here are the materials you will need:
- An indigo dye kit ( This is the kit that I prefer)
- Natural fiber fabric or clothing
- 2 (5) gallon buckets – such as the ones from Home Depot or Lowe’s
- Rubber gloves
- Small wood squares
- Rubber bands
- Plastic binder clips
- Scissors
When choosing a fabric, make sure it’s made of natural materials; cotton, linen, wool and silk work best, and today I’m choosing to use cotton, working with square pillow covers and rectangular napkins. Here are a two basic binding techniques that I used and will be showing you today:
Itajime shibori is known as the shape-resistant technique. To start, fold the fabric like an accordion.
Fold it again in the other direction, again like an accordion. Place it between two pieces of wood or any flat-shaped object, and bind it together with rubber bands. The shapes and rubber bands will prevent the dye from penetrating the fabric they cover. The larger the shape and more rubber bands you use, the more white you will see on the fabric. The smaller the shape and fewer rubber bands, more indigo will be the result.
Kumo shibori is the pleat and bind technique. I used this method the most. The technique involves binding the fabric in very close sections which results in several spider-like designs. Start by folding the fabric into an accordion. Pinch and bind into sections.
Do the same with the opposite side. Continue binding with rubber bands, working your way toward the center. Keep binding until you can’t go any further and use additional rubber bands to make a tight bundle.
To start the dyeing process, follow the manufacturers instructions provided with the kit. For the kit that I recommend, start by filling a 5 gallon bucket with 4 gallons of warm water. Pour the indigo dye powder into the bucket and stir in a circular motion.
Second, pour in the soda ash and reduction agent. Stir again, very carefully, in a circular motion and then in reverse. It is VERY IMPORTANT not to oxidize the dye bath, so keeping it covered and stirring it gently is paramount. Once the dye is mixed well, cover the bucket for at least an hour either with a lid, or plastic wrap. When you check on the dye and see a foamy oil-slick looking top layer and a neon yellow-greenish colored liquid below, then you know the dye is ready to receive the fabric.
Rinse the fabric in the second bucket of clean, warm water. Carefully squeeze out all the water before submerging it into the indigo dye bath. Wearing rubber gloves, gently manipulate and massage the dye into the fabric. Remember to work gently as not to agitate the dye.
After 10 minutes, take the fabric out of the dye. Don’t be alarmed that it will have a green hue. After a few minutes, as the fabric is exposed to oxygen, it will turn a beautiful dark blue.
After all of the pieces have been dyed and have turned blue, repeat the dyeing process again. The more the fabric goes into the indigo bath, the darker the fabric will become. Keep in mind that the fabric will appear a darker indigo when wet, and will fade slightly when washed for the first time.
After dyeing process is completed and you are happy with the hue, allow pieces to dry. I let my pieces dry for 48 hours. While pieces are drying, do not unwrap! This is important. Once dry, put on a fresh pair of rubber gloves. Taking a pair of scissors, cut away the rubber bands, and remove binder clips, if using.
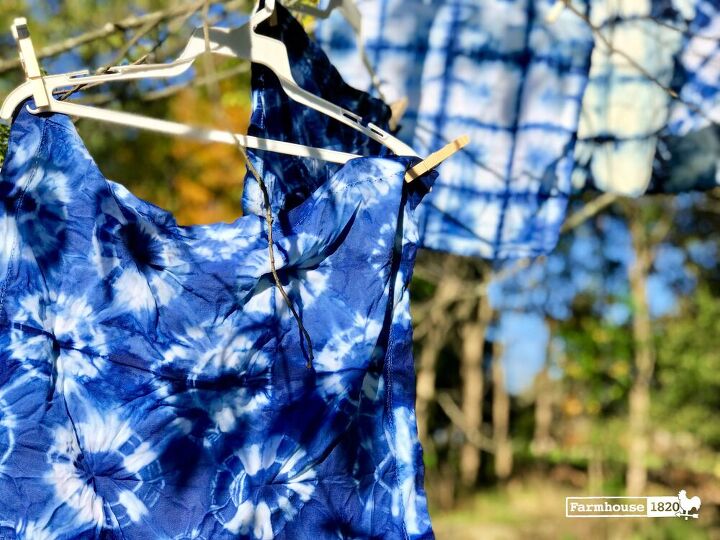
Here is the Itajime technique: This is the shape resistant technique. The fabric is gridded with striped lines from the rubber bands. Some dye did ease in where the fabric wasn’t tight, but I love how it turned out. There are no mistakes in shibori.
Here is the Kumo technique. …
Here is where I used binder clips. See the rust spots? Don’t be like me and use metal binder clips. Make sure you use plastic binder clips.
And lastly, here is the binding method that is easiest, but makes a big impact. All I did for this technique is I folded the fabric accordion style, then secured a rubber band every couple inches from end to end.
Once all of the pieces have been unwrapped, it’s time to wash them. I hand washed each piece individually in cold water and a tad of distilled vinegar. Hang the pieces to dry outside completely. Use an iron set on the lowest setting to set the color.
The dye vat should allow you to dye up to 5 pounds of fabric.
Surely now, you’ll want to shibori!
**This blog post contains affiliate links
Enjoyed the project?
Resources for this project:
See all materials
Comments
Join the conversation
-
 Nanci Newhall
on Aug 19, 2021
Love it going to try is on my cotton curtains in my guest room
-
-










Frequently asked questions
Have a question about this project?