


DIY Holiday Snow Globe: Easy to Make
It’s wonderful how simple this diy holiday snow globe is to make yourself. There’s something about snow globes that is so mesmerizing.
Flipping them upside down and then right side up. Watching the snow fall.
No matter how old you are, you can’t help but flip it over when you see one.
Seriously. You can’t resist flipping it over, can you?
I got the idea to create a holiday snow globe when I was at Dollar Tree.
I had a pillar candle holder in my hand and walked past the vase section. I noticed their small round vases and put one on the candle holder. The vase sat nicely on the candle holder. Then I turned the vase upside down and the top of the vase snuggled nicely into the lip of the candle holder.
Whoa!
I immediately saw that it would be a fantastic snow globe, as long as I could create a tight seal between the vase and the candle holder.
(No one wants a leaky snow globe.)
I had an idea, now I just needed to decide what I wanted inside my snow globe.
In many ways, that was the hardest part of this homemade snow globe project.
Why?
Because whatever I put inside my snow globe needed to be waterproof. So, the item couldn’t contain metal, fabric, or anything organic. Those materials would eventually disintegrate or rust. Which wouldn’t make for a fantastic snow globe diy project.
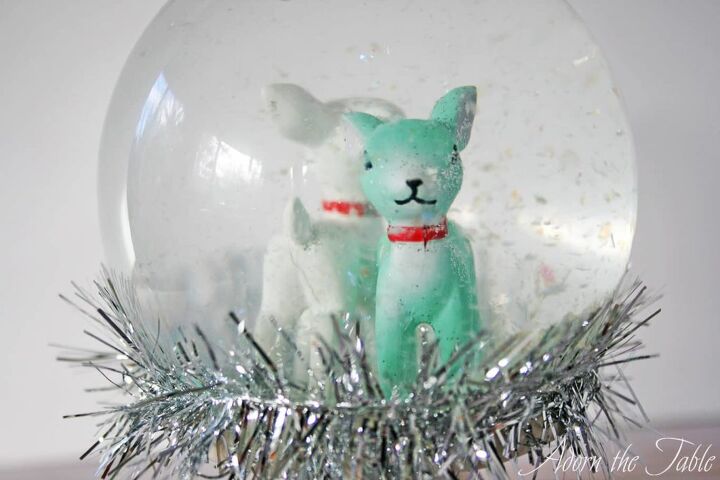
Items in snow globes need to be either ceramic or plastic.
Plus, whatever I put in the snow globe needed to be small enough to fit within the globe, with room to spare.
A globe filled with liquid will distort the size of the items inside. They will look larger than they actually are.
*Note: you want to make sure that there is space between your item(s) and the top of the globe. You don’t want it to appear that they are touching.
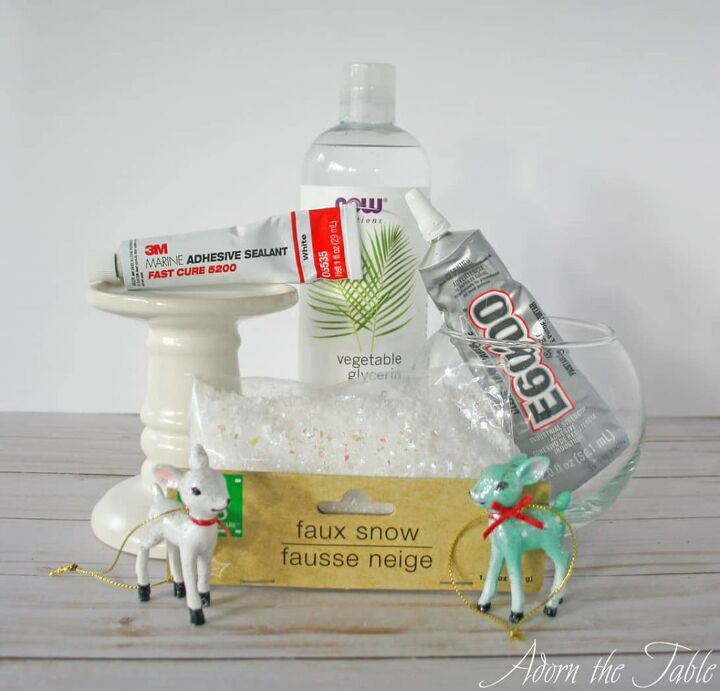
Supplies for DIY Holiday Snow Globe
- Pillar candle holder (from Dollar Tree)
- Small round vase (from Dollar Tree)
- Fake snow or glitter (from Dollar Tree)
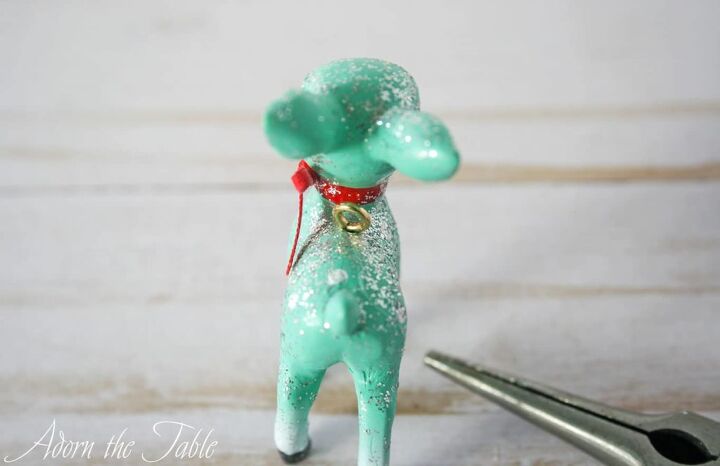
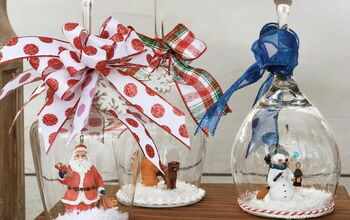
- Ceramic Christmas ornament(s) (I found mine at Target)
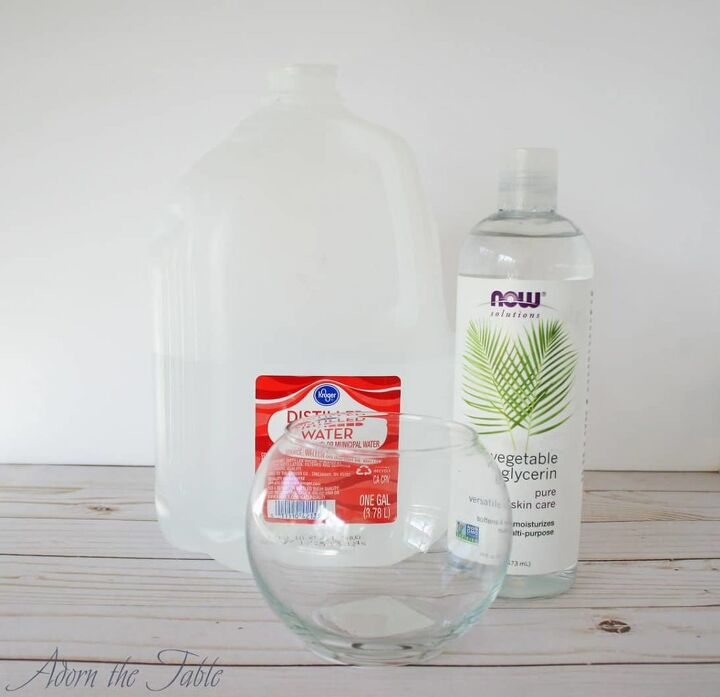
- Distilled water
- Glycerin (or clear glue)
- Marine adhesive sealant
- E6000 adhesive
- Tinsel (optional)
- Glass door knob (optional)
FYI: This is a diy Dollar Tree snow globe, but I’m not using the “snow globe” from Dollar Tree. You will diy it with items you purchase from Dollar Tree.
How to Make Your Easy Homemade DIY Snow Globe
Step 1: Prep your DIY snow globe project
Clean your glass vase. Make sure all debris, fingerprints, and smudges are removed. (You can’t clean the inside of the glass later – lol!)
Also thoroughly clean the candle holder and ornaments.
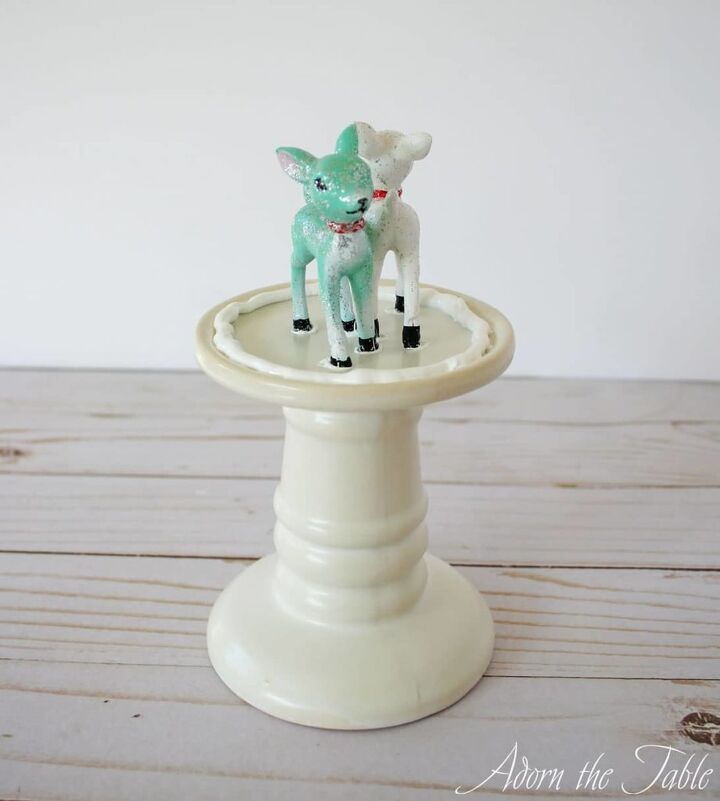
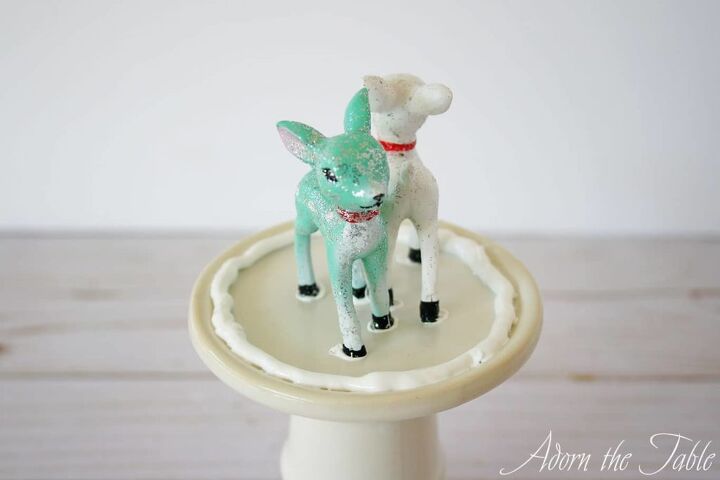
Step 2: Add figurines to snow globe
On the top of the candle holder; lay out where you want your snow globe items to go. Test if it will work by putting the vase over them.
If you are using Christmas ornaments (like I did) and they have a metal hook for hanging, remove the hook with a pair of needle-nose pliers. Then dab a little E6000 clear glue over the hole where the hook was, to seal the hole.
Make any adjustments until you are happy with the placement.
Then take a little of the marine adhesive sealant and add it to the bottom of your ornament, or snow globe items. Position them on the top of the candle holder where you decided they should go.
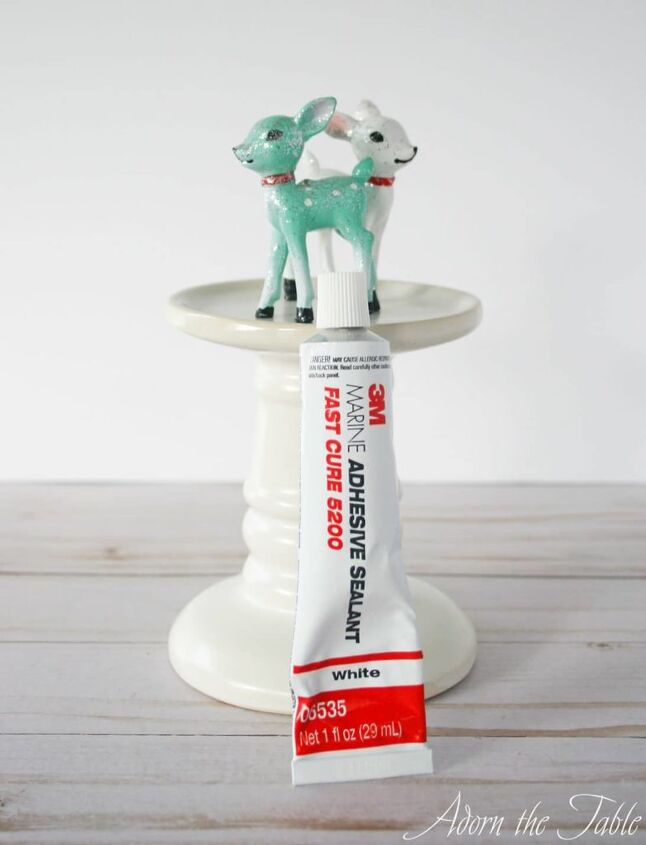
Note: the marine adhesive takes 24 hours to dry, so you have a little time to make any adjustments.
Step 3: Get the globe ready
Once your snow globe items are glued in place, and 24 hours have passed, it’s time to get the globe itself ready.
Fill your holiday diy snow globe (the vase) with room temperature distilled water, almost to the top. Leave a little space for now. We will top off the water at the end of this step.
Two things are key:
- Your water needs to be room temperature for your diy snow globe. If the water is cold or hot, it could create condensation inside the globe that will result in an unattractive snow globe.
- You must use distilled water. Not tap or bottled water.
Why should you use distilled water in your snow globe instead of bottled or tap water?
It is very important that you use distilled water because it doesn’t contain any natural minerals that could eventually turn the color of your water. Yuck!
After you fill your globe with distilled water, add 2 tablespoons of glycerin or clear glue (not white glue – it must be clear) per cup of water.
Why should you use glycerin inside a snow globe diy? Glycerin slows down the “falling snow” inside your homemade snow globe. So you can see the “snow” fall. If you choose to not use it, the “snow” will fall quickly.
*Ratio of glycerin to water is 2 tablespoons per 1 cup of water. So, if your globe holds 2 cups of water, you want to add approximately 4 tablespoons of glycerin. You don’t need to be exact with this measurement. Just don’t add too much glycerin, as it might cause your snow to clump.
*Glycerin costs more than clear glue, but it does a little better job than the clear glue of slowing down the falling snow.
Now add your fake snow or glitter. Approximately 2 tablespoons, or enough to create a small layer on the bottom of the bowl. Make sure that your fake snow is not made of paper. It should be a plastic product, so it won’t fall apart or disintegrate in the water.
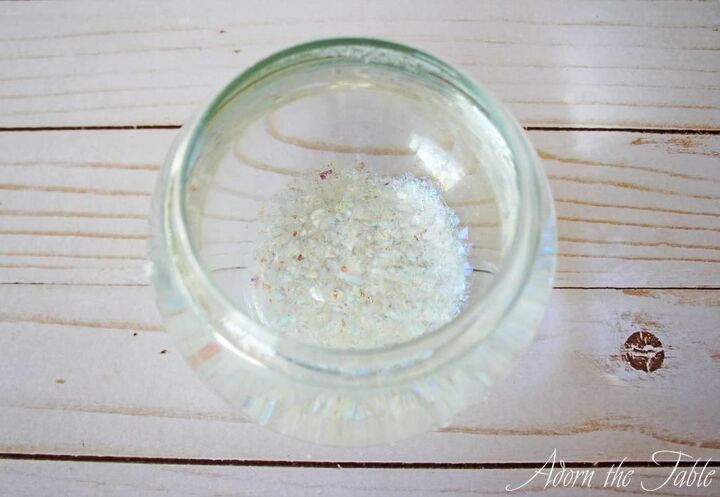
Stir the distilled water, glycerin, and fake snow. Watch how the snow falls to the bottom.
If the fake snow falls too quickly for your liking, add a little more glycerin. Or, if you want to see more snow swirling, add a little more fake snow (or glitter). It all depends on what you prefer.
If some of the fake snow or glitter doesn’t sink to the bottom, let it sit for about 15 minutes and stir again. After the snow has settled, skim off any remaining snow or glitter that is floating on the top.
Now top-off the globe with distilled water, so that it overflows a little. *Note: I placed a container under my diy globe to catch the water that overflowed.
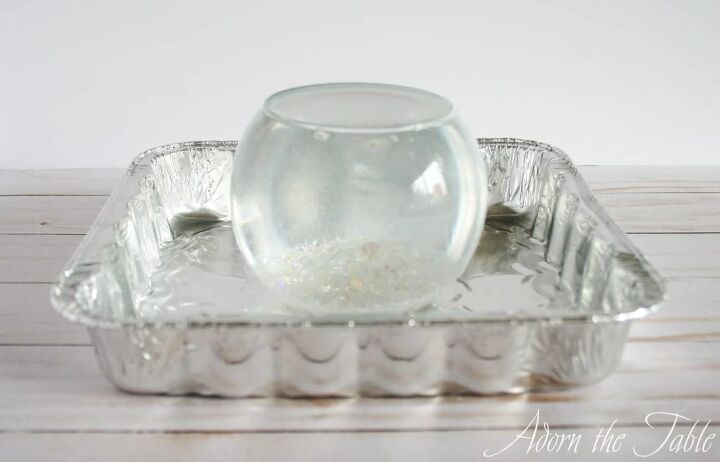
I overfilled the snow globe so that my globe would be completely filled with water, with no air bubble at the top.
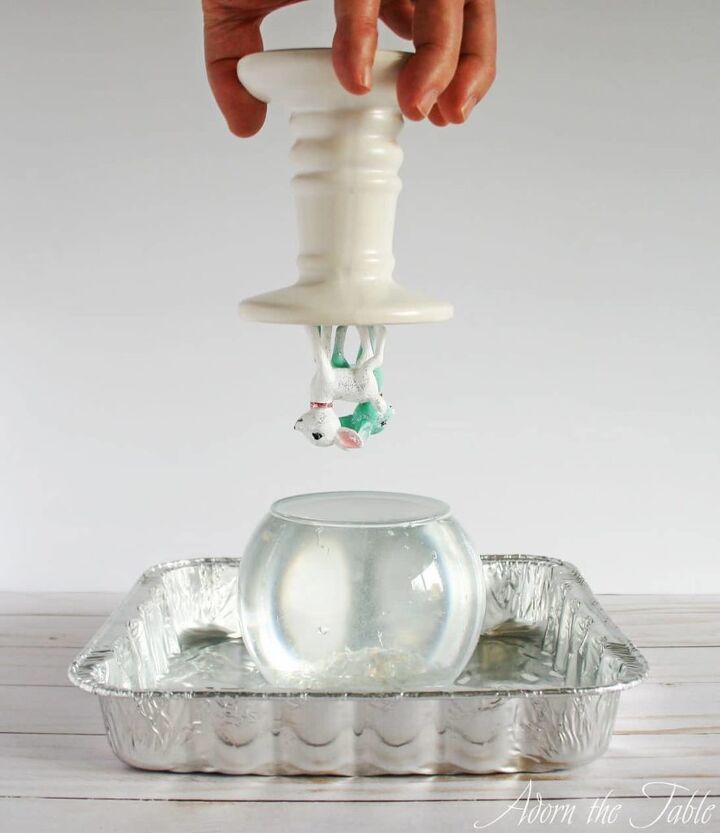
Step 4: Attaching your diy snow globe to the base
Now that your globe is filled with water, it is ready to attach to the base.
Take the marine adhesive sealant and add a thick bead of it around the inside of the candle holder, where the globe will attach to it.
*I highly recommend using the marine adhesive sealant, as it adheres under water. After trial and error, and doing a lot of research on glues, epoxies, and sealants, it was the only thing I could find that would work under water. Originally I used E6000 adhesive, but it didn’t hold up in the water, and it couldn’t create a waterproof seal between the vase and the candle holder.
You want to make sure that the opening of the globe will sit within the adhesive.
You are going to be turning your candle holder (with the ornaments permanently attached) upside down and placed onto the globe.
But before you do this step, do the following:
- Make sure your globe is perfectly straight, not at an angle
- Have your globe sit in a container to catch the overflowing water.
Now slowly put the candle holder down into the water-filled globe. Water will flow over the sides which is fine, as the marine adhesive sealant works underwater.
Make sure the globe is sitting inside the adhesive ring and that it has oozed out a little.
You might need to add a little more adhesive between the globe and the candle holder. I found that by placing a little adhesive on a toothpick, I could add it easily to the areas where I didn’t see any adhesive.
If you have a little too much adhesive, take a piece of a paper towel and carefully remove it.
Make any adjustments to the positioning of the upside-down base on the globe.
Let dry upside down for 24 hours.
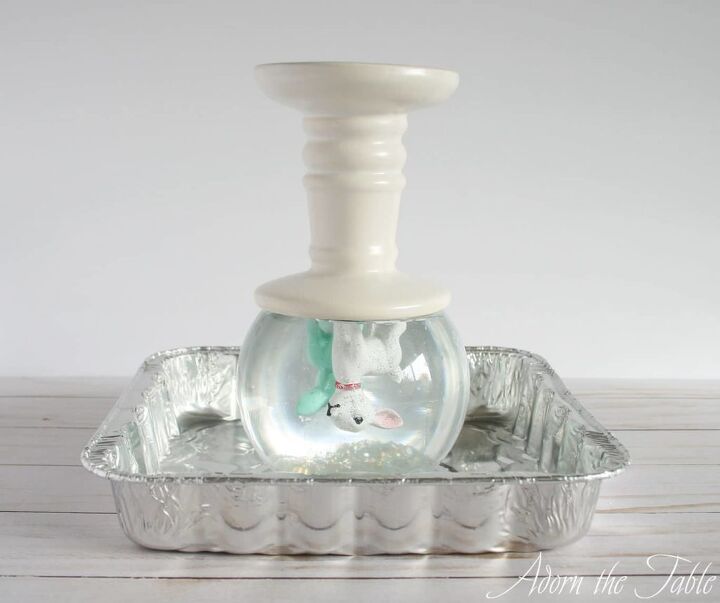
Step 5: Turning over your homemade snow globe
Now it’s time to turn over your diy holiday snow globe.
Slowly tilt your snow globe. If you feel any water or moisture – stop and examine the area. You might have a pin size hole. If so, add a little of the marine sealant to fill it and wait another 24 hours. You want to be sure that no water will leak out before you completely flip over your snow globe.
Continue to slowly tilt and turn your diy snow globe around all of the edges where the globe and base meet.
After you are confident that you have a completely waterproof seal around the whole snow globe (and have waited 24 hours for the sealant to dry), turn it over.
Sweet!
You have made your very own holiday diy snow globe!!
(happy dance)
Step 6: Adding embellishments to your DIY snow globe
Now to put the finishing touches on your snow globe.
After all, that white sealant probably doesn’t look the best (haha).
Take some tinsel, or garland of your liking, and wrap it around where the globe and holder meet.

Glue in place.
Add more embellishments, if you wish.
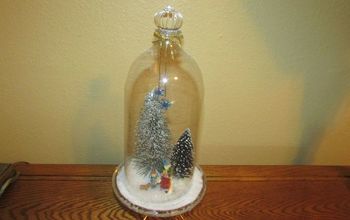
You can also add a finial to the top of the snow globe. I chose to use a small glass crystal doorknob. Use E6000 to glue it in place.
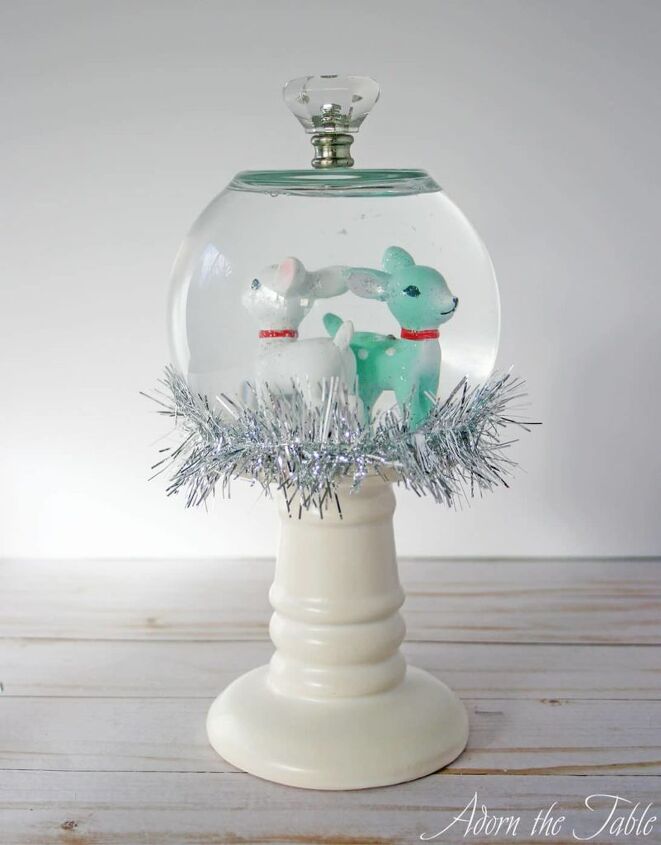
Isn’t this the cutest snow globe diy project!!
Just think of what you can do with it:
- Use it as part of a centerpiece on your holiday table
- Show it off on your coffee table
- As a wonderful gift for someone special
Check out the diy holiday snow globe on my retro Christmas table setting. It’s adorable!
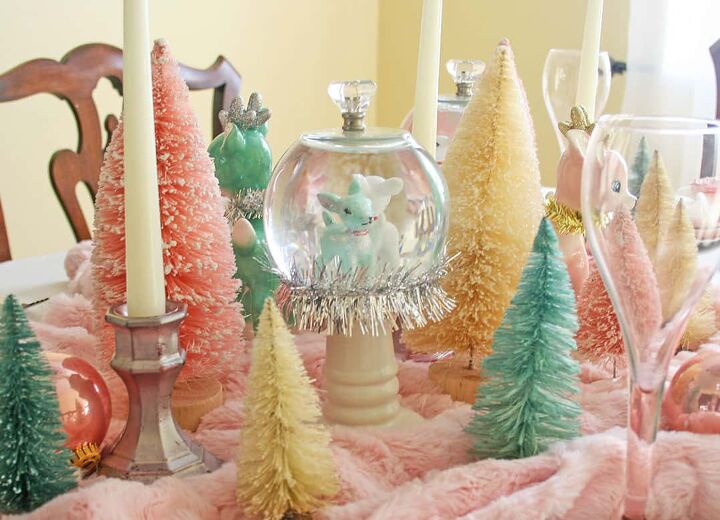
*Note: To change the look of your snow globe, consider spray painting the pillar candle holder either silver or gold or a different color that would compliment the items inside your globe.
Check out other easy diy projects
- Twisted Paper Flower Napkin Rings
- Colored Mercury Glass Candle Holder
- Color Bottle Brush Trees
DIY Christmas Decorations
Resources for this project:
See all materials


Comments
Join the conversation
-
I will be making one too ! You're table display is so much fun to look at, eye candy indeed !
-
this is perfect our granddaughter collects them!


Frequently asked questions
Have a question about this project?