


How to Make a Boutonniere Yourself for the Big Day

By Sharon Brandwein
Most people would agree that boutonnieres are an essential part of the wedding attire for the groom, his groomsmen, and maybe a few other VIPS in attendance. And while it would be pretty hard to scan any wedding ceremony or prom without spotting a boutonniere, it's still probably safe to say that making a boutonniere is something of a lost art. With any luck, you could probably find a local florist who can make a simple boutonniere. But if you're not having any such luck or you’d like to try your own hand at it, it's pretty simple to do yourself.
If you decide to take matters into your own hands, you've come to the right place. In this guide, we share everything you need to know about making your own boutonnieres for your big day, and we also detail the key differences in using fresh flowers versus faux ones. Lastly, we'll teach you how to preserve a boutonniere to keep as a memento for years to come.
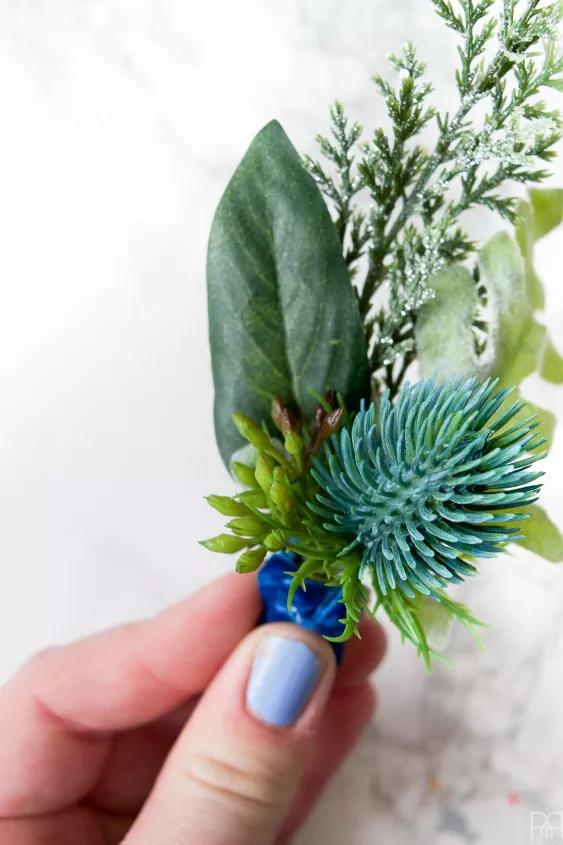
Photo via Zest it Up
Should I Use Real Flowers or Fake Flowers in My Boutonniere?
Before you dive into the ABCs of how to make your own boutonniere for a wedding or other special event, you’ll first have to decide whether to make a boutonniere with real flowers or fake flowers. Each one has its own pros and cons, so the decision might not be as easy as you think.
Real Flowers - Real flowers always look dynamite, but they may not look so hot as the day and night wear on. Keep in mind that the color may fade, the petals might drop, and the flower could wilt. What’s more, you may be limited to what’s in season and what’s locally available. For example, if you had your heart set on a calla lily for your intended’s lapel, you’ll simply be out of luck if you can’t find one at your local florist. And, if you find a florist who can create boutonniere, it might be pricey and fall out of line with your budget—especially for out-of-season flower selections.
Fake Flowers - The great thing about fake flower boutonnieres is that they’re prefabricated, so all you’ll have to do is take it out of the box and attach it to a lapel. Typically, you’ll have a nice choice of sizes for the boutonniere, and, of course, it’s not a live flower, so it’s endlessly reusable. That said, boutonnieres with fake flowers can look fake—because they are. If you’re shopping for one online, your best bet is to pay close attention to reviews and, if at all possible, look for photos that other buyers have posted (a.k.a. unedited photos) to give you a better sense of what you’ll be working with.
When to Make a Boutonniere
The closer you can make the boutonniere to the event it’s for, the better. Of course, there are a million things going on when the big day rolls around, so if you can enlist someone's help then go for it. If there's a shortage of hands, the next best bet is to make the boutonniere the night before.
If you make a boutonniere the night before the event, leave the stems exposed and place the boutonniere in a shallow cup of water. And while you might be tempted to put it in the fridge, think twice about that. Unlike a florist’s fridge, which only houses flowers, most home fridges tend to have lots of other things chilling behind their steely doors. Your most immediate concern when it comes to your boutonnieres is produce. Fruits and vegetables tend to emit gases that can affect the integrity of the flower and cause blooms to wilt. If you must store the boutonnieres in the fridge, do your best to keep them as far away from any produce as possible or stow produce in airtight containers for the time being.
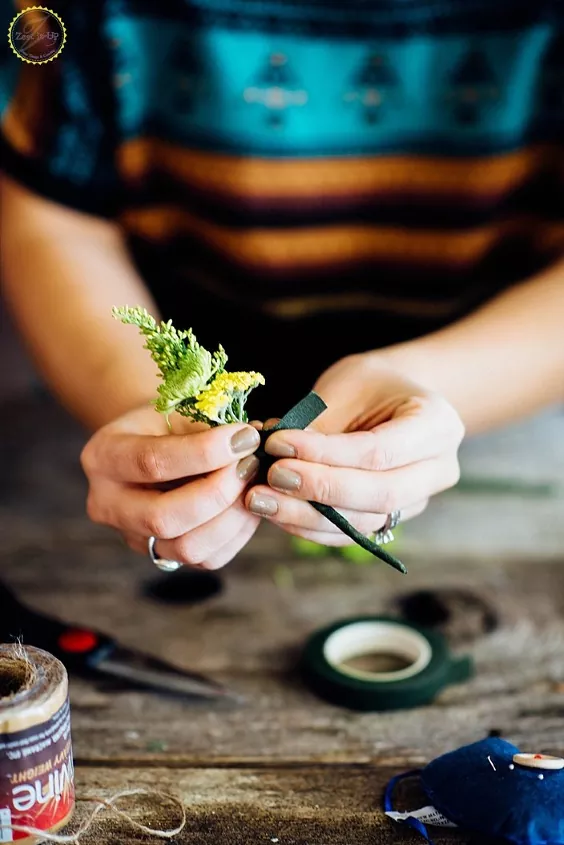
Photo via Ariel
How to Make a Boutonniere With Real Flowers
If you don't have a clear vision of what you want the boutonniere to look like, your best bet is to do a bit of research well in advance before making your first cut. For some really great ideas, you may want to check out any DIY resource you have at your disposal, like flipping through your favorite magazines, scrolling through Pinterest, or watching YouTube. These resources are typically packed with plenty of great photos and ideas to give you a great jumping-off point.
Once you have a vision in mind, it’s time to collect your materials and get started on making your boutonniere.
Tools and Materials Needed
- Floral clippers
- Ribbon scissors
- Flowers and foliage
- 6-inch piece of 18-gauge floral stem wire
- Floral tape
- Ribbon in a ⅝- to 1-inch width
Step 1: Cut Flowers
Use floral clippers to cut your flowers to the desired length. To make things easy while you’re working, you may want to leave the stems somewhere around four to five inches. Your finished product will likely be about one inch or less, but trimming the boutonniere to that length is accounted for in the final steps of the project.
Step 2: Arrange Flowers
Arrange your boutonniere however you wish in one hand, pinching the flowers together with your fingers. Start with the main flower and then layer in greenery and any other dried elements you’d like to include.
Keep It Simple
Step 3: Add Wire
Once you have your arrangement just the way you like it, place the six-inch wire behind the stems to give the boutonniere some structure and support.
Step 4: Wrap Floral Tape
Starting from the top of the stems, secure the stems together by wrapping the floral tape down the stems in a spiral pattern. Continue wrapping until you have about three-quarters of the stem covered.
Step 5: Trim Stems
Using your floral clippers, trim the excess stems and continue wrapping the floral tape around the wire. Once you’ve reached the end of the wire, change directions and continue wrapping upwards towards the base of the buds on the boutonniere.
Step 6: Trim Tape and Add Ribbon
When you reach the top of the stem before the buds, cut off the tape. At this point, you can cover the taped stem with ribbon, or you can leave it as is.
How to Secure a Boutonniere
When the big day arrives, use a pearl pin to attach the boutonniere to the lapel. Poke the pin through the back of the lapel, pierce through the main flower stem, and then back into the fabric.
How to Preserve a Boutonniere
Many couples like the idea of preserving the boutonniere as a souvenir of their wedding day, It makes a nice keepsake, and it’s easy enough to do with a little help from silica spray. To preserve your boutonniere:
- Place the boutonniere upright in a tall airtight container. Cover the bottom of the container with a few inches of silica spray.
- Once you have enough silica spray on the bottom of the container, spray the rest of the boutonniere with silica so that all parts of the flower are covered.
- Place the container with the boutonniere in a cool, dry place and leave it dry for five to seven days.
- Once you’ve checked to make sure the flower is dry, you can then place the boutonniere on display however you please.
Do you have any tips for making a boutonniere? Comment below—we’d love to hear them!


Frequently asked questions
Have a question about this project?