


How to Make a Cute Flower Pine Cone & Twig Wreath

Hello and thanks for checking out my post today.
I made this DIY wreath for Christmas but purposely didn't make it too 'Christmassy' so I didn't have to take it down afterward.
The wintery elements are the cool colors and the way I've frosted up the foliage but this wreath wouldn't look out of place in the other seasons too (with the exception of fall maybe).
I intend on keeping this wreath up until at least late spring!
Check out my YouTube video on how to make this wreath, info, and the link below!
Feel free to post any questions or comments too and I'll get back to you asap.
Watch the video
As I mentioned above, I've got a YouTube video of this tutorial up on my channel now.
Click on the video above to watch and please consider subscribing for loads of future crafty content 👍🏻
I've linked all the products I've used in this tutorial in the description of my YouTube video too in case the links Hometalk provides are quite what you're after.

Tools and materials
- Twigs
- Pine cones
- Faux foliage
- Acrylic paint
- Hot glue
- Twine
- MDF/wire hoop
- Gardening shears
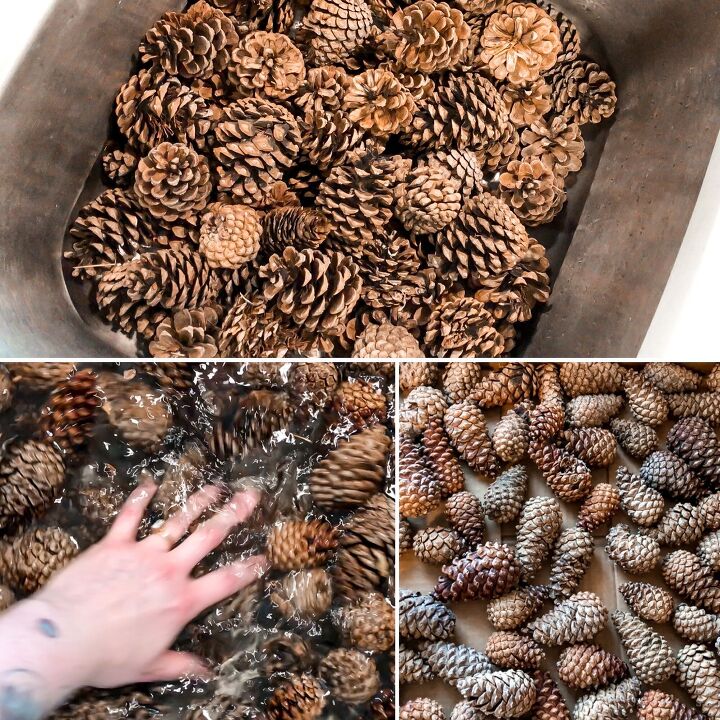
1. Prep the pine cones
You can of course buy a pack of pine cones and skip this whole step, but if you're like me and enjoy collecting them, then you'll want to clean them first.
In a 2:1 solution of water to white vinegar, thoroughly soak the pine cones for about 30 mins.
After 30 mins of the pine cones being submerged, give them a really good rinse with clean water.
Let them dry out in a warm dry area and turn them over occasionally so that they can open up again (they will close up when wet).
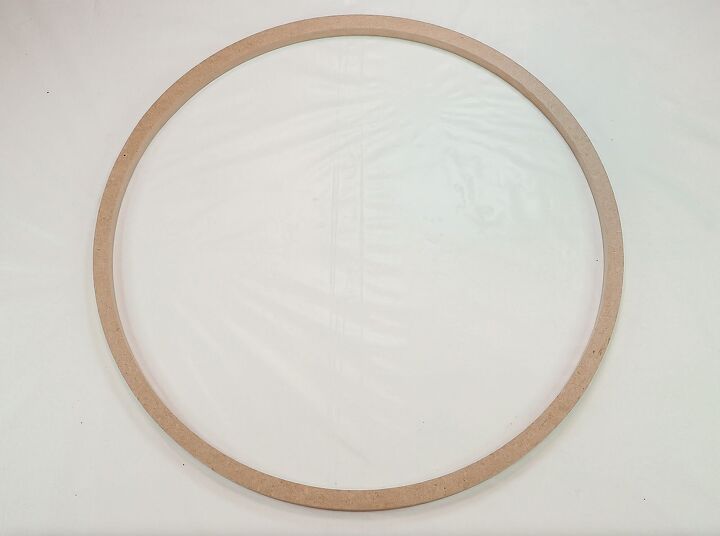
2. Paint the hoop
I bought this 12-inch MDF hoop from Michaels. I painted it so that it was less noticeable should parts of it still be visible at the end. A wire hoop would work just as well and could be painted in the same way.
However, It's not necessary to do this step if this doesn't particularly bother you.
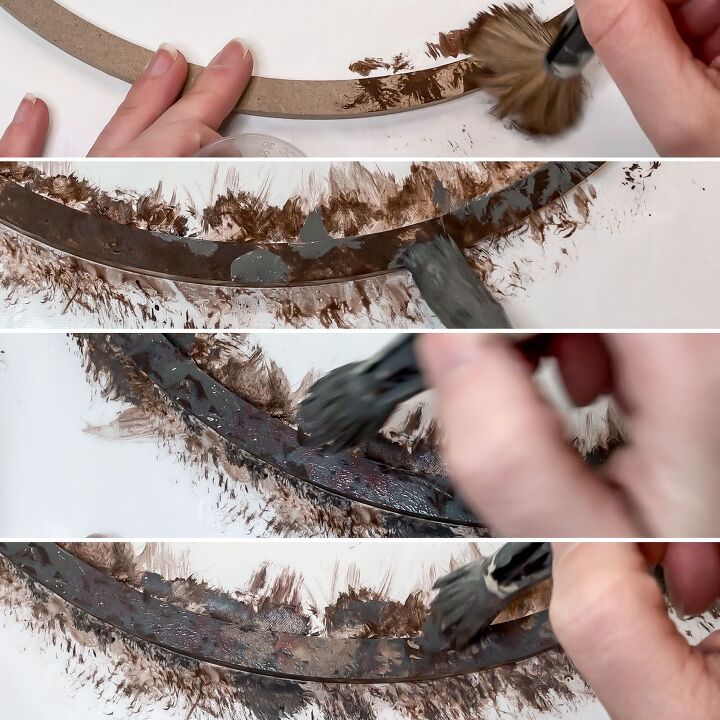
For this project you will need to collect a bunch of garden twigs of varying lengths and thicknesses.
At this stage, grab a handful of these twigs and examine the main colours in them, then mix up some paints to match these shades.
Paint the MDF hoop, including the inside and outside edges in these colours.
I mixed up 4 colours in total, a dark brown, grey, reddish brown and a beige. I used the colours Burnt Umber, Khaki and Barn Red from Apple Barrel, White and Green from CraftSmart and Maui Sand by FolkArt to create my shades, in case that helps.

Stipple the colours onto the hoop so that they blend together nicely but they don't need to be seamlessly blurred. The colours in my twigs looked patchy so if the colours on the hoop blurred together too well, it would still stand out.
Check as you go to see how your hoop-twig blend is looking then set the hoop aside to dry once you're happy with it.
Again, this painting step is completely optional in case you're thinking 'that's a lot of effort to disguise the hoop'. 👍🏻
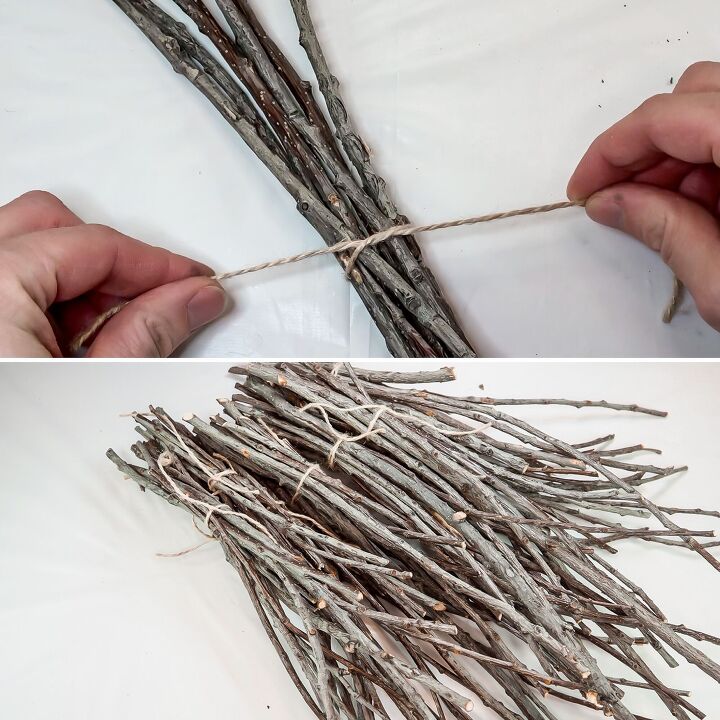
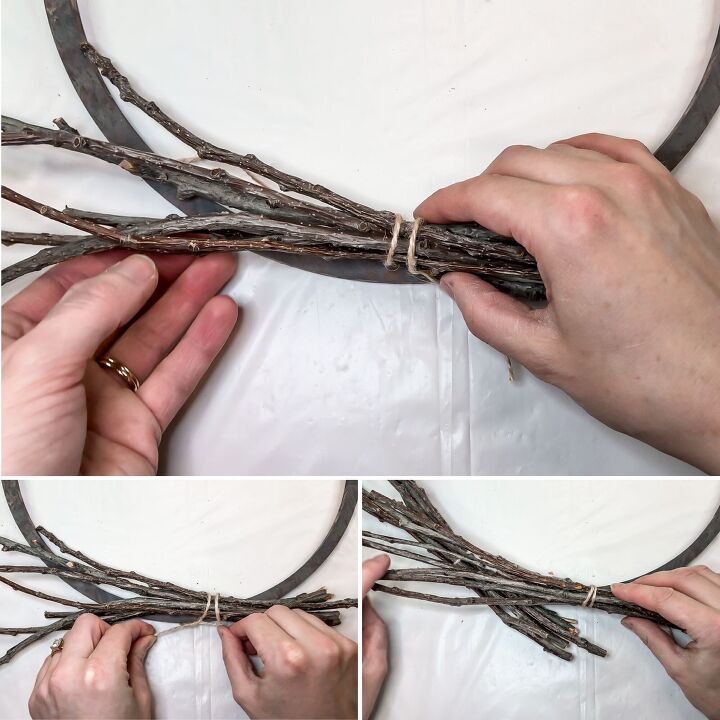
3. Make the twig bundles
Tie small bundles of twigs together with twine. Include twigs of varying sizes so that the bundles look random.
For my 12-inch hoop, I made roughly 15 bundles of approx 10 twigs per bundle.
You want the bundles themselves to look fairly uniform, the randomness is related to the twigs within the bundles.
Bring back the hoop and lay the first bundle on the front of the hoop frame.
Use another piece of twine to secure this to the hoop.
Lay the 2nd bundle on top of the first but slightly further around the hoop. Tie this in place too.
Use as much twine as is needed to keep the bundles in place. Don't worry about how visible the twine is at this stage, it will be removed later on. Also, don't worry if your wreath feels loose and rickety right now, the structural integrity will come from glue that will be applied later.
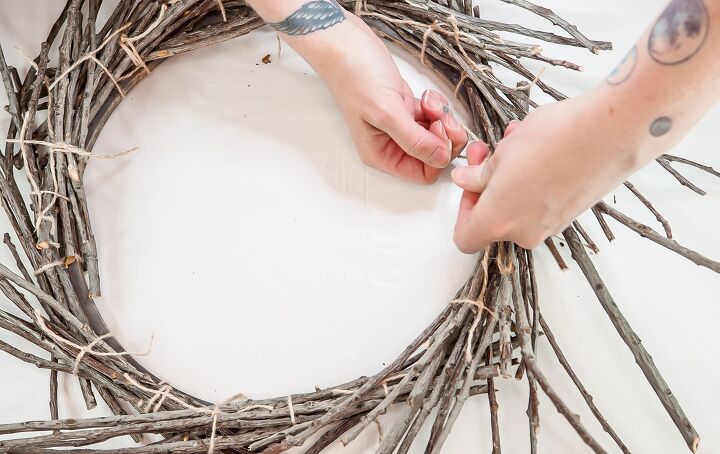
Keep going until you've attached all your bundles or as many as you like.
It may even be worth making your bundles as you go so you don't make too many unnecessarily 🤷🏼♀️
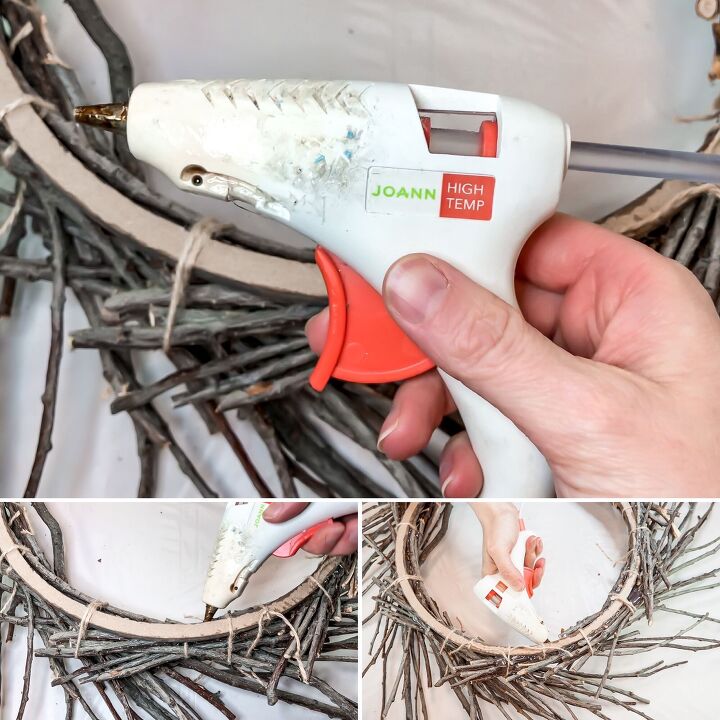
4. Glue everything in place
Once the shape of your wreath looks good and everything is laying roughly in the right place, it's time to tighten things up.
Turn the wreath over and, using a hot glue gun, start gluing the bundles to the frame and then to each other.
Try to be strategic with the glue so as not to let the glue show through to the front. The shininess of it can be quite a contrast to the matte twigs.
Add as much glue as is needed, even within bundles, so that everything holds together.

Once the glue has hardened start removing all the twine that is visible from the front.
Don't worry about removing the twine you can't really see, it won't make much of a difference in terms of the overall look and by leaving it there it should help maintain the structure.
Cut through the twine with scissors and either pull the twine away if possible or cut both ends as short as possible so there's less chance of them being seen.
If needed, add extra glue to the areas that once had twine.
You should be left with a solid, sturdy structure that holds as one.
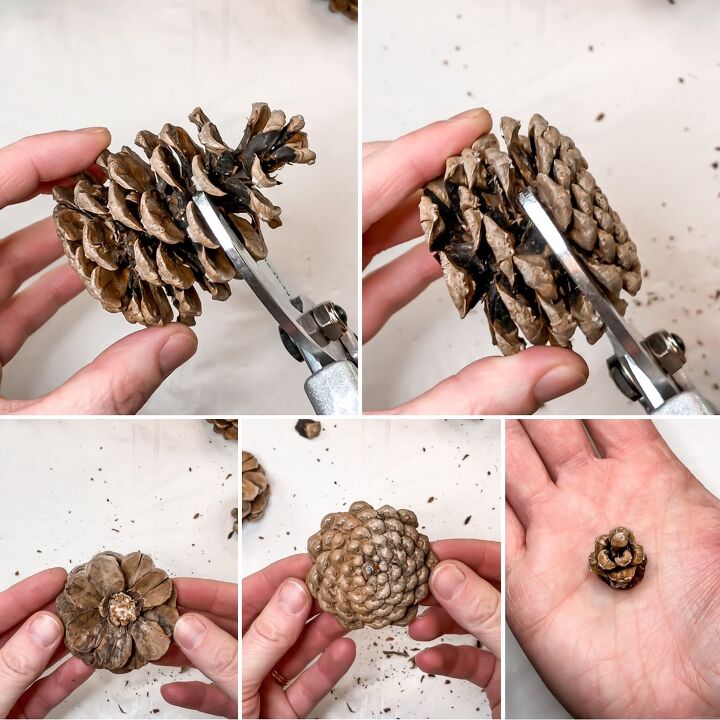
5. Add the pine cones & faux foliage
Using gardening shears, chop up your pine cones into 3 pieces.
The top part makes a small spiky-looking flower, the middle part gives that generic flower look and then the bottom looks sort of like a dahlia if turned upside down.
You can make a 4th type of flower by pulling the bottom few prongs off of the small spiky flower and gluing them to its side making a more compact, bud-like flower as shown in my pic above.
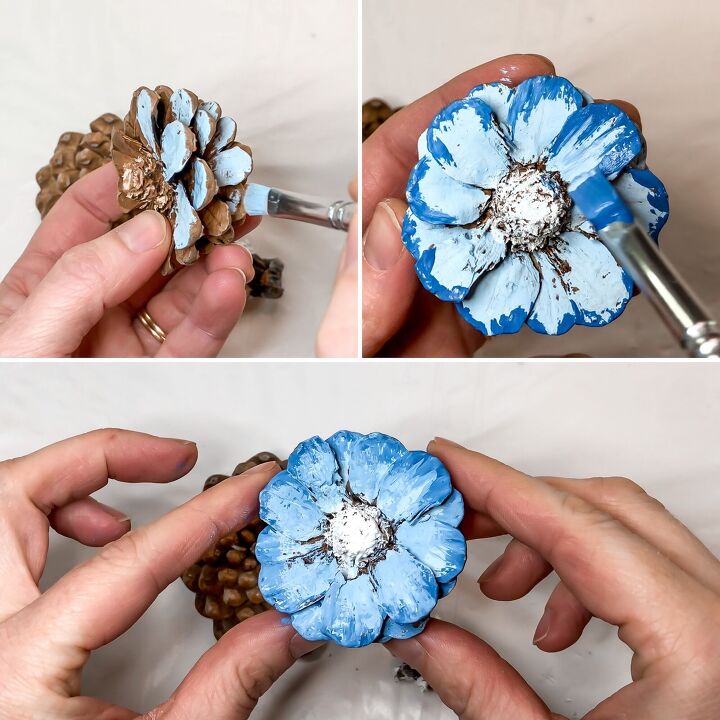
Paint the flowers however you like. This basically determines the whole look of the wreath so plan what colour scheme you want to go for.
Bright oranges and yellows would be lovely for summer and if mixed cleverly with other key shades would probably cross over nicely into fall 👍🏻
I'm not against making a wreath for every season but if I really like one that I've made, I want to keep it up for as long as possible. I don't like feeling as though I have to take it down as soon as a new season comes along.
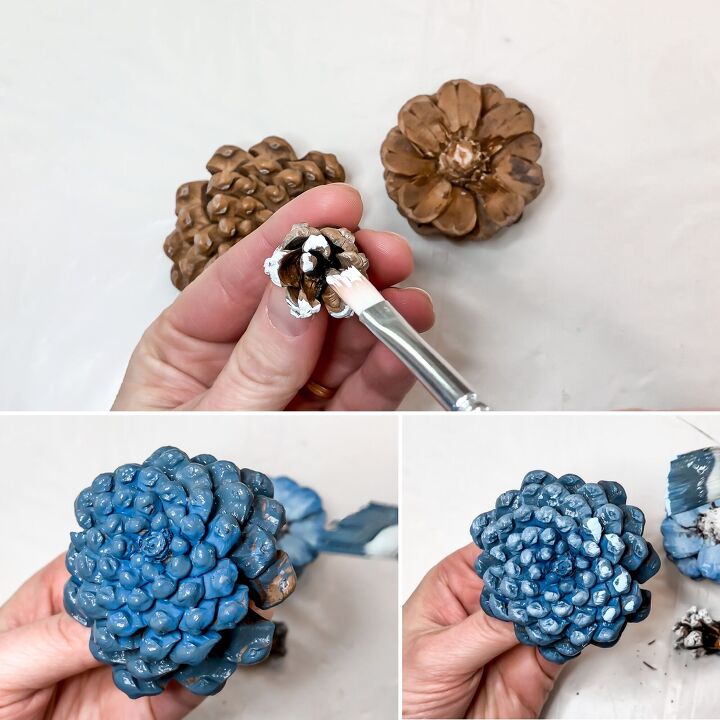
I went with cool blues and pinks, with varying shades of white and grey, which look great for winter and spring!
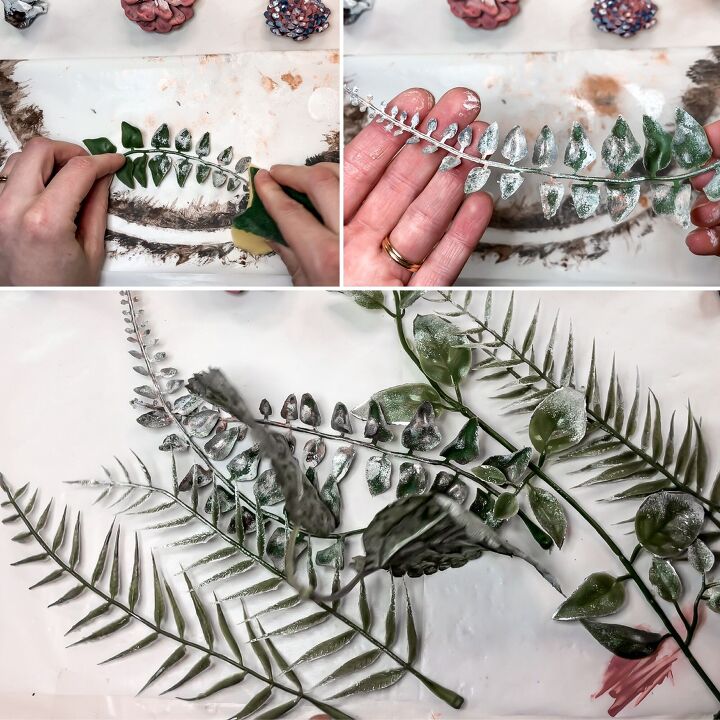
I also add faux foliage to my wreath. Add real foliage if you prefer but I personally like knowing it isn't going to break or disintegrate.
I sponge on rose gold, white and silver to give it a pretty and frosty look.
If you're making that summer/fall wreath, I think gold would work well.
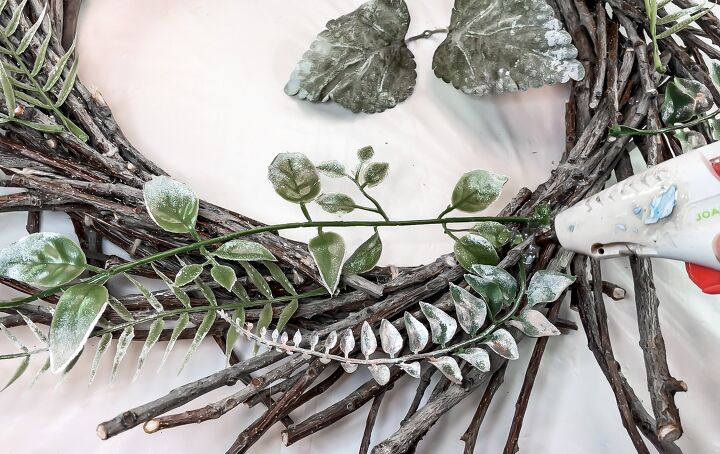
6. Assemble the wreath
With all your individual elements completed, it's time to assemble them into one beautiful piece.
Start by gluing the foliage in place around the twigs. I focus on the lower half of my wreath for this.
I also have in mind that I want my flowers to be concentrated to the lower half of the wreath and slightly to one side. It might be worth planning your composition out too.
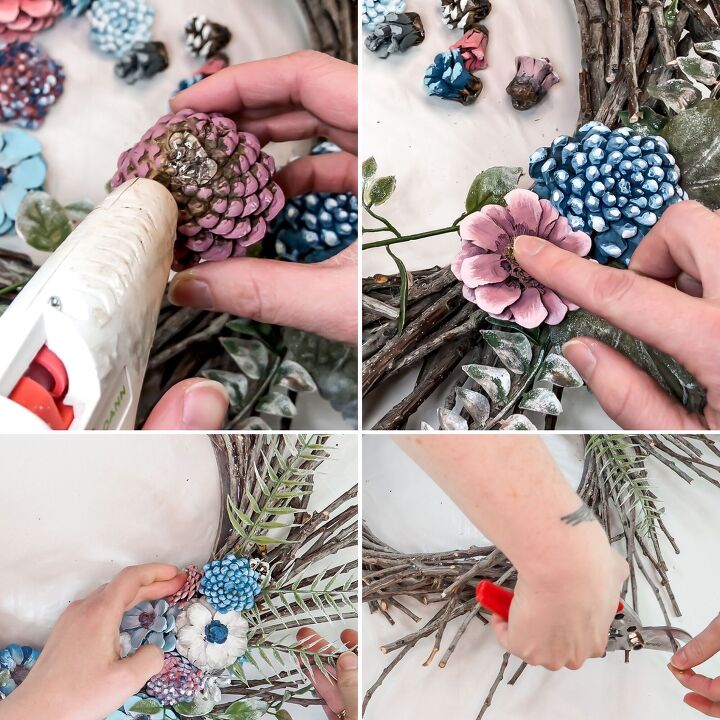
Hot glue the backs of your pine cone flowers and hold them in place.
Use the little ones to fit into small gaps that have been created and add flowers to the inside of the wreath too - not so far inside that the wreath has trouble laying flat when you hang it up though.
Keep going until you've used as many of your pine cones as desired.
Use this opportunity to snip at any rouge or gangly twigs that look out of place so that the overall look is exactly how you want it.

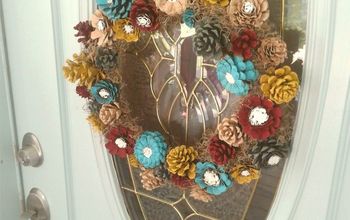
DIY pine cone & twig wreath
Then all that's left to do is hang it up and show it off! I hope you've enjoyed this tutorial. Let me know if you think you'll give it a go!
Please remember to check out my YouTube Channel and consider subscribing, that would be amazing! 👍🏻
I also have an Etsy Store where I sell lots of handmade goodies so feel free to check that out too.
Thanks again so much for viewing my post today and until next time,
Happy crafting x

DIY fall wreath ideas
Resources for this project:
See all materials


Comments
Join the conversation
-
I too, love to gather things from nature and bring them into my home. Your wreath is so beautiful. You have a way with painting the cones to make this work. I think I may want to try and make this too. Thank you.
-
Awesome ! Really like that! 👍


Frequently asked questions
Have a question about this project?
By far one of the most beautiful wreath ideas, can't wait to try it. I pick up pinecones everywhere I go. Thanks you!!!
I’ve been saving pine cones for a while now just for a project like this. Your tutorial was the best I’ve ever seen. Thank you, thank you ,thank you. Do you have a special way to hang it?
Very nice! I didn't see the kind of paint you used listed or mentioned. Did I miss it?
what is the purpose of the vinegar?