DIY Solid Wood Lamp With a Wooden Shade

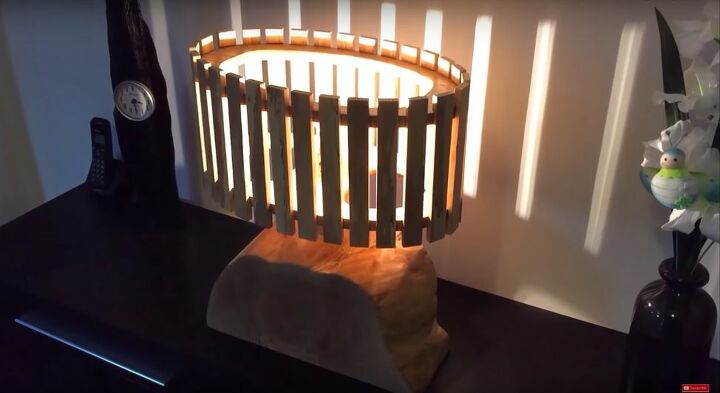
Have you ever found a piece of wood so beautiful that you wanted to make something special from it? When I found this chunk of ash, I knew that it couldn’t be used for just any old project, it needed something that would place its beauty front and center. In the end, I found the perfect project for it, a solid wood lamp! This project is simple, yet creative, and shows off the natural beauty of the wood I used.
Tools and Materials
- Large chunk of ash
- 3 ash planks
- Router
- Router flattening sled
- Circular saw
- Tape measure
- Pencil
- Plywood
- Square ruler
- Nails
- Hammer
- String
- Jigsaw
- Can (used for tracing)
- Screws
- Table saw
- Electric drill
- Wood glue
- Clamps
- Hardware for a lamp
- Rubber bands
- Sandpaper
- Varnish
- Paintbrush
- Wires for a lamp
I used a lot of power tools to accomplish this project. If you don’t have all of the power tools, there are places where you can use regular saws, however it will take a lot longer and require quite a bit more elbow grease.
I flattened the wood using a router and a router flattening sled. The flat sides will become the front and back of the lamp, so it’s not essential that they be completely flat, but I didn’t want any bits of wood sticking out. I used a router flattening sled that I made myself. They are especially useful when planing end grain, which is exactly what I was doing here.
Using a circular saw I created a flat end to serve as the bottom of the lamp base. My chunk of wood was quite thick, so I had to first cut one side and then flip the wood and cut through on the other side. I did the same to create a flat top as well.
In order to make the lampshade, I needed to cut two pieces of wood with identical outside edges, so I created a template on a piece of plywood to help me cut them to the exact dimensions. First, I found the center of the wood using a square ruler and a pencil. Then I measured where I wanted the edges of my shade to be. I wanted it to be rounded and I have a pretty ingenious method to do this.
First, mark where you want the outer and inner edges of your oval to be.
Then, add nails to each of the two inner edges, and one for the outer edge.
Next, tie a string that stretches from the inner edge of one side to the outer edge of the other.
Now remove the outer nail and, using a pencil, trace an oval. The string will create the shape for you.
Cut the outer edge using a jigsaw. Now you should have an oval. Using a can, I traced the cut outs that I wanted to make for the base of the lampshade, and then cut those out with a jigsaw as well.
Using a can, I traced the cut outs that I wanted to make for the base of the lampshade, and then cut those out with a jigsaw as well.
Once the template was complete, I moved on to making the bottom of the lampshade. I screwed the template into a plank of wood and then traced it using a router. This was a quick and easy way to get the exact shape I wanted with maximum mobility.
Using a jigsaw, I cut out the middle of the template that I had made. Then I repeated the same process that I used to create the bottom of the lampshade.
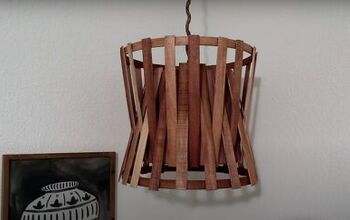
Because I wanted the entire lamp to be made of wood, I had to figure out how to translate a lampshade into wood. I came up with slats! Using slats, I could block out enough light for it to not be blinding, while still allowing enough light through for it to be functional. To create the slats, I cut a board of ash into pieces using a table saw.
I wanted the slats to easily fit the shade. In order to achieve this I added notches to each end of the slat. This would enable the slat to fit comfortable over the bottom and top pieces of the lampshade. Then I could simply secure them with wood glue instead of having to worry about nails or screws.
Before I could assemble my lamp, I needed to make holes so that I would be able to wire my lamp at the end of the project. Using a drill, I added a hole to a wooden block, and then did the same to the lamp base.
With all of my pieces ready, it was now time to assemble my DIY solid wood lamp. I drilled two holes in the wooden block as guides for my screws. Then I glued the block onto the base and screwed it in for good measure. I made sure to use a metal rod inserted through the block and into the base to make sure that the holes that I had drilled on each of them lines up. Next I drilled a hole in the center of the base of the lampshade, through which I would wire my lamp. I added some hardware to make sure that everything was secure.
Now it was time to finally see my design come to life! With the lampshade base secure, I took two of my slats and connected them to opposite sides of the lampshade. Then I slotted the top of the lampshade into place. Once I was happy with their placement, I took each slat, added a bit of wood glue in the notches at each end, and attached them to the lampshade. With the first few I used a clamp to make sure they didn’t budge. As I added each slat, I used another slat to make sure that they were evenly spaced. Once I had finished one side of the lamp, I secured the slats with a rubber band to make sure that they dried without slipping. Then, I continued gluing the remaining slats, using the rubber band to keep them in place.
I lightly sanded the lamp to get rid of any rough spots. Then I used a clear varnish to seal my work. I chose not to use a stain as I wanted the natural beauty of the ash to shine.
Using the holes I had already created, I wired the lamp and installed the light. These lamp wiring kits are easy to find and install yourself. They also tend to cost around $10, so it’s not too expensive to create a lamp you love.
Isn’t it majestic! I love the shadows the lamp creates when it’s lit at night. I’m so happy that I used ash to build this DIY solid wood lamp. Its simple beauty adds so much to the lamp itself. Have you made a lamp yourself? Let me know in the comments below!
Enjoyed the project?
Comments
Join the conversation
-
 Sally Gillies
on Apr 25, 2023
Absolutely unique! Great photos of your process, too. Thank you for posting.
-
-









Frequently asked questions
Have a question about this project?
How much do you want for it?