Installing a Reclaimed Wood Accent Wall In My Workshop

This post was sponsored by Centennial Woods. All opinions are my own.
Have you ever wished you could add a touch of warmth and texture to an otherwise boring space? That's how I felt when I was staring at the plain white walls in my workshop. This is a space where I spend a lot of time trying to be creative and building interesting projects, but looking around the space I couldn't help but feel like it was a bit plain and boring, which is basically the polar opposite of inspirational.
So I decided to install a reclaimed wood accent wall. It's only fitting, a wood accent wall for a wood shop. The nice thing about using reclaimed wood for the accent wall is that it's both aesthetic pleasing and functional. How could an accent wall be function? Great question! The wall behind my work bench is subject to a lot of abuse, it's constantly getting dented by pieces of wood and tools while I'm working. True, cladding the wall in wood isn't going to prevent me from bumping into it, but, since it's a reclaimed wood with an intentionally worn finish, all of those bumps and scratches are just going to add to that look. It's like if you ripped a pair of pre-ripped jeans. No big deal, right?
The Video
Before we start this project I should let you know that there is a video version of this post available. All you have to do is click play above.
I honestly think it's the best way to see how this project is done, but I know some of you prefer to read about your projects. so if that sounds like you, don't worry I've got you covered there too, just keep on scrolling!
Unboxing
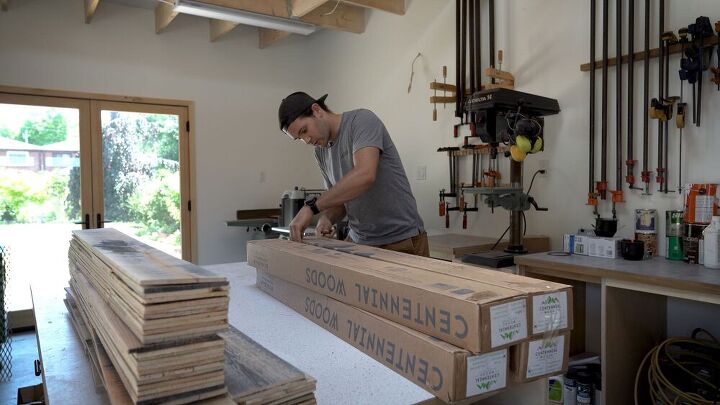
The first step of this project was pretty straight forward, I started by unboxing all of the wood that Centennial Woods sent me. I received 8 boxes, each containing 20 square feet of reclaimed wood. The wood comes in various lengths so you've got a lot of different sizes to choose from while you're working. Each board is approximately 1/4" thick and the color I choose was called Wheatland, though this product is available in a lot of different colors.
The area that I wanted to cover was approximately 140 square feet, but it's always important to order a little bit of extra material when attempting a project like this. Every time you cut a piece to make it fit you're potentially wasting some materials (and if you're anything like me, you might mess up a few cuts and have to re-do them  ). So it's important to take that into account when estimating how much to buy.
A good rule of thumb is to order 10% extra, but depending on how complex the area you're trying to cover is you may want to bump that number up to 15% or 20% if you know you have a lot of cuts to make.
Prepping
The next step was taking care of all the prep work. Just like any project, if you take the time to properly prepare for installing an accent wall, the job will go a lot smoother.
I started by removing all of my tools and materials. Then I removed all of the switch plates and outlet covers, and gave the whole area a good vacuum. I don't know about you, but I find it a lot easier to work in a clean and organized space.
See that bright green line? That's a laser level that I setup on the opposite side of the room. The line is perfectly straight and level and represents the top of where the accent wall will be. I didn't want to cover the entire wall of the shop. I felt that it would be a little too overpowering if it was the whole wall, so I set the maximum height at 5 feet off the ground.
Finally I marked out the location of each stud using painters tape. Since I built the shop, I had a good idea of where most of the studs were located. Obviously, not everyone is going to have intimate knowledge of how their space was constructed, so I've got a couple of tips to help locate studs in your space.
Outlets and light switches are usually mounted on the sides of studs, so try tapping the wall on either side of a switch or outlet. If one side sounds more deadened and less like a drum, that's likely where a stud is. Studs are generally laid out 16 inches center to center, so if you can locate one stud you can measure off of that one to find the rest.
Installation
With all of the prep out of the way I was ready to start cutting and installing the reclaimed wood.
I pulled a measurement from the left-most side of the room to the center of a stud and cut a piece of wood the same length on my miter saw.
Here's a little tip for using a miter saw: Don't rush it. Cut slowly and you'll get a cleaner cut!
Prior to installing each piece of reclaimed wood, I applied a thick bead of construction adhesive to the backside of the board. I used a nail gun to affix each board to the wall, but realistically once the construction adhesive dries it will do the lions share of holding the boards in place. Construction adhesive is amazingly strong once it sets.
While applying the construction adhesive I was careful not to apply it too close to the edge of the boards. This was to avoid any accidental squeeze out when installing them on the wall.
I loaded up my cordless 18 gauge brad nailer with some 1 1/2" nails, positioned the boards on the wall until they were just touching the laser level line and then began nailing the boards to the wall. I did my best to nail through each board and directly into a stud for maximum strength. Like I said before, realistically these nails are just holding the boards in place until the glue can dry, but it never hurts to make things as strong as possible.
The first row went in without much difficulty...
Measuring Around Outlets and Switches
But the second row was going to be a bit more challenging. On this row I had to cut around a lot of outlets and switches.
I carefully measured the location of each outlet and switch, and translated those measurements onto the appropriate boards. On the left and right side of each switch you have a good 1" margin for error since the switch plate cover is much larger than the switch itself. However, you'll want to be careful when measuring the vertical location of the switch. It's important that the boards sit behind the "ears" (the metal tabs at the top and the bottom of a switch or outlet) of the switches and outlets. That will ensure that the switches and outlets sit proud of the new wall surface like they are supposed to.
I actually messed this part up, and didn't do this for the first five or so switches, so I had to go back at the end of the project and shim them with little off cuts.
Cutting Around Outlets and Switches
With the lines scribed onto my boards I cut them out using a jigsaw. Don't worry if your cuts aren't perfectly straight or super clean because they'll get covered up once you reinstall your switch plate covers.
Just take your time and cut as closely to the lines as you can.
Once I got past the second row it was smooth sailing for a little bit. I chewed through boards and glue and made a lot of progress in a short amount of time.
While installing each board I made sure that I didn't have any cuts lining up on adjacent rows. This is practice that I carry over from installing hardwood floors. With hardwood floors it helps to keep everything straight over time, but here there wasn't much of a practical reason to do it, I just don't like the look.
The Last Row
Unfortunately the last row was a little smaller than a full piece. It never works out just perfectly does it? To figure out the size of my final row I measured from the floor to the last row I installed, set my table saw to that measurement and ripped the boards.
The little push block you see me using in this photo is a great addition to my shop. It's highly customizable and helps keep my hands away from the spinning saw blade.
After ripping the boards down to size, the installation was a breeze. I glued the back of them and nailed them in position.
I was really happy to see this corner of my shop get a wall covering. It's where I store all of my rolling tools and I was constantly denting and scratching the walls while putting them away. The reclaimed boards will provide some much needed protection.
Capping The Top
With that last row in I was ALMOST done, but there was one last job to take care of. Looking at the top of the accent wall you could see a raw edge that needed to be covered.
I bought some 3/4" by 3/4" corner molding from a home improvement store and ripped it down so that it was more like a 3/4" by 1/2" on my table saw.
I then painted the corner molding using some left over wall paint from when we built the workshop. Painting it the same color as the wall will help it blend and bridge the gap between the two different surfaces.
Thankfully I'm pretty meticulous about labeling and saving paint colors, it really pays off in situations like this.
After the paint dried I nailed the corner molding to the top of the accent wall to cap things off and cover that raw edge.
I then reinstalled the switch plate covers, put all my tools back in place and stood back to admire my work.
Enjoying It
I was completely floored at the difference this accent wall made to my space. Not only is it functional, adding protection like I talked about before, but it just makes the whole space feel so much more warm and inviting.
It really feels more like a studio where I can create cool art rather than a cold sterile work environment.
Typically a product like this would be used in a home or office, but I think it works just as well in a workshop environment.
Alright, that's it for this build everyone. Thanks for reading!
I hope you enjoyed this build, if you did you might want to check out my YouTube ( YouTube.com/ZacBuilds) and Instagram ( Instagram.com/ZacBuilds/) to see the rest of my builds.
Big thank you to Centennial Woods for sponsoring this build. Their product was a pleasure to use and I'd be happy to work with it again any time!
If you have any questions or comments hit me with them down below in the comment section!
DIY home decor using reclaimed wood
Enjoyed the project?
Resources for this project:
See all materials













Frequently asked questions
Have a question about this project?
who sells centennial woods wheatland reclaimed?
Why didn’t you just remove the wall cabinets and then reattach them afterwards. Seems like it would have been less cutting. Also, why not measure the with of the wood and then measure up from the bottom to avoid cutting the bottom piece?