DIY Salt Dough Mountain Wall Hangings

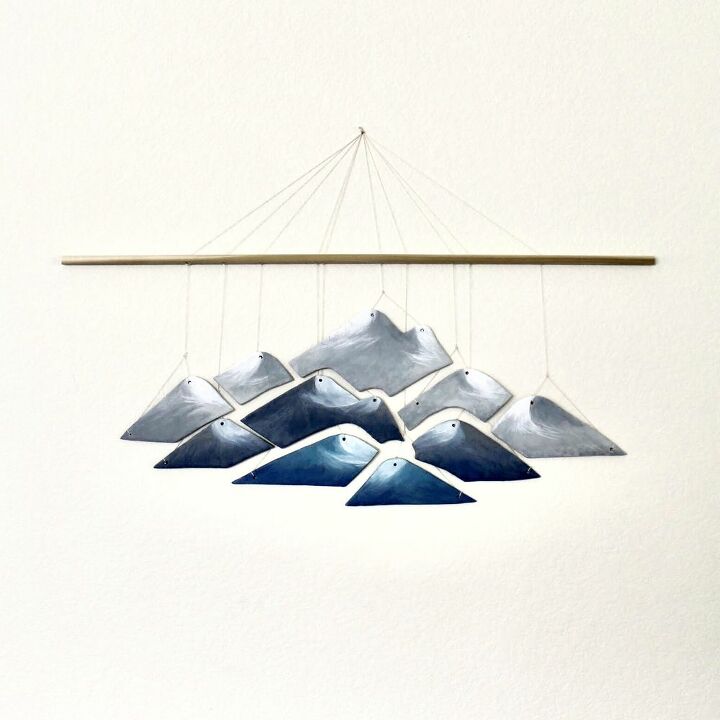
In my opinion, salt dough is one of the most accessible and versatile materials to use in crafts and so easy to make. I love to create wall hangings using salt dough so I’m here to share with you how I made this mountain inspired salt dough wall hanging.
I will share with you all the tools I used and the steps I took to make this piece but I will also give you ideas and alternatives if you don’t have all these items.
What you will need to make exactly what I made:
- Flour
- Measuring cups
- Salt
- Tap water
- A rolling pin
- A wooden dowel (under a dollar from Walmart)
- String
- A drill
- Scissors
- Paints and paintbrushes
- A basic knife
- A straw
- Glue
What I did first was sketched out a design of what I wanted to make. Don’t worry about it being exact but this will go a long way to helping you keep an eye on what you want your salt dough pieces to look like. If you have a printer you could even print your image out and cut your shapes out to use as stencils. I don’t have a printer unfortunately but if I did, I would definitely choose this option.
Now time to make, shape and bake your salt dough. There are many recipes online but the one I find that works best for me living In Denver with the dry air and high altitude is as follows.
Salt Dough Recipe
- 1 cup of flour
- 1/2 cup of water
- 1/2 cup of salt
- Bake for a total of 4 hours at 200F
First, I sift my flour into a bowl and then add the salt by sprinkling it into the flour evenly. I then add all the water at once and mix with my hands.
The mixing does take a while and though it may be tempting to add more water, don’t. I find my salt dough cracks more if I add more water. Need the mixture for a good 10 to 15 minutes until you feel it is really well combined and then roll out flat with a rolling pin. I like to roll until the dough is about 5 or 6mm thick.
Using a knife, cut out your shapes, or cut around your stencils if you printed them out, and then punch 1 hole at the top and 1 in the corner of the long end of your salt dough shapes using a straw.
You may find that you don’t get many cuts from your salt dough mix based on my recipe but I find if you double the mixture it becomes a lot harder to work with and to get a good consistency from the dough, therefore, I suggest you make 2 or 3 batches of the dough instead of 1 large batch.
Then it’s off to the oven.
Place your shapes on a baking tray on grease proof paper and place on the middle shelf of your oven on 200F for 1 hour.
After an hour, take your tray out of the oven and flip your pieces. After you have flipped them, place some oven prove pottery on top of your pieces to help keep them flat.
For the next 3 hours, just keep an eye on your salt dough and flip as your feel necessary to make sure they fully dry out. Watch out for the corners and edges making sure that they don’t start to curl and weigh them down with oven proof items.
Lay your pieces out to cool before painting them. I then used my original sketch again to keep me in check with my original idea and to remember where each piece goes.
In the past, I’ve experienced my salt dough pieces cracking and rubbing against the wall once they are up, so this time I decided to coat each piece with cross-hatched glue from my glue gun. I find this gives the salt dough good rigidity and a little buffer when up against the wall.
Next, you want to start threading string through your salt dough pieces using the holes you made earlier. I used one long piece of string, at least 2 feet long, to tie to the first hole and then tied a shorter piece of string from the second hole to the longer piece of string. I then neatened the knots but cutting any excess string. The reason I used 2 pieces of sting and 2 holes was so that when the salt dough shape dangles on the wall, one end doesn’t droop down due to the center of gravity. Instead, the shape should hang straight just like your sketch.
Keep repeating this with all your pieces making sure that you leave lots of length on your string for later and making sure that all your pieces hang straight when they dangle. This can be tricky to do but it’s really important for the overall affect when you’re finished.
Now, lay your shapes out as you want them to appear on the wall and then lay your wooden dowel down parallel to the top of your mountain scene but leaving a small gap of roughly 3 inches. Then gently pull all the pieces of string straight up and rest them on the wooden dowel. Take care not to move your pieces out of their over all shape when doing this.
Then using a ruler, measure the spaces between each piece of string, both along the dowel and closer to the salt dough pieces to make sure that the gap is same at both points. This will ensure that once you secure your string on the dowel that the salt dough shapes remain the correct distance apart from each other when they hang on the wall.
Once you are confident that each string is perpendicular to both the salt dough piece and the wooden dowel, mark a small dot on the dowel with a pen to indicate where to drill a hole. Do this with each piece of string.
You could of course simply tie the string around the dowel which would give you the ability to slide the salt dough shapes to the left or right once they hang on the wall. This way you can easily rectify a mistake if one is made. You would also not need a drill.
If you chose to carry on as before, now drill holes through each marked dot and then thread through the corresponding piece of string for that hole. Secure each bit of string in place at the right tension by discreetly putting some glue down the drilled holes.
Pull all the pieces of string together and tie in a secure knot.
Be extremely careful when lifting your creation up to place against the wall as each piece of salt dough mountain will likely twist and turn.
Find a spot in your home where you want to display your creation and loop the tied string onto a nail, and there you have it.
This was a mixed bag of “easy-peasy” and “oh, hello...!” so be patient and take your time, especially with the threading part. Getting it right will make the difference between this being stunning or yikes.
Good luck and happy crafting!
Enjoyed the project?
Resources for this project:
See all materialsComments
Join the conversation
-
 Doreen Kennedy
on Dec 31, 2020
You really made turned ordinary salt dough into a piece of art. Definitely not your child’s kindergarten dough art! Although, I still have my kids precious dough art.
-
 Hannah Somerville's Crafty Tutorials
on Dec 31, 2020
Aw thank you, Doreen 🙏🏻
-
-
-
 Carol F
on Dec 28, 2024
Very clever and your painting technique makes it look 3 dimensional. Well done!!
-
 Hannah Somerville's Crafty Tutorials
on Dec 28, 2024
Thank you ❤️
-
-











Frequently asked questions
Have a question about this project?
Can you make jewelry from this salt dough?
If you made windchimes would they hold up to banging against each other?
Could you use air dry hobby clay instead?