Statement Piece Dream Catcher

I love dream catchers but they can be so expensive to buy, especially if they are quite large in size! They are really simple to make, so here’s a tutorial on how I made my own statement piece dream catcher.
**Video tutorial on my Instagram page @_prettyliving
https://www.instagram.com/p/CArECtGnRIS/
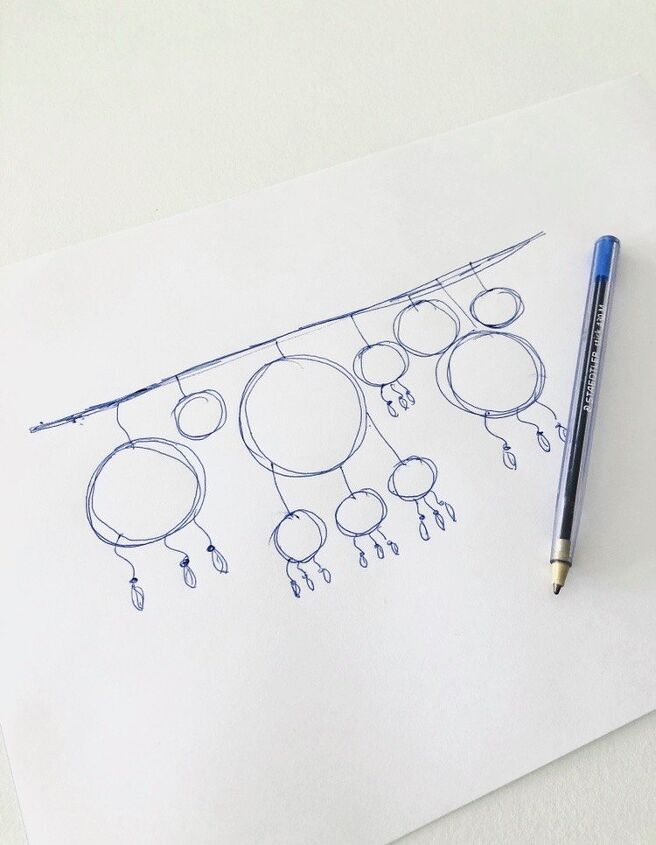
I started with a few sketches of what I had in mind. This was important in working out what would look good and also what materials I needed to buy, for example how many rings, doilies and what sizes I needed.
Tip: for each ring I use a doily that is up to 5cm smaller in diameter than the ring - the crochet doilies have a bit of stretch in them. If the doily is the exact same size or bigger than the ring it tends to sag when attached.
Once I had my doilies and metal rings (or hoops), I layed them all out and checked that all the sizes were okay.
Next, I put marks on the rings inline with the centre of each “petal” of the doilies, as a guide of where I would be attaching them.
Then I grabbed some twine and threaded it through one of the petals of the doily and tied it onto the ring - keeping inline with one of the markings I just put on. I made sure to leave around 20-30cm access twine as I would use that later.
Then I started from one side and began wrapping the twine around the ring, making sure to keep it nice and tight.
Tip: I used roughly 1 metre of twine at a time - it was a lot easier to work with.
Now this is the part where my markings on the ring came in handy, as once I hit the next marking I then threaded the twine through the next ‘petal’, pulled it tight and then continued on wrapping until I hit the next marking and so on.
If I ran out of twine halfway I simply cut another piece, tied it to my end piece, folded down the access bits and then just wrapped over them tightly as I continued on down the ring.
Once I had made it the whole way around the ring and was back at the start, I just tied the left over twine onto the access bit I left at the start and then cut off the leftover, but leaving that access.
I then put some superglue on the knot, just to keep it from coming loose!
Next I cut some small lengths of twine, and threaded a piece through a wooden bead so that it was just poking through the other side. Then I put a feather through the bead from the opposite side side, and put some super glue where the twine touched the feather to attach them.
Lastly, I started attaching everything together - this is where the access twine I left on the rings came in handy as I used it to tie them on. I attached everything with a double knot and put some glue on all the knots again.
I then found an old piece of bamboo (from the garden) and used it to hang everything from. A broken tree branch would work too!
To hang it on the wall I used some fishing line, I just made two small loops around the wood and hung it on two screws we already had on the wall.
Im really happy with how it turned out, it was so simple to make and also a lot cheaper than buying one this size.
Thanks for reading! A video tutorial of this is available to watch on my Instagram page @_prettyliving plus more of my DIY projects! :)
Enjoyed the project?
Resources for this project:
See all materialsComments
Join the conversation
-
 Stacey
on May 29, 2020
Yes I'm going to try this. I'm going to use large and small sea shells and driftwood.
-
 Jess | Pretty Living
on May 29, 2020
Oh that sounds nice ❤️
-
-
-
 Mary Cooper
on May 30, 2020
This is beautiful. I have so many of my moms and grandma's dollies just in a box. What a precious way to display them and not damage them
- See 2 previous
-
 Jess | Pretty Living
on May 30, 2020
Thank you so much ❤️ That’s really special that you have them 😍
-
 Peg Somerville
on May 30, 2020
Just a suggestion...to starch the doilies before assembly to help
keep their shape
-











Frequently asked questions
Have a question about this project?
Great idea and very pretty
Your doily looks very thick compared to mine, mine were made with a thinner string and I hope pulling on them will not stretch them and make it look too wonky.
I have so many doilies this is a good idea, hopefully I can follow your instructions, I usually have to see something being made to figure it out, do you have a video of this? 6-6-20 BE SAFE, 6', WASH YOUR HANDS...…...