


DIY Herringbone Floor in a Hallway

My hallway carpet was a disaster. Here’s how I made a cheap replacement and added a pop of color to our hall.
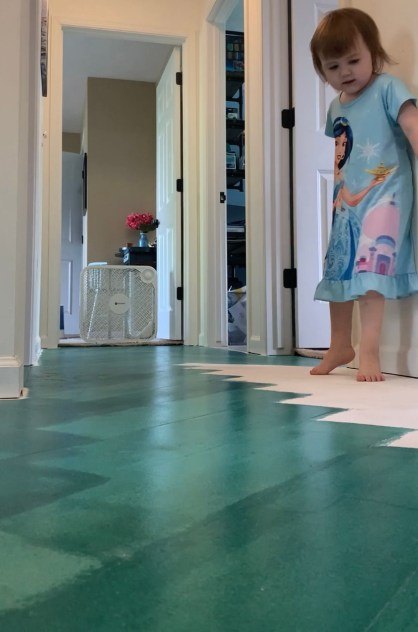
I’m sure I will be very sad when my husband’s cat finally dies. But, as you might’ve learned from one of my TikTok rants, I will not miss ruined carpets. We’re holding out on replacing most of our house’s flooring until after Lucky passes, but our upstairs hallway carpet had suffered so many Lucky “visits” that I couldn’t take it anymore. Eventually we will probably put all new carpet in the hallway and bedrooms because this is Michigan and it gets COLD up there in winter, but for now I found a fairly inexpensive and kinda cool new flooring solution. Is it temporary or is it permanent? We’ll see when the time comes for carpet in the bedrooms.
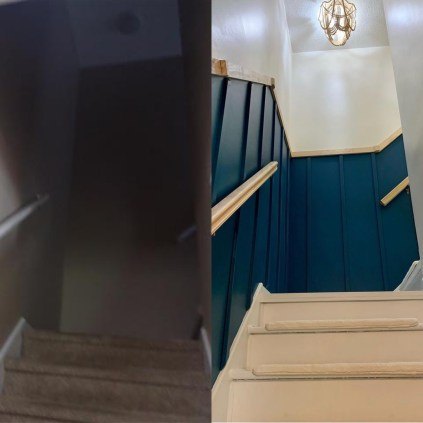
For the upstairs stairway, I’d already yanked the brown carpet (this house’s grossest DIY project so far) and painted the wood treads and risers white to add light to what was a very dark and brown stairway. Seriously, as the picture shows, it was THAT dark without a light on during a sunny day.
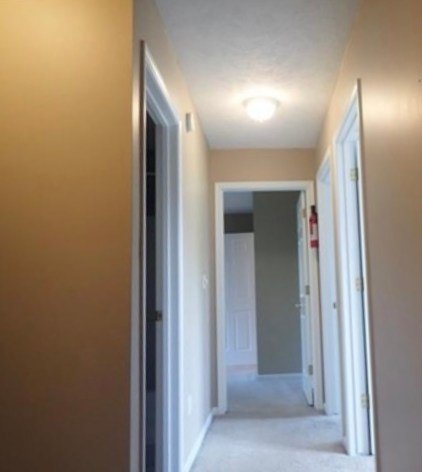
When I fixed the stairway, I also painted the hallway walls, so at least our hallway was already brightened with lighter paint like the stairway. I’d also slightly updated the doors by changing to more modern, black hardware. But that carpet stayed…and stayed…and stayed.
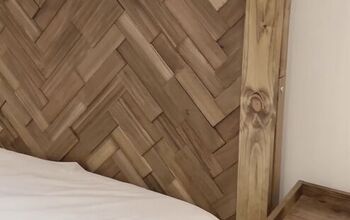
After some arguing about the hallway’s flooring, my husband caved and let me apply the same solution from our stair landings to our hallway floor. For those landings, I’d used leftover 1/8 inch plywood to make herringbone flooring. I painted them white to match the stairs, and they’re a nice little touch. So, to extend and tie together the look of the stairway into the hallway, we agreed to make the hallway herringbone as well.
Supplies:
(See my website’s blog post for purchase links)
- 4×8 sheets of 1/8 inch plywood
- Wood putty
- 5/8 inch brad nails
- Primer
- Paint (I used Royal Pine)
- 6-inch paint roller
- Wood corner molding (if needed for a hall meeting stairs)
- Polyurethane
- Quarter-round trim, primed
- White trim paint
Step 1: Yank up that carpet! This was equal parts extremely gratifying and disgusting. It’s actually not that hard to get up carpet, but it does take time. And it’s messy, especially if you have 22-year-old carpet that’s been frequented by a cat who can’t be bothered to go down to the litter box! Anyway…
I started by using a razor knife to cut the carpet at the doorway of our bedroom at the end of the hall. I used a straight board to make sure my cut wasn’t uneven across the threshold. Once that was separated, I pulled that end of carpet and peeled it back to roll up as I went. At the doorways to my daughters’ bedrooms, I cut the same way to make straight lines, sighing a little as I left the old carpet in their rooms and pulled back the hallway carpet.
I lucked out in that my dad was around to help that first day, so he carried the rolled up carpet to the trash for me. I am very grateful for this, because it was gross.
With the carpet up, I then pulled up all the padding underneath the carpet. This stuff is lighter but usually stapled down a LOT, so there are many, many staples to pull free. Plus you have to remove the carpet tack strips that run along the walls, and those are pokey! Removing all this is tedious, but I used a combination of pliers, a hammer, and a screwdriver to pop it all loose.
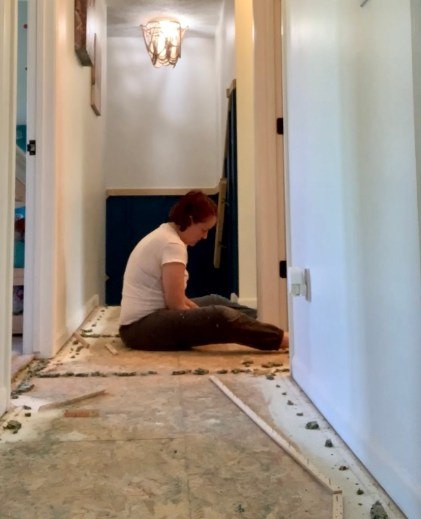
Once that was done, all that was left was to sweep up the mess, and no more gross carpet!
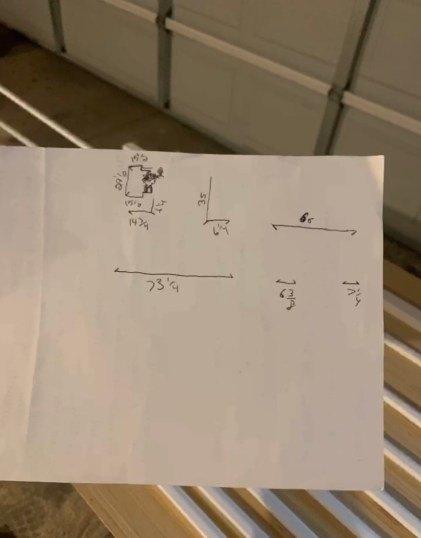
Step 2: Mark a center line and measure. I learned one thing quickly when doing the stair landings – it takes a lot of math to make a herringbone floor. To make sure everything would be laid out correctly in my much bigger hallway, I made a straight line down the middle of my hall by using a marker and a board that my dad assured me was straight. This way, I could make sure each board was centered to keep my pattern right.
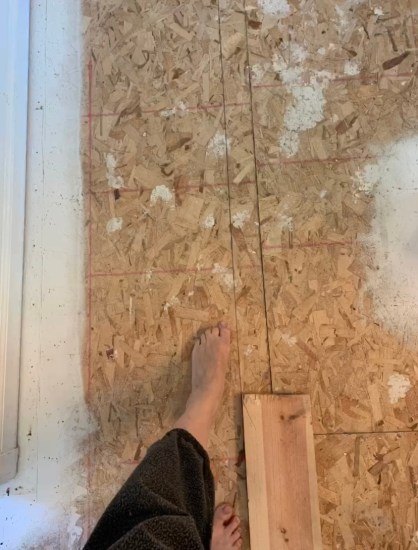
I’d used 6-inch wide boards for the landings, so it made sense to keep the same widths for the hall boards. For the lengths, I decided to go with 24 inches so that I could use every last bit of my 4×8 sheets and not waste any. To be sure those dimensions would work, I measured from my center line to the wall and confirmed there would be a good fit for a 24-inch long board.
Step 3: Cut the plywood. I’d figured out the square footage of my hallway earlier and knew that I needed 4 of the 4×8 plywood sheets to be safe, because cutting for herringbone can create a lot of little bits of waste that add up. Cutting the plywood sheets in half to get 24-inch lengths was my first step, and my dad’s table saw came in very handy for that. (You could use a circular saw or jigsaw, but the table saw was FAST and made cleaner cuts.)
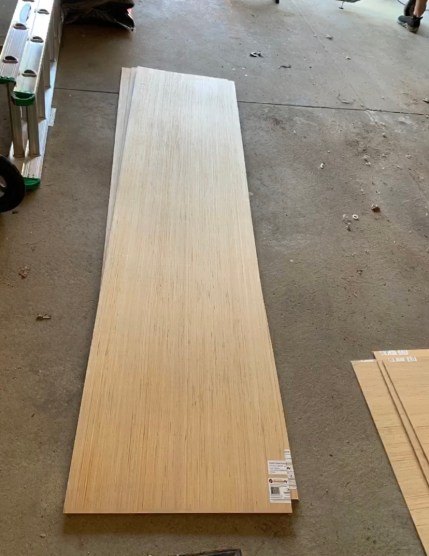
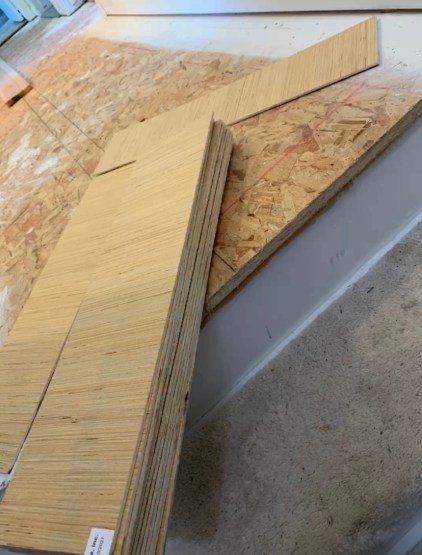
Then I needed to cut each of these long pieces into 6-inch strips. Again, it was simple with a table saw. When that was done, I had a nice pile of 6×24 inch plywood boards to start my floor. I DID leave one of these halved sheets intact for any unforeseen pieces I might need, figuring I could cut more 6-inch strips if I needed it.
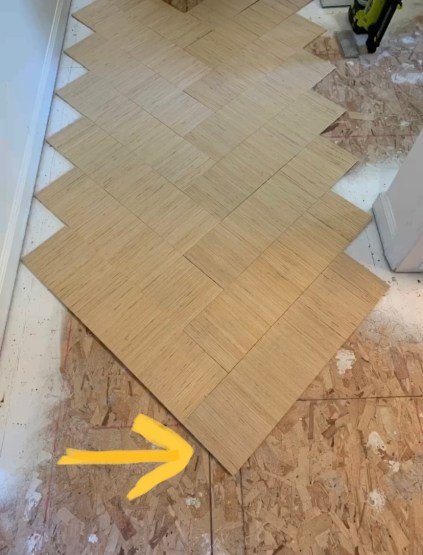
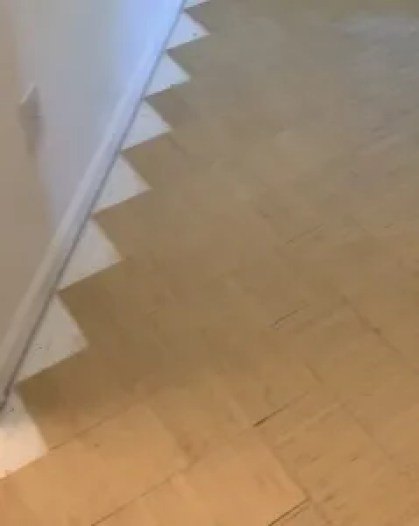
Step 4: Lay out the boards that will fit as whole pieces, THEN nail down. Before you get excited and start nailing down the boards right away, lay them out to be sure everything works. I started at the beginning of the hall by my stairs and put the first board down where a whole board would first fit without jutting out over the stairs. Then I put the next board in place to make a “V” across from the first board. It took a little adjusting to see where they needed to be so that there weren’t any gaps while ALSO being even over my center line drawn on the floor. (See photo above.) Once I had it right, this let me know that my center line needed to hit the 6-inch end of each board centered at 3 inches to make my angles work right and run straight down the hall.
Once I had this figured out, I continued to lay the boards following this same system.
After I had down all the boards that would fit as whole pieces, I quickly nailed them each down with my brad gun and 5/8 inch nails. In case I had to pull up the boards to adjust, I only put a nail in each corner for now. As it turned out, everything worked out and I could have secured them fully right then, but better safe than sorry. 🤷♀️
Note: Be sure not to use nails that are too long, in case you might have ductwork or wires running under your subfloor. Since this plywood was only 1/8 inch thick, it didn’t take much to nail it down into the subfloor.
After laying out this first section of herringbone down the hallway, I also needed to continue the pattern into a short section that turned the corner to our linen closet and my second daughter’s bedroom. A few more whole pieces fit here, so I lined them up to my existing pieces and nailed them down as well.
Step 5: Measure and cut thresholds. Remember how I left one of my halved sheets of 4×8 plywood alone? Glad I did! I ended up cutting that leftover plywood into pieces long enough to go across the doorways where my flooring would meet the old carpet still in our bedrooms and the tile in the girls’ bathroom. This is, after all, a hallway full of doors, and making these thresholds made nice framing for the herringbone floor. I cut these the length of the doors’ openings and as wide as the doorframe , which was a little over my usual 6 inches. I nailed these in place before finishing off my flooring so I’d know exactly how to measure for the pieces that would run up to these thresholds.
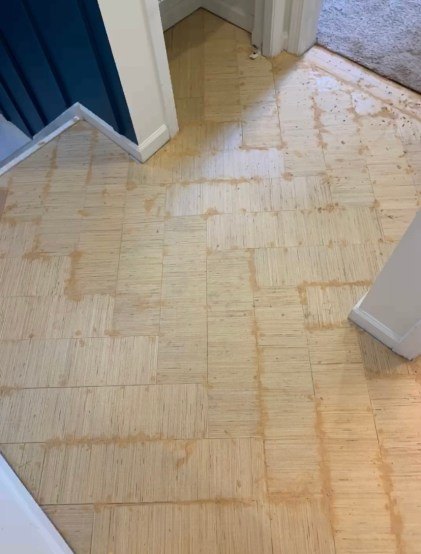
Step 6: Measure and cut any pieces needed to finish the floor. This, honestly, was the tricky part requiring a lot of math. You can see from the photo that I needed a LOT of little triangle pieces to fill in the spaces between the ends of my 6×24 pieces and the walls.
Those were pretty easy to cut with my miter saw, and I used extra 6×24 inch boards to make sure these triangles were the right size on the side that would touch the 6-inch end of what was already nailed down. It also helped that, for these triangles, I had some wiggle room where they’d be covered by quarter-round trim along the baseboard – EXCEPT for the triangles that would run up to my thresholds, because those had to be really close to perfect.
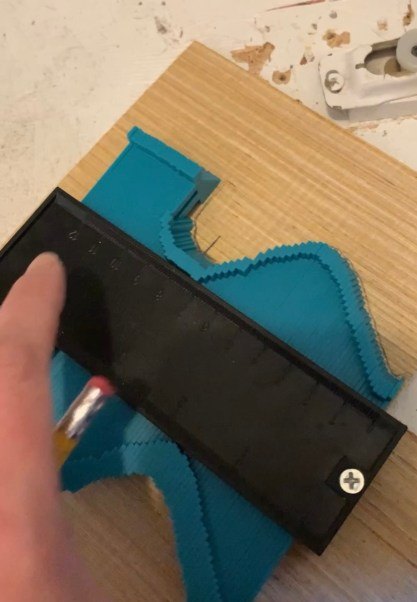
For other odd pieces, I held my 6×24 boards near my weird sections and used a tape measure to measure around where my flooring was missing. Then I used those measurements to sketch on those boards where I needed to cut. This took a while, and I often did one board at a time – measuring, cutting, and laying in place – to make sure I remembered exactly what I needed to do. For one VERY tricky cut around our linen closet’s base hardware, I used my contouring tool and my jigsaw to cut out where the hardware had to go.
Once I had my odd pieces cut, I put the rest of the puzzle together and nailed in these boards/pieces to finish laying the floor. With all the pieces down, I stepped on EVERY board to see if any were loose and especially nailed down where I felt any movement under my feet.
Another “odd piece” was the edging I needed for the end of the hall that went to the stairs. I used wood corner molding to create a kind of stair tread nose, and this I cut at the exact length of the space running across the top of the stairs. This piece was easy to then nail into place over the plywood. I’d done this to the stair landings earlier, so I knew it worked well without being a trip hazard. I actually like that in the dark you can feel for it and know where the stairs start. (If you’re not doing a hall that meets stairs, obviously you can skip this part.)
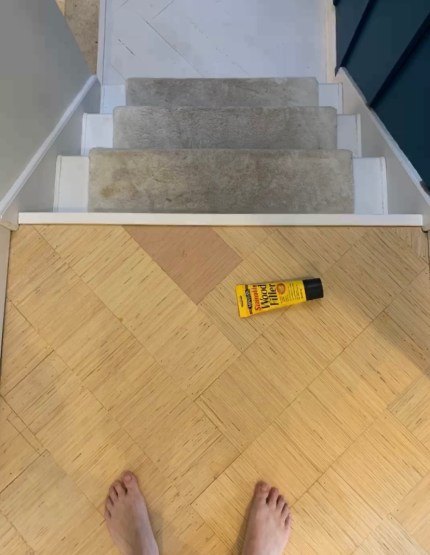
Step 7: Putty the nail holes. All that nailing left MANY nail holes to fill. I also had slight gaps where some of the boards didn’t quite meet. Filling all this with putty took a long time, but the end result was worth it.
Below you can see the threshold piece to my daughter’s room and also this corner section with the linen closet. See all that putty?! It actually wasn’t as bad as it looks – my kids helped with this part and got a little putty-happy. LOL
Step 8: Lightly sand the floor. My putty dried fast, so I swept up all the excess (that my kids helped with) and then went over the whole floor with my sander just to smooth down any rough spots. This step was simple and concluded with a simple sweeping job to get every last bit of sanded putty and dust.
Step 9: Prime and paint. I used leftover primer from our basement stash, starting at the far point in the hall and working my way to the stairs so I didn’t trap myself. (Lol. It’s happened before.)
It took a while to dry and looked a little uneven for whatever reason, so I did another coat of primer. However…
I initially was planning to paint the floor white to match the stairs and continue that look all the way. So, I thought it best to do 2 coats of primer to be sure the wood color wouldn’t come through the white paint. However, then I remembered that I live with a 2-yo, 3-yo, a dog, a cat, and a 39-yo messy husband. Therefore, a white floor in a well-used hallway didn’t seem like the smartest idea.
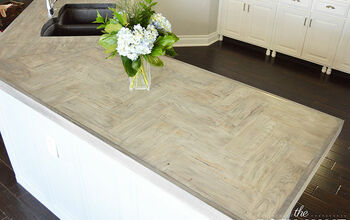
And so I changed to painting the floor green. This definitely didn’t need that second coat of primer because the green was certainly dark enough to cover the wood color. Oh, well – better planning next time.
How did I arrive at GREEN? Well, I decided to use the same “Royal Pine” green that I’d used elsewhere in the house because I had a lot leftover, plus I liked that it would tie the upstairs to the downstairs’ color scheme. And the dark green definitely would hide pet hair and dirt and crayon marks, etc. better than white. On top of that, I’d used a slightly celery-colored paint on the hallway walls, so I hoped that would play nicely with the green floor.
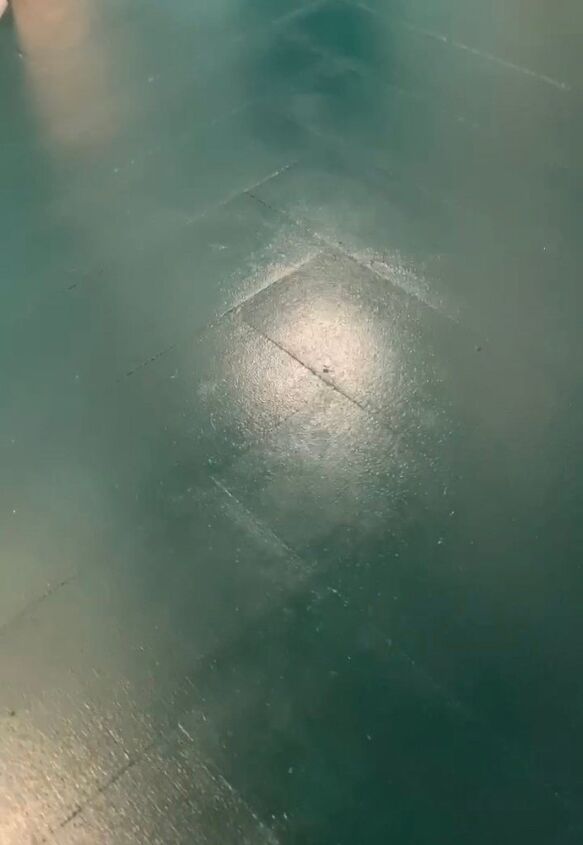
Crossing my fingers that this was a good idea, I found that the green paint went on really nicely. It also dried quickly, so I could do 2 coats to be sure it covered all that white primer. 🤦♀️ Whatever paint color YOU choose, I recommend using a 6-inch roller – the same width as the boards – and follow the pattern of your wood pieces. This way, I didn’t have any streaks going from board to board in any way that looked weird against the herringbone pattern.
Like I said, the paint dried really fast. Within a few hours, I was able to kneel on it and use a touch-up brush to finish the edges around my floor by the baseboards.
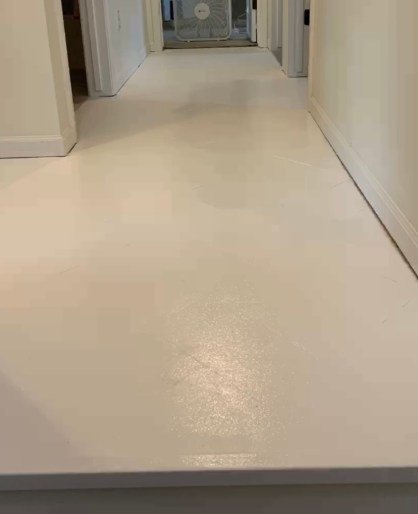
Step 10: Polyurethane. To protect the floor, I went over it with a quick coat of glossy polyurethane. Normally you’d use a brush to apply poly, but I was in a hurry plus wanted to avoid any brush strokes showing up, so I used another 6-inch roller and again followed the pattern of my boards. It went on easy and looked nice and smooth when I was done.
Step 11: Finish with quarter-round trim molding. To cover the edges where the plywood met the baseboard, I used primed quarter-round trim. It was easy enough to measure every part along the wall where I needed it, and I quickly sketched this and showed which way my angles needed to go when cutting – for the corners and/or just to add a decorative touch.
Then, I simply cut the trim pieces with my miter saw and nailed them in place with my usual brad gun. Once they were attached, I used some wood putty to fill my nail holes and then quickly touched up with spare white trim paint. I could have used caulk to also fill in any gaps between the baseboard and quarter round, but I’ll do that later if gaps appear – for now the paint did the trick.
Done!
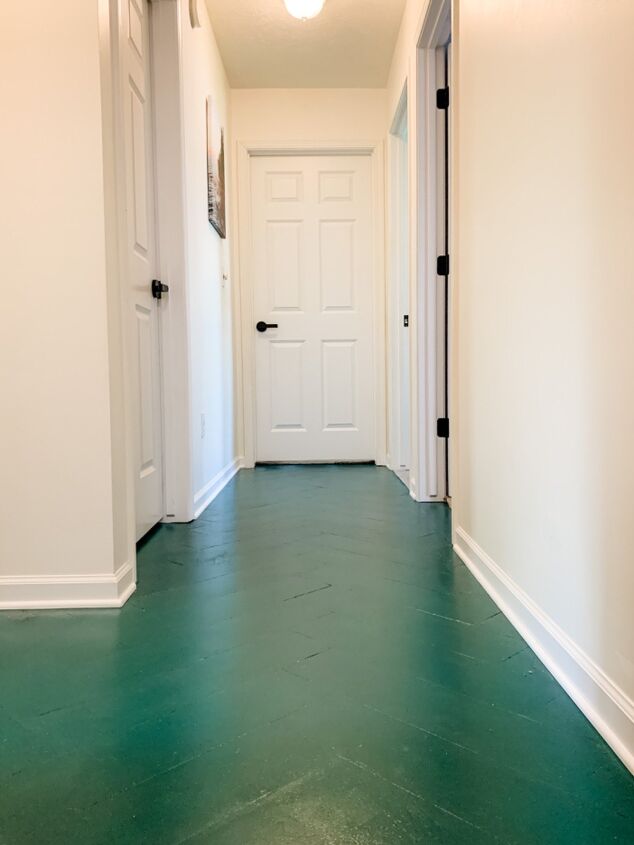
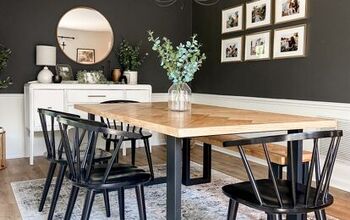
To my great relief, everyone likes the green floor and thinks it is a vast improvement…except the cat. 😆 I’m glad I didn’t go with white doors, white walls, white floors after all. The green is a bit unexpected but ties in with the color scheme of our downstairs, and it looks pretty sharp and makes this small hallways interesting.
Now to figure out art/pictures that work in this space…
Resources for this project:
See all materials


Comments
Join the conversation
-
Hi, this is great! I also have a “naughty” kitty (or two) who’ve destroyed our TV room rug. I’m on a very tight budget so I have 2 questions I hope you can answer for me:
1) Do you know if this project is cheaper than using faux-wood-look linoleum?
2) We have a lot of golden oak woodwork in our house, & I’d like to match the new floor to it. Stain probably won’t work (b/c the putty won’t take it), but do you think finding the right color of brown paint would make the plywood look more like faux laminate wood-look slats?
Thanks so much for your great ideas! I’m subscribing to your blog!
—Alexa F.
-
Thank you for your great advice & ideas! 😁


Frequently asked questions
Have a question about this project?
Wow a lot of work involved to complete your project! I just finished a bedroom with laminate floor tiles and that was not as easy as I thought it would be. The underlayment plywood was not flush and I had to sand parts of it down so the tiles would be completely flat. (there was carpet in this room when it was built and no need for the floor to be completely flush) Laminate tiles are tongue and groove so there is no raised edges. And there were even some patches on the floor where the tongue and groove were lifting up, so I brad nailed a few pieces down, but some would not stay down bc the nails were just not adhering to the plywood underneath. From your picture I see some of your wood tiles that are sticking up, probably bc floor was not completely flat or the nails, like my floor, were just not adhering to the plywood underneath. When all was said and done, with all the material that was needed to finish your project, the amount of labor needed, the time it took to complete it, was your project still economical compared to just buying laminate tile?