


How to Tile Over Tile the Right Way

By Brooke Ressell
You’re tired of looking at the same old tile in your kitchen or bath day in and day out. It’s outdated and unattractive, and you desperately need a change. Sound familiar?
After much consideration, you really wish there was just a simple way to give the tile a quick facelift without all the hassle that comes along with removing tiles. Because the thought of ripping out all the old tiles before you can even begin to put in the new makes the idea seem like such a big waste of your precious time and energy.
From creating a mess of epic proportions to finding a place to dispose of old tile, renting or buying tools you don’t currently own, and putting your kitchen or bathroom out of commission for a while, removing old tile before putting up new can sometimes seem like more trouble than it’s worth.
Fortunately, laying tile over tile is a viable option that can speed up the process of a kitchen or bath remodel. Read on to find out everything you need to know to get started today.
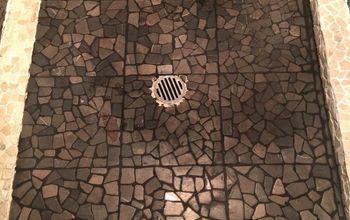
Photo via Emily Rone Home
Can You Put Tile Over Tile?
Absolutely! Putting tile over tile on walls, floors, and ceilings is not only a possibility, but it can actually produce great results you’ll be happy with. And you don’t even need to consult a professional contractor prior to completing this DIY project in your home.
What to Consider Before Putting Tile Over Tile
Before you begin, it’s always a good idea to assess the current condition of the tile in your room. In fact, there are several important things you want to keep an eye out for:
Tile and Adhesive Materials
Certain types of thin-set and mortar can only adhere to the back of tiles and a substrate—not the front side of another layer of tiles. Or perhaps you currently have ceramic tiles but you want to cover them up with glass tiles. To do so effectively, you would need to find a product that would adhere well to both surfaces so that the new tiles stay securely in place over a long period of time. To figure this out, read the manufacturer’s specifications for each product you’re considering carefully or contact them directly for more information.
The other consideration in regards to tile material is if you decide to go with peel-and-stick tile. In most circumstances, you can cover any type of tile with peel and stick tile. You just need to be sure to clean and prepare the surface properly by degreasing the entire tile area and sanding away any uneven spots.
Current Tile Condition
Tiles that are largely chipped, cracked, uneven, discolored, or mildewy should be removed instead of being covered up in most cases to prevent further damage to the subfloor, walls, or ceilings underneath them.
Tile Thickness
Make sure that adding a layer of tile will not add so much additional height to your floors or depth to your walls or ceilings that it becomes an impediment. Having too much height on tiled floors could make it a tripping hazard as you enter the room and require you to install some type of transition strip for safety purposes. Having too much depth on walls and ceilings can impact crown molding or the trim around windows and doors.
Changing Tile Direction
You can tile vertically over horizontal tiles and vice versa. Just make sure to prepare the surface well beforehand, use products you know will adhere well and last for years to come, and use spacers to keep tiles from shifting before they dry.

Photo via Construction2style
How to Tile Over Tile
Ready to put tile over tile in your kitchen or bath? We’ll show you step-by-step just how easy installing tile over existing tile can actually be. Let’s get started!
Safety Warning
Protect your skin, eyes, and lungs from tile dust by wearing protective gear during the entire project. A dust mask, safety glasses, and work gloves will add an important layer of protection while you work.
Tools and Materials Needed:
- 4-foot level
- Grease pencil
- Angle grinder
- Wood mallet
- Belt or orbital sander
- 80-grit sandpaper
- Shop vac
- Mild detergent with a degreaser
- Sponge or towel
- Measuring tape
- Wet tile saw
- Diamond-tipped blade for angle grinder (optional)
- Notched trowel
- Thin-set mortar
- Tile
- Spacers
- Grout
- Margin trowel
- Grout float
- Grout sponge
- Grout sealer
Step 1: Assess the Tile
The first step in laying tile over tile is to assess the original layer of tile. To do this, use a four-foot level and a grease pencil to mark any high spots on the tile or grout lines you find along the way.
Step 2: Angle Grind
Once all of the high spots have been marked, use an angle grinder with a masonry wheel to grind them down. You want the entire surface area to be as level as possible so taking your time now will create much better results in the end.
Step 3: Check for Loose Tiles
Then, use a wood mallet to gently tap on each of the tiles. If you hear a hollow sound, it means that the tile is loose. If you find any loose tiles, you’ll need to carefully remove them (try to keep them intact so you don’t need to buy new ones), apply a new layer of thin-set, lay them, and wait for them to dry before moving on to the next step.
Step 4: Sand the Tile
Next, use a belt or orbital sander and eighty-grit sandpaper to sand the entire surface area of the original layer of tile. This scuffs up any glazes on the tiles and helps them adhere to the incoming layer of tile.
Step 5: Vacuum the Tile
Now that the tile has all been sanded down, vacuum the entire surface area with a shop vac to remove any dust and debris.
Step 6: Clean the Tile
Clean all of the tiles really well with a mild detergent with a degreaser using a sponge or towel. This removes any build-up and prepares the original tile layer for thin-set and new tile.
Step 7: Rinse and Dry
Wipe the tiles down with water and a sponge or towel and let them dry thoroughly.
Step 8: Measure
Use your measuring tape to measure out the area you wish to tile. To mark the difficult cuts you need, use the grease pencil on the tile to mark exactly where it should be cut.
Step 9: Cut the Tile
Cut the tile using a wet tile saw. You can also use your angle grinder with a diamond-tipped blade in place of a tile saw if you choose. Wet tile saws are much easier to use for straight cuts, but some DIYers prefer angle grinders for angled cuts.
Step 10: Spread Thin-Set
Next, with the notched end of your trowel, spread a layer of thin-set directly onto the tile floor, wall, or ceiling you’re planning on covering. Then, spread a layer of thin-set on the back of the tile you’re about to set with a notched trowel, being sure to back butter it in one direction.
Step 11: Set the Tile
Set the tile in place, sliding it perpendicular to the combed lines on the surface, and press firmly.
Work Quickly
Step 12: Use Spacers
Use spacers to set additional tiles your desired distance apart. Typically, you’ll want to use two to three-millimeter spacers for walls and ceilings and five-millimeter spacers for floors to create precise grout lines.
Step 13: Repeat the Process
Repeat the cutting, back buttering, and setting processes until all tiles have been set in place.
Step 14: Allow to Dry
Wait out the recommended dry time on the thin-set product you purchased.
Step 15: Grout
Once the tile has dried into place, it’s time to grout. Mix the grout per the instructions on the label, use a margin trowel to scoop grout out onto the tile, then use a grout float to push the grout into the joints at a forty-five-degree angle, sweeping your grout float in large arcs to get good grout coverage across the entire surface area.
Step 16: Let Grout Set
Next, let the grout set. This typically takes between fifteen to thirty minutes but follow the manufacturer’s recommendations.
Step 17: Wash the Tiles
Once the grout has set, use a damp grout sponge (not too much water, which can wipe away too much grout from the joints) to clean all of the grout from the tiles. Change out the water frequently as you clean the grout off of the tiles and squeeze dirty water out of the grout sponge regularly.
Repeat this process several times until the tiles are nice and clean.
Step 18: Allow Grout to Cure
Next, allow the grout to cure for 48 to 72 hours depending on the grout manufacturer’s suggestions.
Step 19: Seal the Grout
Once the grout has cured, it’s time to seal it. Since grout is porous, it can soften when it gets wet, which in turn can cause the tiles around it to crack. Depending on which grout sealer you use (read the label for what types of tile it works on), it can be sprayed onto the grout or wiped on with a sponge or an applicator brush.
Have you successfully installed tile over tile? We’d love to hear about it; let us know in the comments below!
Comments
Join the conversation
-
A great tutorial. Lots of great tips. I learned over time you can tile large format tile over small format tile. The small format tile has so many grout lines that will grip the large format tile. Also one needs to use a mastic thinset rather than cement based mastic. That was my plan be when I remodeled my half bath. There was a dry concrete base the small tiles were adhered to. That is what they did back in the 50's, 60's, and into the 70's before cement board was invented.


Frequently asked questions
Have a question about this project?
Where can I get the peel tiles,,,,the ones you peel the paper off.