


How to Grow and Harvest Juicy, Delicious Watermelon

By Alexa Erickson
Juicy, hydrating, vibrant watermelon is a deliciously healthy fruit that exudes the essence of summer. The scrambling and trailing vine-like plant is one of the most popular fruits to grow in the garden, and although it requires a lot of space, sun, and water, it’s possible to grow in your own backyard. This how-to guide will help you plant, grow, and enjoy watermelon in your garden.
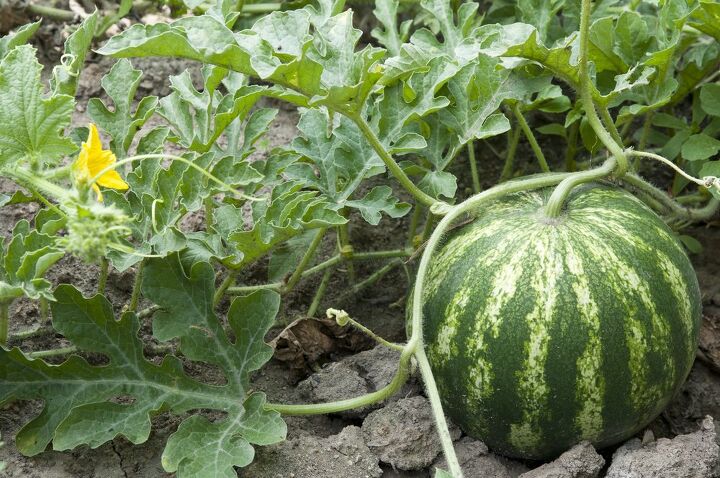
Photo via Shutterstock
When to Plant Watermelon
Watermelons require warm soil, so plan to plant them in late spring to early summer. In warm climates with long growing seasons (check your plant hardiness zone here), you can sow the watermelon seeds directly outdoors about two weeks after the last frost date, or when the soil temperature is 70 degrees Fahrenheit or above (you can calculate this using a soil thermometer).
For cool climates with short growing seasons, start seeds indoors two to three weeks before the last frost date, then transplant the seedlings two weeks after that date, or when the recommended soil temperature of 70 degrees has been reached. This is also when you can transplant nursery plants.
Pro Tip: Laying black plastic over your planting area can help warm the soil faster. Be sure to poke some holes in the plastic to let moisture through.
Where to Plant Watermelon
Planting watermelon requires ideal soil, lots of sun and water, and plenty of space. Here are a few factors to consider before deciding where to plant watermelon.
Climate
Because watermelons need a long period of warm weather to grow well, they tend to be more popular in warmer climates with long growing seasons. Don’t fret if you live in a cooler climate, though: You can still have success in growing watermelons by starting seeds indoors or purchasing young plants from a nursery (keep in mind that these will be very tender), and by growing shorter-season varieties. Depending on the variety of watermelon you’re planting, it can take between 70 and 100 days to go from planting to harvest.
Sun Exposure
Watermelons thrive in the most sun they can get. Plant watermelons in a spot that gets 8-10 hours of direct sunlight a day, avoiding areas where trees or your house may shade the plants—this can stunt their growth. Pro Tip: Growing watermelon in raised beds promotes good drainage and will hold the sun’s heat longer. Just be sure that you’ve got plenty of space!
Soil Type
Watermelons are heavy feeders that take all summer long to mature. For these reasons, it’s extra important to pay attention to soil detail where you plan on planting the watermelon. Start by performing a soil test, which will tell you the soil’s pH level and pinpoint nutrient deficiencies. Ideal watermelon-growing soil requires a pH between 6.0 and 7.5 and a loamy, slightly sandy, well-draining consistency.
To manipulate your soil into the right conditions for planting watermelon, mix high-nitrogen compost into the beds right before planting. (In homemade compost, grass, plant debris, coffee grounds, and fruits and vegetables are considered nitrogen-rich materials. If you use a store-bought compost mix, be sure that the percentage of nitrogen content is higher than the percentages of phosphorus and potassium.) Using compost to amend your watermelon bed’s soil will also help boost soil structure and water retention.
Plant Spacing
Watermelons are one of the biggest fruits to grow and harvest, so they require a vast amount of space. Each plant should have an area of up to 20 square feet to allow its vines to sprawl out plenty. Do not plant the fruit near other crops to avoid the possibility of crowding.
Companion Plants
Like we’ve said: Watermelons are big and take up a lot of growing room, so they’re most likely left best grown alone in their beds. Watermelons also exude allelopathic chemicals that hinder seed germination and seedling growth, which can kill off low-growing neighboring plants. If you truly want companion plants for your watermelon, grow the fruit next to established plants that grow up, like tomatoes and corn. Watermelon vines will also cover the garden bed and serve as a living mulch that will inhibit weeds.
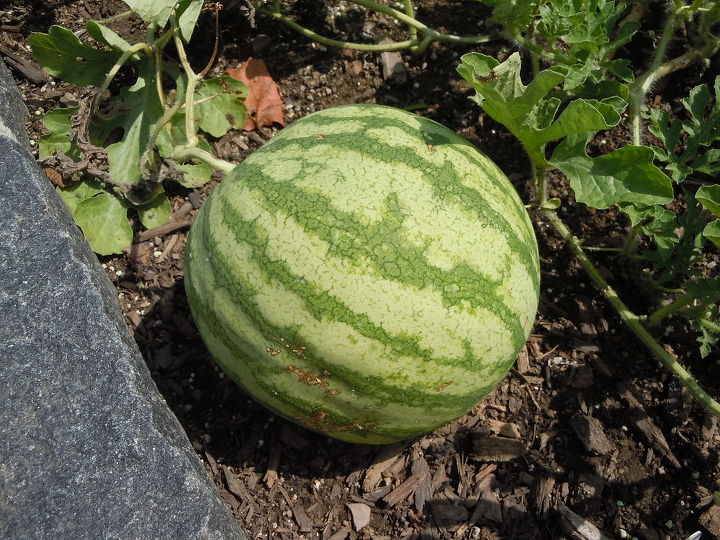
Photo via Walter Reeves
How to Plant Watermelon
After preparing your watermelon patch and making sure the soil is warm enough, it’s time to plant away. Start shopping for seeds in the winter to secure the watermelon variety you want, or hit up the garden nursery in early spring for young plants to transplant into your beds. Here’s how to plant watermelons from both seed and transplants.
How to Plant Watermelon from Seed
Tools and Materials Needed
- Small shovel
- Watermelon seeds
- Fertilizer or compost
- Measuring tool
- Floating row covering
- Watering wand or a watering can
- Scissors
Step 1: Add Fertilizer
Before you start digging and planting, mix 4 inches of fertilizer or 6 inches of well-aged compost into the top layer of the garden bed’s soil.
Step 2: Construct Watermelon Patches
Planting watermelons on mounds helps the plants get maximum soil drainage and sun exposure. Pile up soil mounds about a foot across and a few inches high. Space each mound 3-5 feet apart to give watermelon vines plenty of room to spread out.
Step 3: Sow Seeds
Press three or four seeds flat into the surface of the soil on top of the mound, about ¾ to 1 inch deep. Cover the seeds with soil and gently pat it down.
Step 4: Water the Seeds and Watch Them Grow
Gently water the seeds using a watering wand or watering can. Once the seedlings have reached a few inches tall, thin your plant, choosing the best-looking seedling sprouts and snipping the others off with scissors. You should have two seedlings per mound.
How to Plant Watermelon from Transplants
If you live in a climate with a growing season shorter than the required number of days to grow your watermelon variety, start seeds indoors. The seeds will germinate and sprout into transplants, which you will then plant into your garden bed.
Tools and Materials Needed
- Three-inch biodegradable pots
- Seed starting potting mix
- Watermelon seeds
- Spray bottle
- Scissors
Step 1: Fill Pots with Starting Mix
Filling each biodegradable pot with the seed starting mix up to about an inch below the rim.
Step 2: Add Seeds
Place three seeds in each pot, then cover with ½ inch more potting mix. Gently water.
Step 3: Place Seed Trays Near Window
Place the trays next to a window that receives plenty of sunlight. Water daily using a spray bottle.
Step 4: Thin the Leaves
Once the leaves of the seedlings are about 2 inches tall, thin them by choosing the best-looking seedling in each pot and snipping away the others.
Step 5: Harden Off Seedlings
About a week after the last frost, and when the outside air has reached 70 degrees, harden off the seedlings by placing them outside for about an hour each day.
Step 6: Prepare the Watermelon Patch
Prepare the watermelon patch once the soil has reached about 70 degrees using the tips we gave above. Dig mounds with planting holes large enough to place two seedling pots in each.
Step 7: Plant Seedlings
Place two seedlings in each hole and trim the top rims of each biodegradable pot until they are even with the soil level outside. Backfill the holes with soil, then gently water. Continue watering every day until plants are well-established.
How to Grow and Care for Watermelon
From watering to fertilizer choices, and all the way to the moment it’s time to harvest the watermelon, here’s what you need to know about proper growth and care for this sweet summer treat.
Watering
As previously mentioned—and as the fruit’s name suggests—watermelons require ample watering. It’s important to water only the root zone, or the immediate area of soil and oxygen around the roots, to avoid flushing away the nutrients in the soil and wasting water. Apply only as much water as the root zone (top 12 inches) can handle. The soil should be very wet, but the water should not pool on top. This may mean frequent and short-duration waterings throughout the day.
Pro Tip: Install a drip irrigation system with a timer for a hands-off, fool-proof watering approach. This will ensure the water avoids the foliage and is only applied to the root zone area.
Fertilizing
After your watermelon plants start flowering, use a fertilizer with less nitrogen to encourage fruit, such as a seaweed-based fertilizer (which is also proven to help the harvested fruits have a longer shelf life!). Spread the fertilizer around 2-3 inches to the side of each plant row. Apply once again right after the fruit has emerged.
Pests and Disease Control
Aphids and cucumber beetles are the biggest bad guys that can affect the health of your watermelon plants. These pests feed on the fruit and can transmit viruses from plant to plant.
To stop melon and cotton aphids from attacking watermelon plants, plant fragrant plants such as the following in a neighboring garden bed:
- Garlic
- Catnip
- Dill
- Mint
- Nasturtiums
Keep the spotted cucumber beetle and striped cucumber beetle from feeding on your melons by planting neighboring crops like:
- Corn
- Broccoli
- Radishes
- Nasturtiums
- Marigolds
- Tansies
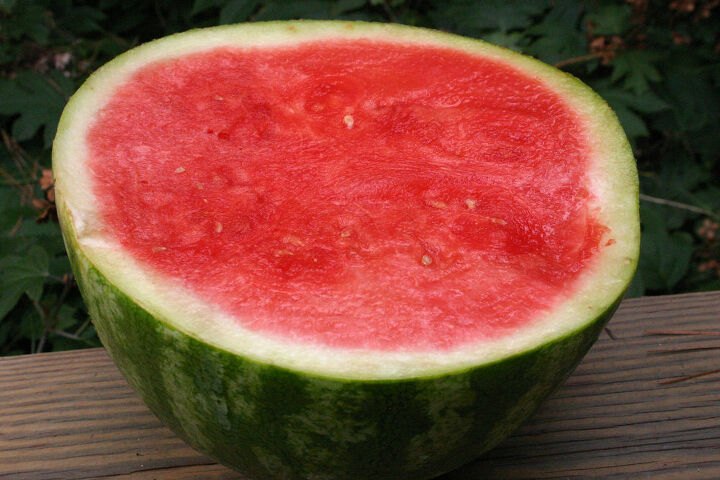
Photo via Walter Reeves
How to Harvest Watermelon
Since watermelons stop ripening once they’re picked, knowing the right time to harvest is imperative. Here’s how to tell when watermelons are ripe, how to harvest them, and some insight on storage for a long shelf life.
Check for Ripeness
Once the watermelon looks large enough to enjoy, you might be eager to pick it. Now is the time to check the watermelons for ripeness. If the fruit has separated from the vine, or if the vine is dead, it’s time to pick the fruit since the fruit won’t ripen any more once off the vine. If the watermelon is still attached, inspect the curly tendril closest to the stem. The melon is ripe if the tendril is dry and brown. You’ll also notice that the skin of the melon has transitioned from shiny to dull, while the underbelly has gone from light green while it ripened to yellow when fully ripe.
Harvest Instructions
Use a sharp knife to cut the fruit off the vine. Be sure to leave a 2-inch long piece of the stem attached to the fruit.
Storing
You can store a watermelon uncut for about 10 days. Once it’s cut, wrap it tightly in plastic. The fruit will last in the refrigerator for about four days.
Have you grown watermelons in your garden? If so, give us your best tips and tricks below!
Comments
Join the conversation
-
Oh I so want to try this when the weather gets warmer. I probably will need to add soil, where I live we have the dreaded clay soil, but it is warm everyday.


Frequently asked questions
Have a question about this project?