


A Complete Guide on How to Grow Winter Squash

By Brooke Ressell
Winter squash is one of the most versatile foods out there. While it’s technically a fruit, it actually looks, cooks, and tastes more like a vegetable. Plus, it can easily be served as either a main dish or as a side.
What foodies love most about winter squash is how many varieties it comes in—all with their own unique flavors, colors, and textures—making it a fun food to experiment with and try out in different ways. From roasting it to frying and pureeing it, winter squash is a delicious addition to any meal and even the pickiest of kids can learn to enjoy it.
So when your family starts including winter squash into so many of your weekly meals, it’s only natural to want to start growing winter squash on your own. And while you certainly need a little extra time and patience on your hands, growing winter squash can be a fun hobby for the entire family. In this guide, we’ll show you how to grow winter squash in your own garden this season.
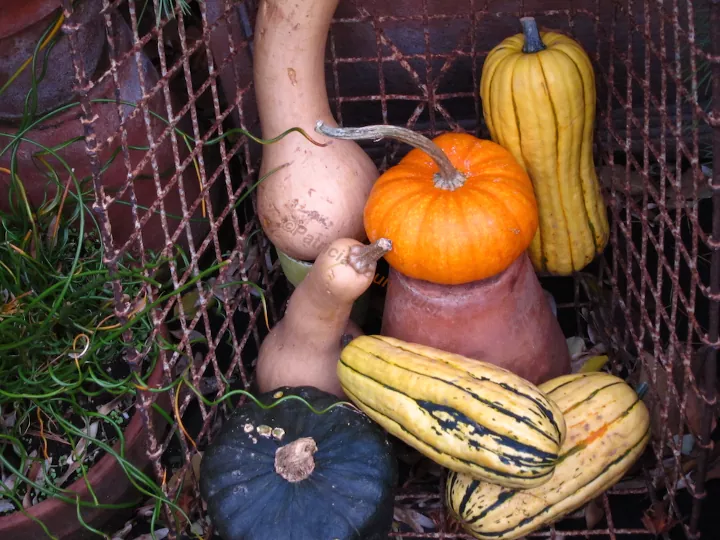
Photo via TheLastLeafGardener
Common Varieties of Winter Squash
You may be surprised to learn just how many varieties of winter squash there are. So when you decide to grow your own winter squash, the first thing you’ll need to do is decide which of the varieties you want to plant most.
To help you decide, we’ll discuss thirteen of the most popular varieties out there:
- Acorn - Acorn squash is a green and orange fruit that is shaped like a giant acorn. It has a mild flavor that is best described as buttery, sweet, and nutty.
- Banana - Banana squash is a long orange fruit with a shape that’s similar to an eggplant. It tastes rich and sweet.
- Buttercup - Buttercup squash is a green fruit that is large and round with a round ridge on the bottom. It has a sweet, creamy flavor and makes a great soup when pureed.
- Butternut - Butternut squash is dark beige and has an elongated pear shape. It tastes both sweet and nutty, and it’s great when roasted.
- Carnival - Carnival squash is a green and orange fruit that is often displayed on fall and winter tables as a decor piece. It has a buttery maple flavor.
- Kabocha - Kabocha is a dark green fruit with a very round shape. It tastes sweet and earthy, similar to pumpkins and sweet potatoes.
- Hubbard - Hubbard is a very large green fruit with very tough skin. It tastes just like a pumpkin and is excellent when pureed.
- Honeynut - Honeynut is another fruit with a dark beige color and an elongated pear shape. It tastes very nutty just like its name implies.
- Pumpkin - Pumpkins are large, orange, and round fruits. They have a rich, sweet flavor and they make mouth-watering pies.
- Red Kuri - Red Kuri is an orange fruit with a teardrop shape. It has a mild, nutty flavor.
- Spaghetti - Spaghetti squash is a yellow, oval-shaped fruit that resembles spaghetti noodles when shredded. Spaghetti squashes have almost no flavor on their own, but they take on the flavor of other ingredients well.
- Sweet Dumpling - Sweet dumplings are small yellow and green fruits in a circular shape. They have a very sweet flavor, making them a perfect substitute for pumpkin or sweet potato in recipes.
- Turban - Turban squash is an orange, green, and yellow fruit that looks like another squash is growing directly on top of it. Its sweet, nutty flavor pairs well with curry.
When to Plant Winter Squash
Knowing when to plant winter squash is the key to having a successful harvest. Keep in mind, the fruit’s name can be very misleading.
Winter squash is actually grown throughout the spring and summer months—not the winter months. Plus, winter squash takes between 80 and 110 days to fully ripen, so if you wait too long in the season to plant it, you just may be out of luck.
Typically, the recommended winter squash planting dates are just after the last spring frost—once the soil has begun to warm up. So you want to plant them no later than late May if you’re in a northern region to make sure that they have enough time to grow and ripen before the first frost takes place in the fall.
For those in the lower southern region, you may have up until July to plant winter squash seeds if the growing season in your area can accommodate that.
Where to Grow Winter Squash
Another important consideration is learning where to grow winter squash so that you can maximize your bounty. Winter squash are pretty hardy, but they do grow best when certain conditions are met.
Climate
Winter squash prefers an outside air temperature between 50-90 degrees Fahrenheit. Any cooler, and the seeds may rot. Any warmer, and the flowers will drop.
They also prefer having a soil temperature of at least 70 degrees F. In essence, they need at least three months of growing time in a frost-free climate to fully ripen.
Sun Exposure
Direct sunlight is crucial when it comes to growing healthy winter squash, so be sure to plant your seeds in an area of your garden that receives at least six to eight hours of direct sunlight per day.
Planting Site
Winter squash need between fifty and one hundred square feet so that the plants can spread out well. You want to make sure that you do not plant too many seeds in one place as they can crowd each other out.
Furthermore, they need a slightly acidic soil with a pH between 6 and 6.8 (you can find this out by conducting a soil test). The soil should also drain well so that there is never any standing water.
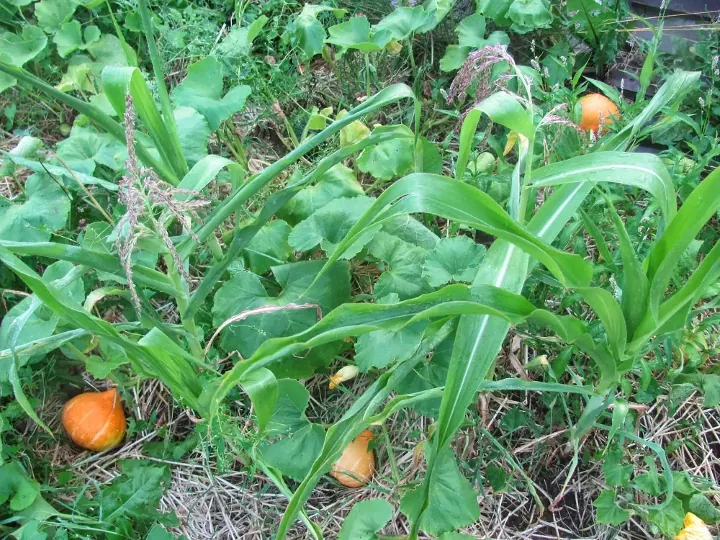
Photo via Family Food Garden
How to Plant Winter Squash
Planting winter squash seeds is actually pretty easy once you get the hang of it. We’ll show you how to plant winter squash seeds right the first time with this step-by-step guide.
Tools and Materials Needed
- Gardening gloves
- Cultivator tool
- Hand trowel
- Compost
Step 1: Put Gardening Gloves On
Put gardening gloves on to keep your hands nice and clean while working with dirt and compost.
Step 2: Till the Soil
Next, you want to till the soil with your cultivator tool. Winter squash needs loose soil to thrive, so till to a depth of one foot—mixing organic matter around, pulling up weeds, removing rocks, and breaking up any clumps of soil along the way.
Step 3: Add Aged Compost
Compost produces healthy, happy winter squash plants, so mix plenty of aged compost into your garden bed with a hand trowel before adding seeds.
Work in Advance
Step 4: Plant Seeds
Because most winter squash varieties grow to be long, vining plants, seeds do best when planted in rows or hills where they have plenty of room to expand.
If you plan on planting in rows, sow two to three seeds roughly one inch deep in rows that are anywhere from two to five feet apart.
If you prefer planting in hills, use gloved hands or a trowel and work the soil to make hills that are about eight to ten inches high and six to eight feet apart. Sow four to five seeds in each mound.
Step 5: Water Your Garden
Water your garden with a gentle spray so that the soil gets nice and moist without displacing the newly-planted seeds.
How to Care for Winter Squash
Now that you’ve planted your seeds, you’re probably wondering how to care for your winter squash plants throughout the entire growing season. Here are our favorite winter squash growing tips:
Water
Winter squash loves heavy and even watering. You should aim to add around one inch of water to the soil each week. Just be sure to water directly onto the soil—not on the leaves, vines, or fruits themselves—to avoid disease. Also try to stick to a consistent watering schedule whenever possible and watch out for wilting leaves, which is a sign of plant dehydration.
Maintenance
It’s crucial to thin out weaker plants to make way for nutrients to get to stronger, fruit-bearing plants. If you planted in rows, leave one plant every 18 to 36 inches by snipping off the other, weaker-looking plants. If you planted in hills, leave the strongest two to three plants per hill.
Fertilizer
Winter squash is a heavy feeder so it thrives when fertilized regularly. Add liquid fertilizer to the soil every two to three weeks starting right after the first blooms start appearing. Just be sure not to spray the fertilizer directly onto the plants themselves.
Pests and Diseases
There are several threats that you want to keep your eye out for while growing winter squash. Pests like squash bugs, cucumber beetles, aphids, and squash vine borers can wreak havoc on your plants. If you see them, act fast by handpicking the bugs and egg clusters off of your plants. You can also spray winter squash plants with Neem. Wrapping the first few inches of each stem with aluminum foil can also act as a preventative measure.
You also want to watch for diseases like powdery mildew, downy mildew, mosaic virus, blossom-end rot, and anthracnose. If there are noticeable changes to the leaves, stems, or fruits themselves like changing color, wilting, or rotting, your winter squash may have one of these common types of diseases. To combat it, remove affected plants quickly and consider applying a food-safe herbicide to your crop.
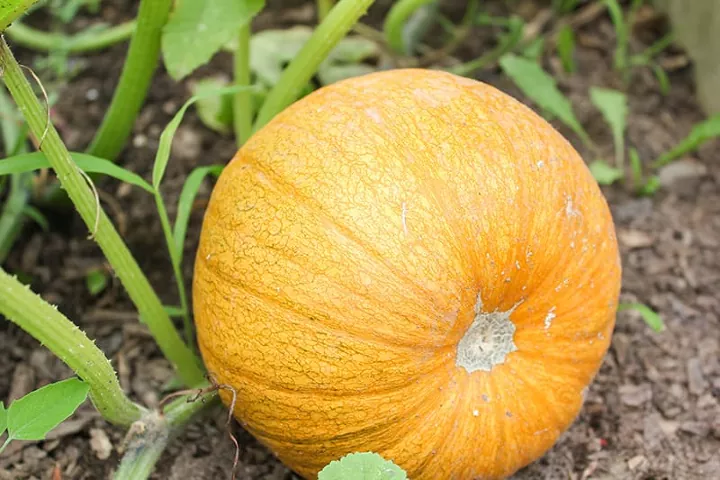
Photo via CreekLineHouse .
How to Harvest and Store Winter Squash
Now comes the fun part! Once fall arrives, periodically check to make sure that your squash fruits have reached their peak color and firmness. To be sure, simply tap the fruit and listen for the telltale hollow sound.
To help them last longer after harvest, use shears to cut each stem two to three inches above the fruit. Then, make sure to cure them for seven to ten days by allowing them to sit outside in the sun or inside in a warm, dry place. Don’t skip this step because curing helps your winter squash shed excess moisture and seal out any fungi or bacteria that may be on its surface.
After the curing period is over, clean each squash well and store in a cool, dry, and dark place in your home that has good airflow. Your winter squash can last for months in the right conditions.
Have you grown winter squash in your home garden? Let us know what tips and tricks you have in the comments below!


Frequently asked questions
Have a question about this project?