How to Do a Bold & Colorful DIY Vintage Desk Makeover on a Budget

Grab your pencils; school is in session! I’m working on making over a kids’ bedroom and I’m flipping some furniture, starting with this DIY vintage desk makeover. We’ll turn an old classroom desk and a basic IKEA stool into the new cool kids on the block. Keep watching for some colorful desk makeover ideas.
Tools and materials
- Dawn dish soap
- Sponge
- Water
- Spackle
- Scraper
- Sander
- Sandpaper
- Wire brush
- Goggles
- Mask
- Painter’s tape
- Primers
- Paint
- Painting tools
- Spray paint
- Respirator
- Polycrylic sealer
Old desk
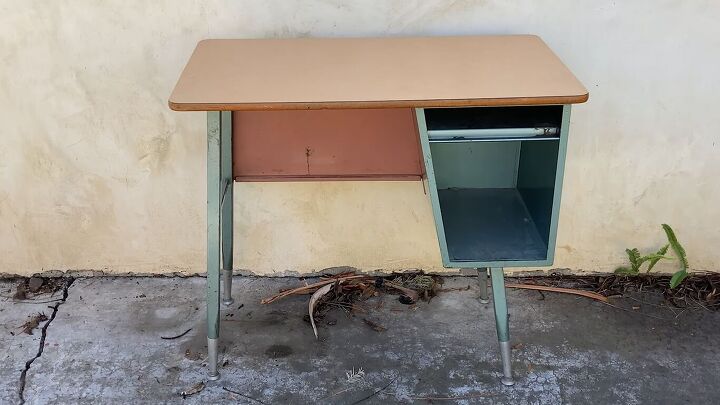
This vintage public school desk belonged to a friend and has been sitting in storage for a while. Do you know how I know it’s authentic? There’s chewing gum still on it. Ew. The top is in good condition, but the metal base could use a little love.
Old stool
In contrast to the old desk that’s been out of use for many years, this IKEA stool has seen plenty of use. We’ve got dings, we’ve got scratches, we’ve got crayon marks. Let’s give it a little rehab.
1. Clean
Grab a little Dawn dish soap and scrub the furniture down. Then, give it a clean-water wipe-down.
2. Fill in the dings
The stool has a lot of dings and dents, we need to fill those in.
Tip: Use spackle instead of wood filler
We could use wood filler for this, but sometimes it sticks or pops out. A top tip is to use spackle instead, especially if you’re only filling bits in for cosmetic purposes. Apply the spackle, wait for it to dry, then scrape off the excess.
3. Sand & scrub
Sand the wooden surfaces down to make them smooth. You can use sandpaper or an electric sander for this.
For the metal frame of the old desk, we want to get rid of the rust. So, go over it with a wire brush, then sandpaper. Finish with a thorough wipe-down.
Note: always wear a mask and goggles; we don’t want to inhale bits of metal or get them in our eyes.
4. Prime
Tape off the pieces you don’t want to paint. If you’re a purist and you don’t want me painting a vintage desk, please know I left the original pencil marks to maintain the original character and intent of the piece.
Apply primer first (I needed a separate metal primer for the metal frame of the desk). Always apply from the top down, so you don’t go over anything twice.
Moment of hell: I didn’t feel like I was being too heavy-handed or spraying too close with my metal primer, but I ended up with a lot of paint sagging and drips. So, I had to wait for it to dry thoroughly, sand it back down, then reapply the primer. Which sucks.
5. Paint
Our pieces are primed and it’s time for some DIY desk painting. You might think because we’re doing a child’s room that we’re going to stick to primary colors. Over my dead body. We are going beyond bold, aggressively pink neon.
I’m using 94 spray paint. Their tagline is “Because Color is Life” and I couldn’t agree more. This one is for my hardcore graffiti artists out there. The shade is Fuschia Fleur. We’re going to shake her up and send our pieces to a rave.
Don’t forget to wear your respirator.
Go for thin, simple coats.
Another moment of hell: I wore my good jeans because I thought I wouldn’t be at risk of spray-painting my legs. But, the wind and the aerosol particles in the air mean my good pants are now pink pants.
For the bottom of the desk, I wanted to add some extra bling. So we’re going to do what we do every day on this channel: paint things gold.
6. Seal
Finally, top off the paint job with a clear polycrylic sealer. (It’s boring to watch, so I didn’t include visuals here.)
DIY vintage desk makeover
Well kids, thanks for coming to school with me today. This is one of the cutest furniture flips I’ve ever done. I hope it inspired you to come up with some colorful desk painting ideas or desk makeover ideas of your own.
P.S. Update on the pink pants: the Internet told me that the best way to get spray paint off clothes is with Dawn degreaser, so I used that and scrubbed the hell out of my jeans. I'll let you know if it works.
What do you think of this DIY vintage desk makeover? Let me know in the comments below.












Frequently asked questions
Have a question about this project?