


DIY Planter Umbrella Stand

I was looking at patio umbrellas a while back and realized that the nice, sturdy bases were going to cost an additional 50 bucks or more. Because I’m cheap, I decided to make my own! While I was at it, I figured I’d make it look cute and disguise it as a planter. I’m definitely not the first one to do this but I’m happy to share my method!
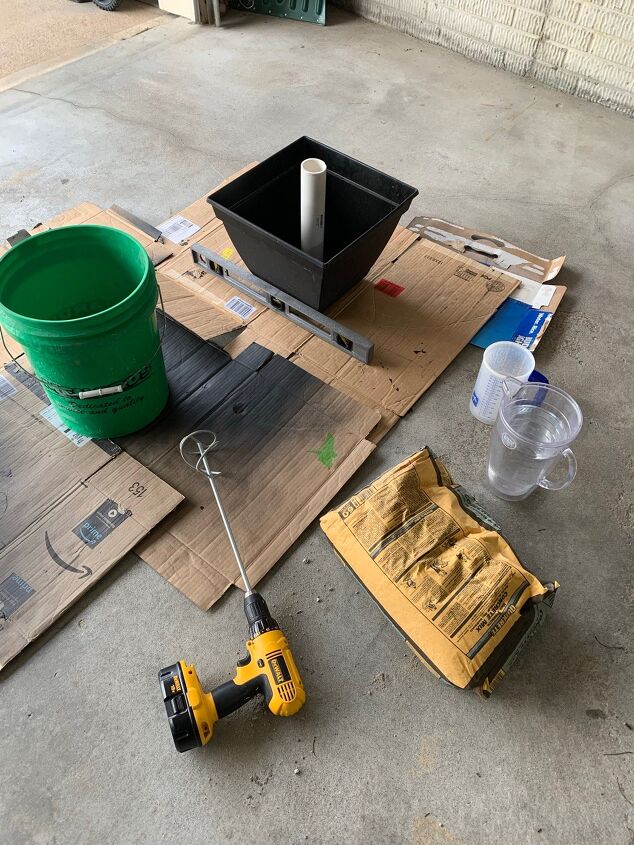
I actually made this late last summer and I updated it this spring! I just bought a cheap plastic planter from Home Depot. Its 11” tall and 15” wide but you could go bigger. I used a full 60lb bag of Quickrete. The pvc pipe I got was 2” x 24”.
**Find out the diameter of the pole for your umbrella. I did a bad job eyeballing mine, and when I got home I realized it would have fit in a 1 1/2” wide pipe. I'm just listing a 1 1/2” one in the materials section, because I think that would fit most.**
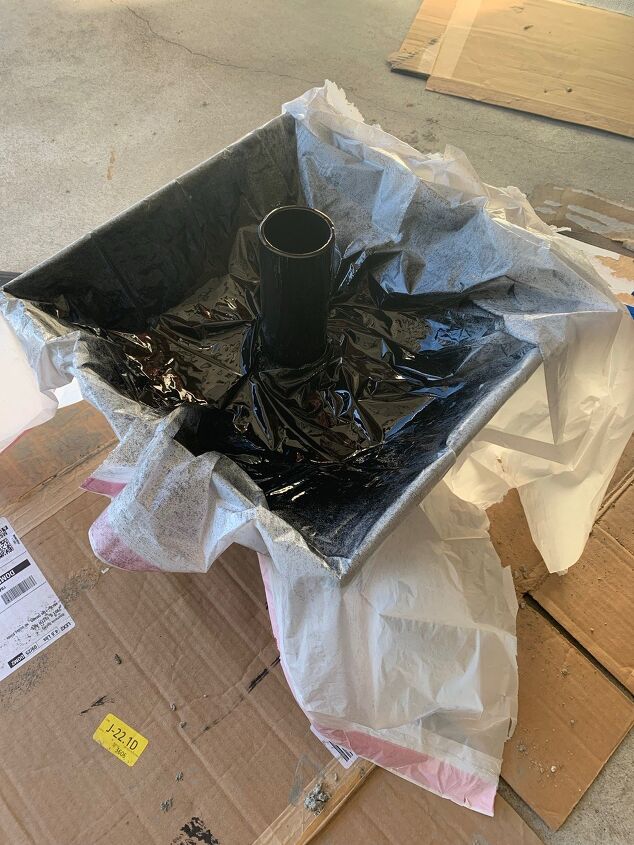
The first thing I did was flip the planter over and drill a hole in the bottom center for drainage. I then took my pvc pipe and cut it in half. I wanted to be able to hide the pipe with the plants in the planter so I didn’t want it sticking out too far. (More on this later).
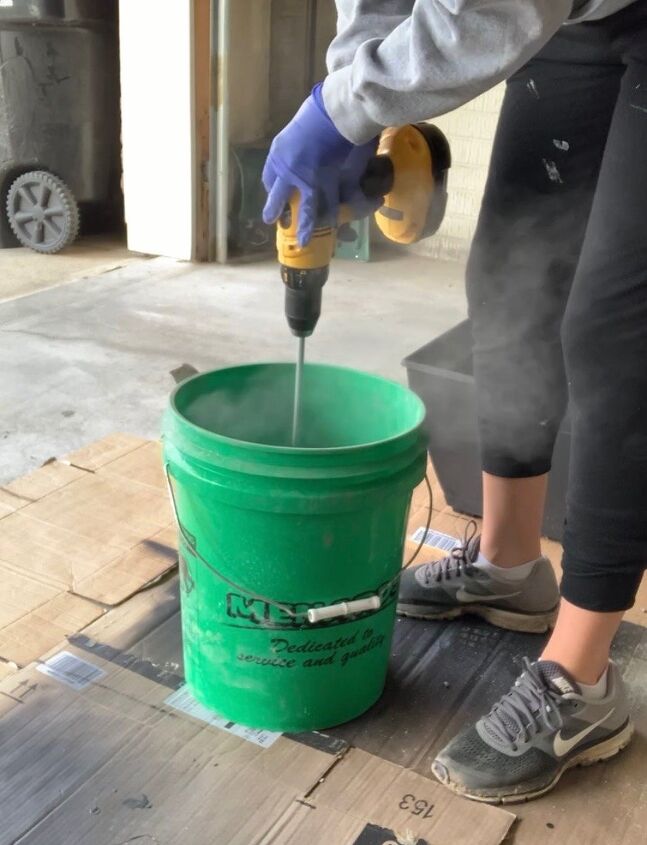
I mixed up my concrete in 2 batches. I had the concrete drill attachment from another project, so I used that to mix it.
**Be careful using this on a battery powered drill because it can overheat fairly easily. This drill is the only thing I have, so I was just extra careful to only mix it in short bursts instead of running the drill nonstop. And I think mixing half of the bag first and then adding the remaining mix and water and mixing again probably helped as well.**
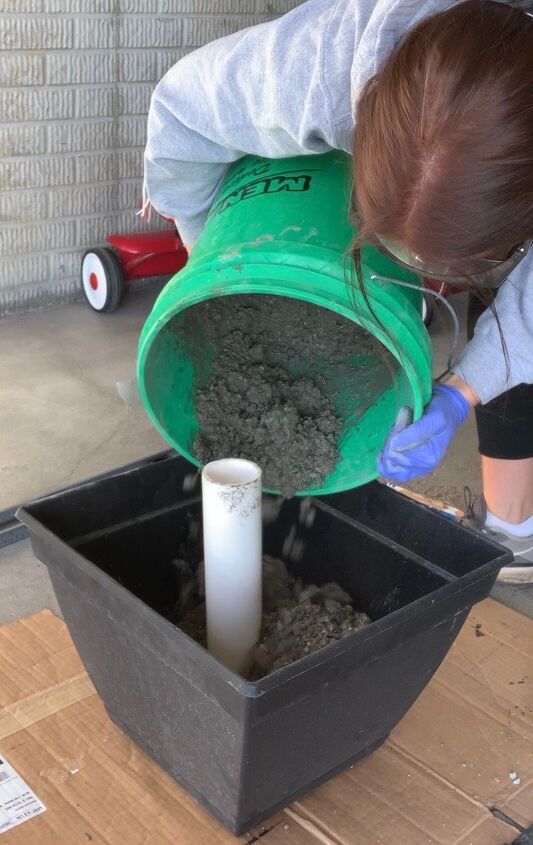
I placed my pvc pipe in the center of the planter with the drainage hole in the middle. I thought about rigging something up to keep it in place while I poured the concrete in, but I ended up just kind of going for it. I dumped half of the concrete in, wiggled the pipe back into place, dumped the rest of the concrete and checked the placement of the pipe again. You’ll wanna make sure it stays all the way down, touching the bottom of the planter as the concrete dries. (Add some weight on top to keep it in place if need be). I used a level to make sure it was plumb and didn't somehow move as the concrete was starting to set. I let it dry overnight.
**I didn't want to make a mess on the back patio so I did this in the garage. I lifted it onto my son's wagon and wheeled it to the backyard  But keep in mind it is NOT light. It would be easier to mix the concrete and pour it in place.**
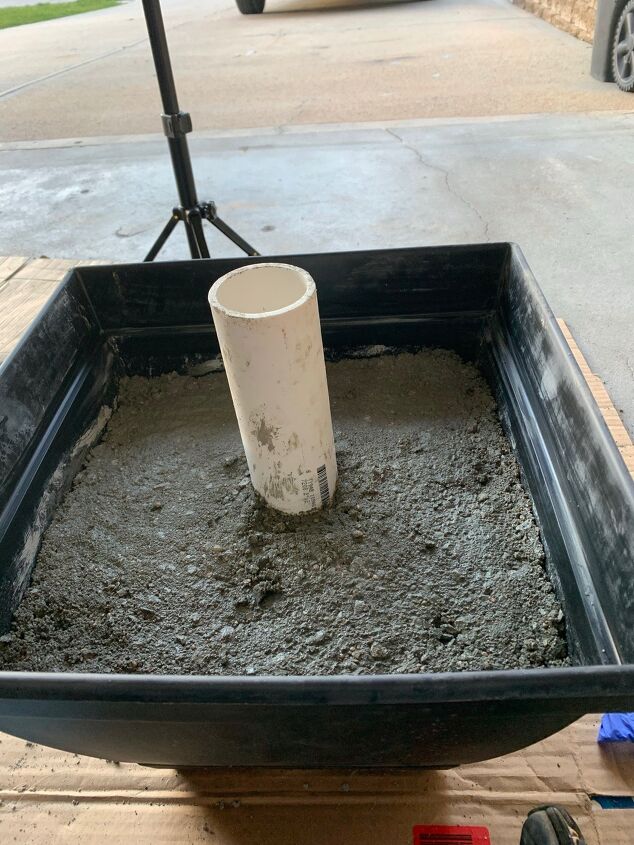
I didn't get the pipe perfectly centered but it was close enough for me. This photo is pretty deceiving because it IS straight up and down. If it's not plumb your umbrella is going to be leaning to the side.
Notice how there is space on top of the concrete to add potting soil. (If I did this again, I maybe would have bought just a slightly bigger planter, to allow for a deeper layer of soil). I drilled drainage holes in each of the 4 sides of the planter, just above the concrete.
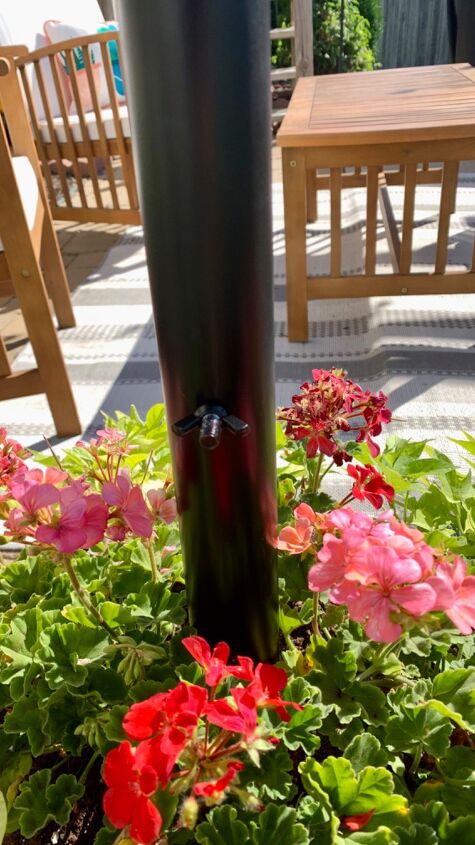
I covered the area around the pipe, took some leftover black spray paint and painted the pipe to match the umbrella pole. Let dry then I sprayed it with a matte topcoat. Once that dried, all that was left was adding the soil and plants of choice! When you want the umbrella in, you just place the pole part of the umbrella inside the pipe and voila.
Now for the updates!! (Then we’ll get to the reveal photos). The umbrella stand held up fine during the remainder of last summer and fall. I did move it to the shed for winter. After having the second windiest spring on record in Nebraska this year, I wanted until late spring to bring it back out. I also decided I’m not taking chances with it and want to make sure it or the umbrella aren’t going anywhere 😆
**This part probably isn’t necessary unless you live somewhere that gets tons of high winds**
I put a tie out stake inside the pvc pipe and twisted it into the ground. This took some trial and error and I had to unbend the “handle” part to get it to fit down into the pvc pipe. I wasn’t sure if it was going to work so unfortunately I didn’t film or take photos. I wish I would have because I felt like a real badass clamping it in the vice and untwisting it😂. I didn’t think I would be strong enough but apparently I was! I had to use a long wrench to hook onto the end and twist it all the way into the ground because, of course I couldn’t get my arm all the way down into the pipe. It wasn’t the easiest solution, but I tried to tilt the planter/tip it over and it wouldn’t budge so I think it’s secure 🤣

So the umbrella stand isn’t going anywhere. Now I wanna make sure the umbrella itself isn’t going to be swept up in the wind thrown into the neighbor’s pool.
I bought a 1 1/2” pvc pipe and this time I didn’t cut it down at all. My husband almost never gets involved in my projects, but he suggested this next step and I went along with it. I bought a bolt that was long enough to go through the pvc pipe and the umbrella pole inside and come out the other side. I grabbed a wing nut to fit the bolt.
I drilled a hole straight through the pvc pipe and stood it up in the plant stand. Next I put the umbrella pole inside of the pvc pipe and marked on that where the holes need to be. I took it back out and drilled a hole on my mark from one side and out the other side. I had to start with a small drill bit and then go back through with the bigger bit. I was really hesitant to do this because I didn’t wanna screw up the actual umbrella. Thankfully, I didn't! I painted and sealed the new pvc and then used construction adhesive to secure it to the inside of the bigger pvc pipe.
**If you start out with this size pipe to begin with you won’t have to do the above step** Take into account what the weather is like in your area and adjust accordingly. You might be able to cut it down a little (just for asthetic purposes).
Now when I put the umbrella in, I just have to put the bolt through the holes and tighten the nut on the other side. This is what it looks like from the back. Then to remove it, you just take the bolt out and lift the umbrella straight up and out.
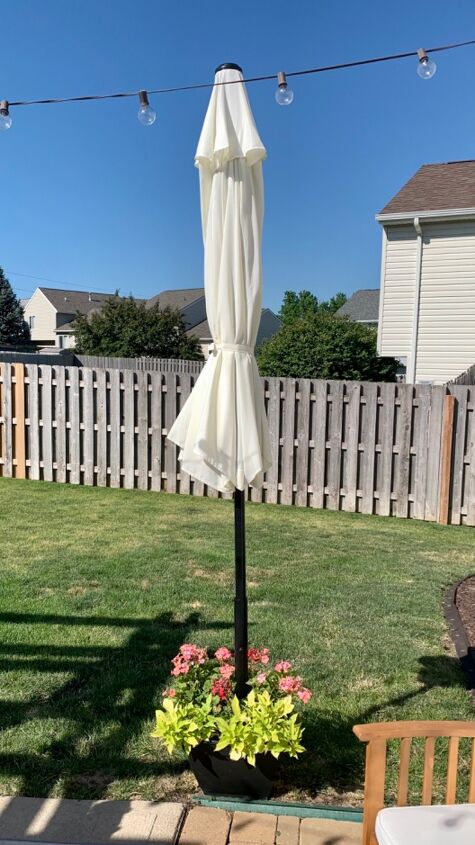
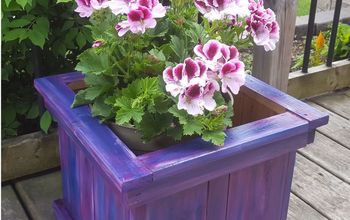
Here it is, new and improved! My geraniums could look better, and so could the grass but I'm really happy with the umbrella stand! lol We were having 17-20mph wind gusts the morning I set this up and even with the umbrella open it seemed very sturdy. (What's funny is, I just noticed you can see in this photo where my neighbor had to repair his fence in places due to wind damage this spring)
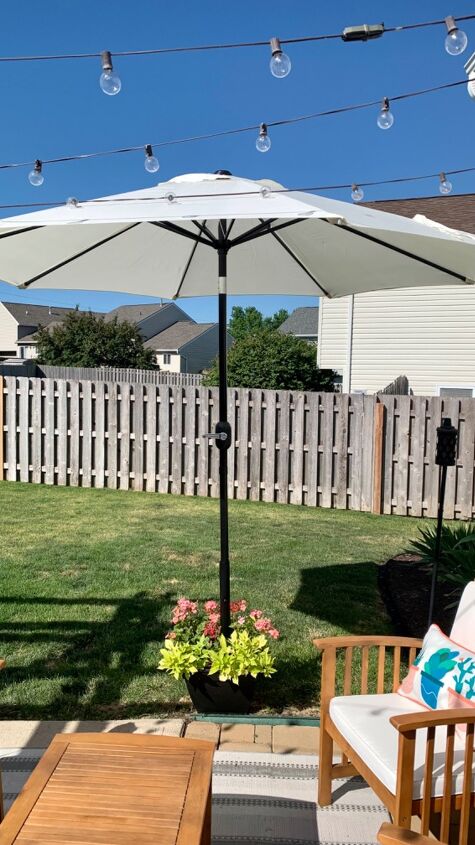
I took the pics in the morning, but the umbrella shades the patio are perfectly in the afternoon sun. I made sure I could still tilt the umbrella both ways and it seemed nice and secure.
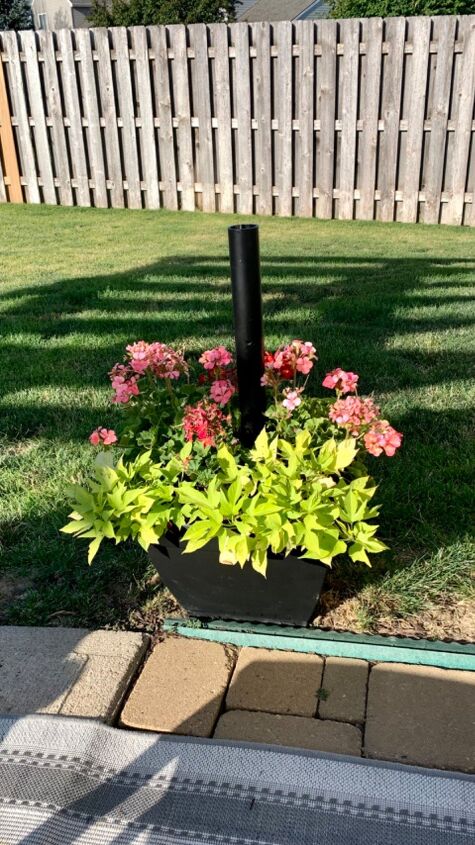
I realized you might wanna see what it looks like without the umbrella in, so I snapped this this morning. I do take the umbrella inside if I know its going to storm. Next year I might try some ornamental grass or something taller in the planter that will cover the pvc better.
Cost: last year this only cost me $14 total for the planter, concrete and pvc pipe. I priced those three things this year and it looks like about $23 total. *sigh* But I have a feeling if I would have bought a regular umbrella stand, I still would have wanted some sort of planter and plants out there so this kinda gives me both in one.
Honestly, each step went relatively quickly and it was pretty easy to make! Would you try something like this?
Resources for this project:
See all materials


Comments
Join the conversation
-
I did the same thing for a Christmas tree stand when our artificial tree metal stand broke. Never thought of using it for an umbrella stand, but what a great idea!
-
I know what your saying about umbrellas and wind, In TX (before moving to FL) we found our umbrella in our neighbors yard, it flew over 2 fences and parts of a garage and didn't even break!


Frequently asked questions
Have a question about this project?
Very attractive stand! No need to hide the PVC. Can't say how many times I have gone out and found the umbrella clear across the yard and the stand knocked over! Your planter/stand seems substantially heavy so I don't understand the need to secure into the ground. The umbrella is my concern and even bolting the pole in, a strong wind would break off (wood) or bend (metal). Has that happened with yours? I have my pole tied between a post and a fence just so the darn thing won't blow over (does not look as nice as yours!).
Really clever and I like how it softened the space!