


Card Table Makeover

by
Genevre
11 Materials
$50
4 Hours
Medium
Do you have an old card table? Take a few hours and makeover that table! This card table tutorial give detailed steps on how to repaint and refurbish your card table and chairs.

Paint has the power to transform something old into something new. This pathetic card table was the prime candidate for such a transformation. I had a lot of fun refurbishing this card table and the best part is that anyone can do it! If you are new to DIY and want to start with an easy project, this one’s for you.
Step 1 Gather Supplies
- Philips screw driver
- Pliers
- Fabric for Tabletop: 1 1/8 yard
- Clear Plastic Vinyl (table cover): 1 1/8 yard
- Fabric for chairs: ½ yard per chair (I did four chairs so 2 yards)
- Hot glue gun and glue
- Spray paint (4 cans will paint 2 coats on 4 chairs and a table)
- Clear Coat spray paint
- Staple gun
- ¼ inch staples (to use in your staple gun)
- Tube of “Liquid Nails” adhesive or other strong adhesive
- Caulk gun
Step 2 Disassemble
Begin by unscrewing the back cushions from each chair, using a standard Philips screwdriver. Keep those screws in a small bowl or baggie, you will need them to reassemble the chair later. The seat cushions can be removed by cutting the tips of the plastic fasteners off with pliers.
Be careful not to pull the plastic screws. They are “T” shaped and if they are pulled through they will rip the masonite board which anchors the cushion to the chair. (If you do rip the board, you can replace it with some masonite board found at just about any hardware store).
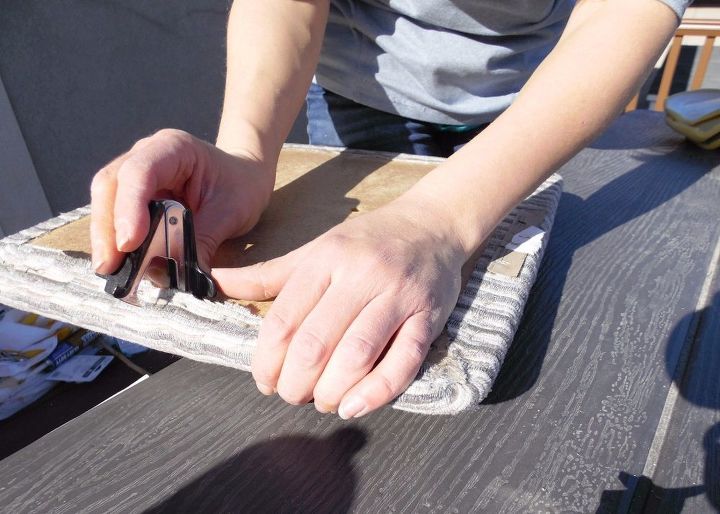
I used a white and yellow fabric and didn’t want the existing grey fabric to show through, so using a standard size staple remover, I removed the old fabric.
If you are reupholstering the chair with a dark fabric you can skip the step above and simply place your new fabric over the existing cloth.
Next, you will pull apart the table. Simply unscrew the L shaped hardware found under the table, and keep those screws in a safe place for later use.
My table top had been “loved” by many DIY projects and needed to be completely replaced. I removed the fabric and batting using the same staple remover, as I used on the seat cushions. If your tabletop is in good condition then you can keep the existing covering.
Step 3 Prep
Take a minute to wipe down the chairs with wet rag, so your paint adheres to a clean surface. If you are painting a smooth metal chair you will need to give them a light sanding with 120 to 150 grit sand paper. You need to sand them just enough to get a rough surface for the paint to adhere to. My chairs were originally powder coated from the factory and didn’t require any sanding because they came with a textured finish. If you are missing any plastic/rubber feet off your chairs, this is a great time to replace those. I got a pack of 4 at home depot for a few dollars. Wipe down the table making sure you clean the hinges and the corners.
Now to the exciting part! Set up your chairs so they are not completely unfolded so you have access to the entire surface of the chairs.
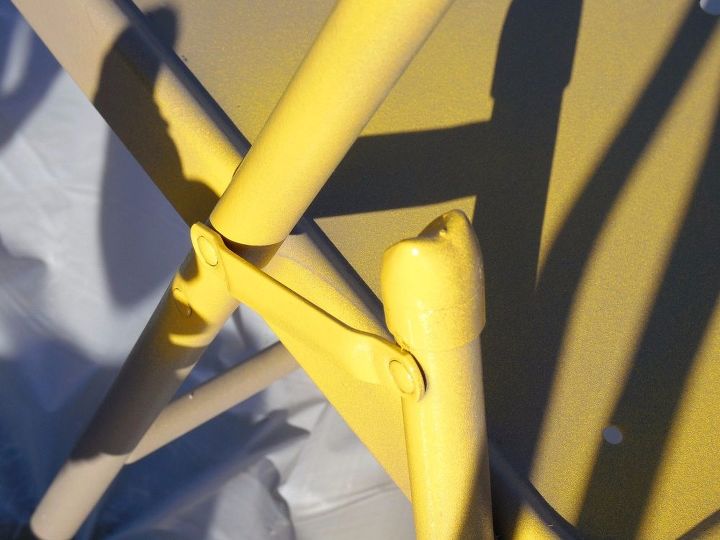
Spray paint chairs and table with first coat of paint. While spraying, keep your spray can upright and about 8 to 12 inches away from the surface of the chairs and table. Come back to your chairs after about 30 minutes for a second and final coat of colored paint. Make sure every angle of the chair is covered.
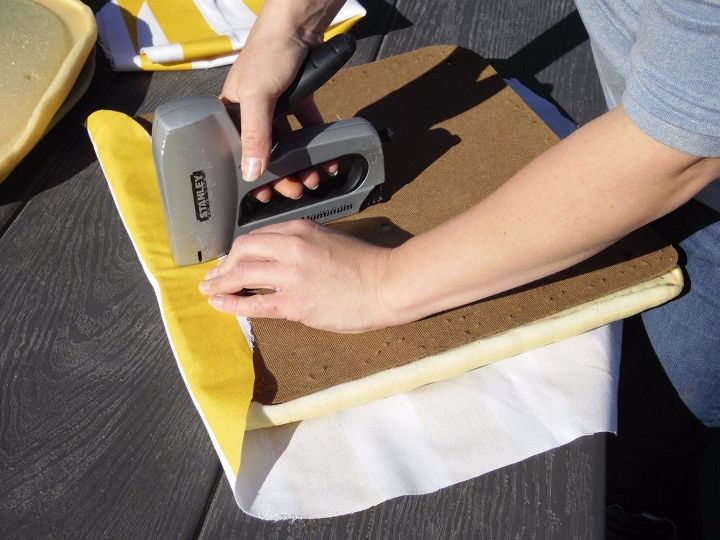
While the paint is drying we will cover those chair cushions! Cut the fabric for your chairs leaving an extra 3 inch border. If you have a pattern like I did (large stripes), make sure your pattern lines up correctly before you cut. Grab your staple gun -- this will be fun.
For the seat cushions, lay your existing cushion and masonite board on the backside of the fabric. Stretch the fabric over the board, and while pressing the staple gun against the board, pull the trigger. Staple all four sides of the cushion making sure your fabric is pulled tight each time you staple. Don’t be stingy on the staples, just have at it! The corners are done last by pulling the center over the board and folding the fabric over each other to get a nice pleated corner. Take a minute and look at the bottom of your seats, there is a front and a back to them. The front is more rounded than the back. You will need to remember this when you assemble them.
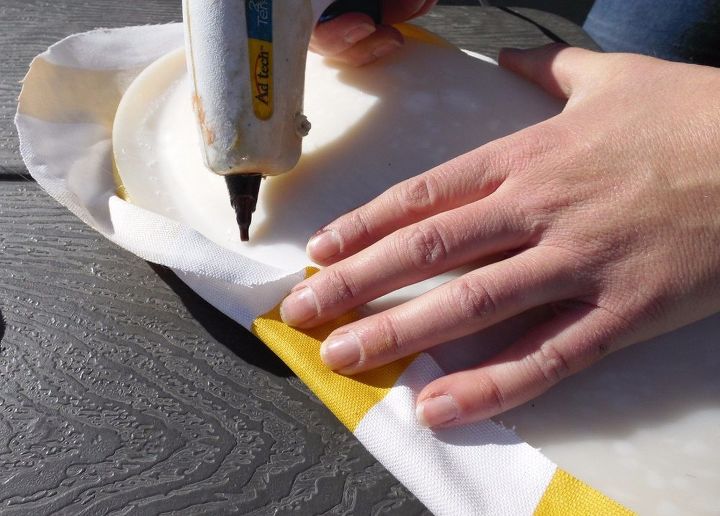
Hot glue the bottom edge, going slowly around the corners. Fold the fabric on itself as you go, working one inch at a time until the cushion is complete. Make sure you do not cover up the existing screw holes, you will need access to these when you reassemble the chairs.
You can use several different fabrics for your table tops: laminated fabric (about $8 per yard), vinyl fabric (about $8 per yard), a plastic coated table cloth (at the dollar store) or you can use a regular fabric and cover it with a clear vinyl covering(about $8 per yard). My local store didn’t have a very large selection of the vinyl or laminated fabrics, and I’m picky, so I used a regular fabric and a clear vinyl covering. The clear vinyl covering is also thicker than any of the other options so if you want something durable, use clear vinyl.
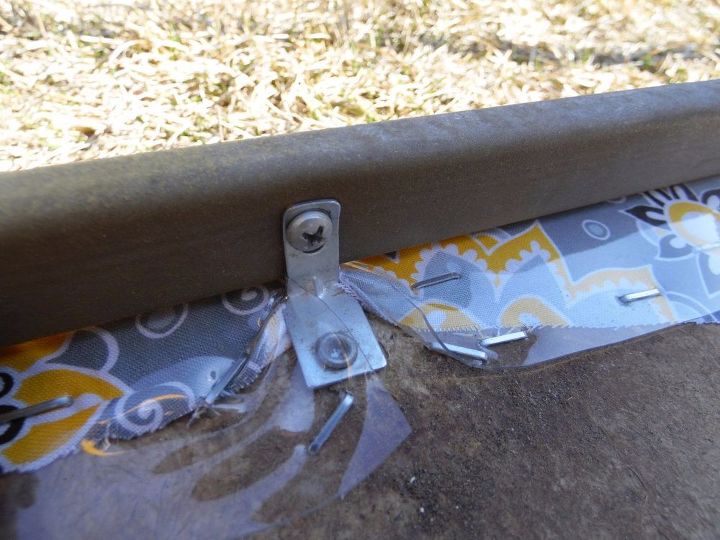
Next you will staple the table fabric to the back of the masonite tabletop using the same method you used to staple the fabric to the bottom chair cushions. You do need to be careful of the “L” brackets.
Cut a slit in your covering right in the center of the L brackets, and then staple the covering on either side to secure it. As you staple, make sure your L brackets are facing the correct direction, as they can swivel on their own.
Once your tabletop is covered, set it aside, and spray the chairs and table frame with a final clear coat. This will help prevent dings and scratches. Allow the clear coat to not only dry but cure, for 24 hours before you reattach everything (annoying I know but well worth the wait).
Reassembling is your next step. For detail on how to complete this check out my direct blog article: http://paintedfurnitureideas.com/card-table-makeover-tutorial/
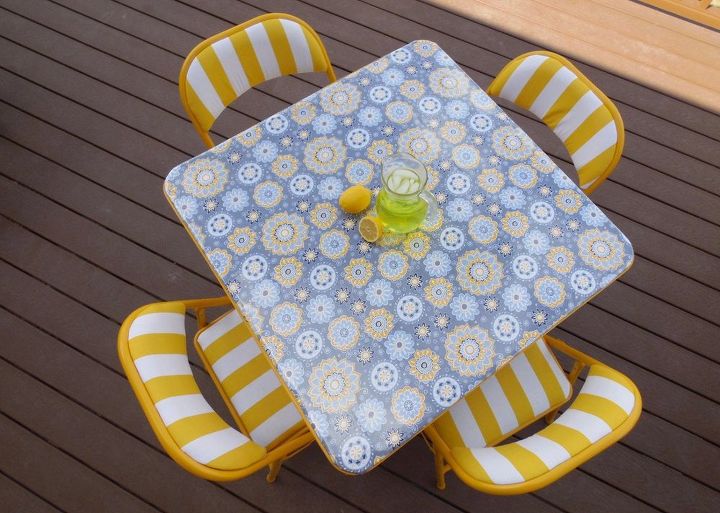
Enjoy your new table!
Want more details about this and other DIY projects? Check out my blog post!
Comments
Join the conversation
2 of 35 comments
-
What a difference!
-
Really cute and stylish!


Frequently asked questions
Have a question about this project?
I love this idea, but where can you buy the clear plastic vinyl?
Where do you get the clear plastic vinyl for covering the fabric?
I thought this was a tutorial about how to redo a card table NOT chairs!!!