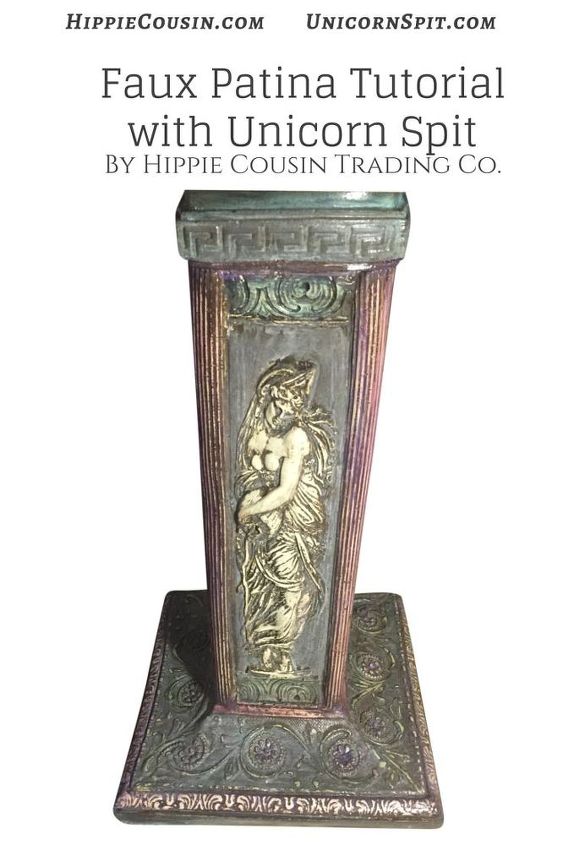
Unicorn SPiT Saved This Dingy & Gaudy 70's Chalkware Pedestal Table

April Dawn Forsythe
by April Dawn Forsythe
7 Materials
$40.00
2 Days
Medium
One of our team members at Hippie Cousin Trading Co. recently scouted this lovely but gaudy 1970's chalk ware pedestal maidens' table at a vintage shop in a tiny Texas town. She was a bit worried that we wouldn't be able to refurbish it into something beautiful, but now that we've completed this project, she too, is a believer in the magic of Unicorn Spit!
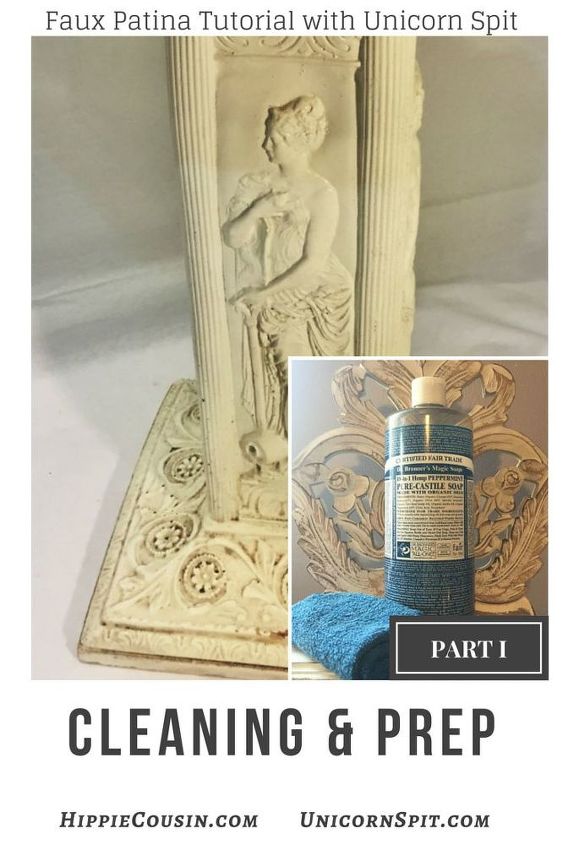
Part I: Cleaning and Prep


As per our usual protocol, we cleaned the piece with Dr. Bronner's Peppermint Pure Castile Oil Liquid Soap and warm water, then allowed to dry. Once completely dry, we very lightly rubbed over with a 3M fine 320 grit sanding sponge to the marble top and the chalkware pedestal. Coincidentally, the piece had a lot of the finish worn off, which would later help absorb the paint and glaze for great faux effects!
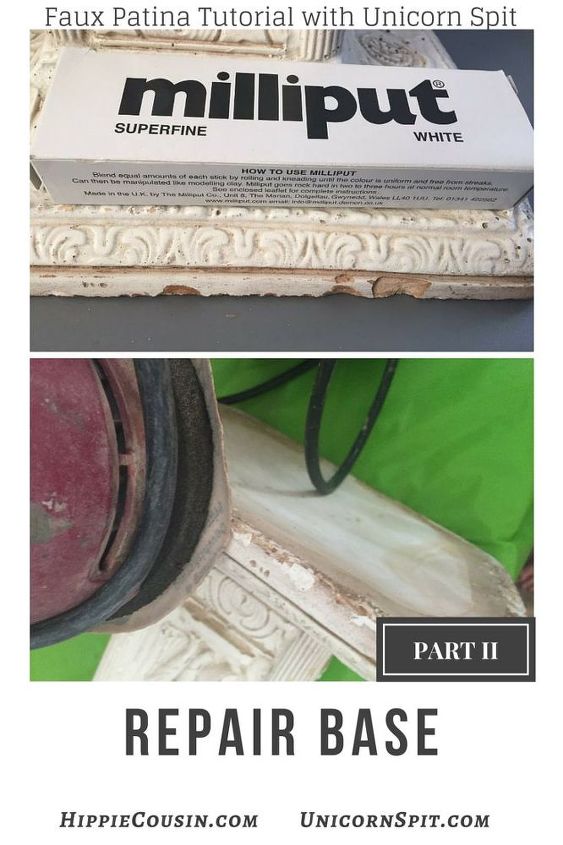
Part II: Repair of the Pedestal Base


The chalkware had some chipping at the base therefore we filled in the damage with Milliput White Superfine Epoxy Putty, after mixing 2 equal dime-sized chunks for 5 minutes. We allowed 4 hours drying time for the putty, and then took an electric sander to the base for a few seconds on each repair. We adore Milliput products purchased from the United Kingdom, and they continue to rescue us in the studio daily!
Part III: Dry Brush Base Coating


We used an angled Purdy XL 1 inch brush to dry brush onto the pedestal 3 thin layers of Coffee Bean by Maison Blanche Paint Company. We desired paint layers with varied textures, and we went for straight lines on the first coat, crisscross lines on the second coat, and alternating swirls and dabs on the third coat. Once each layer was dry, we lightly sanded with a 3M fine 320 grit sanding sponge.
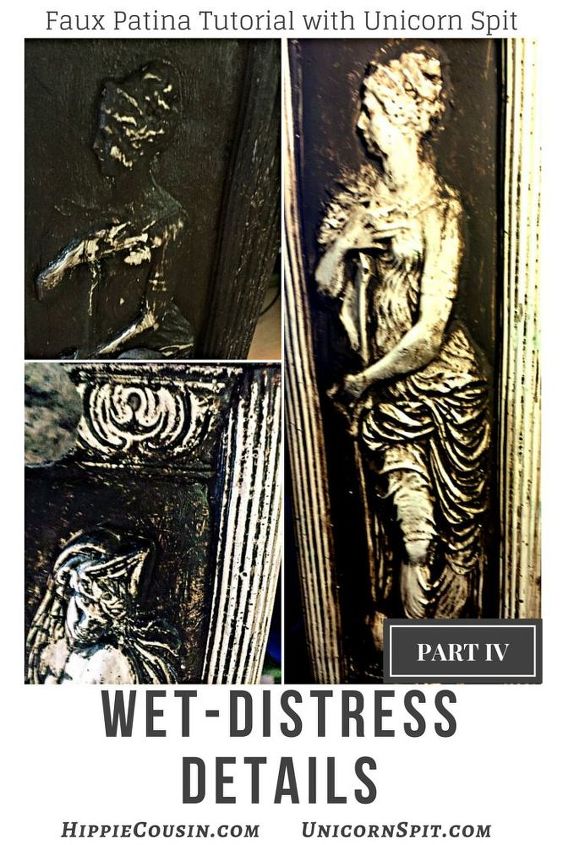
Part IV: Wet-Distressed Details.


We often use baby wipes to wet distress chalk or mineral paint, but for this project we used some household wet cleaning wipes to remove paint from the pillars, maidens and trim details. The cleaning wipes removed the paint easily and left behind enough paint in the crevices for a gritty old world effect.
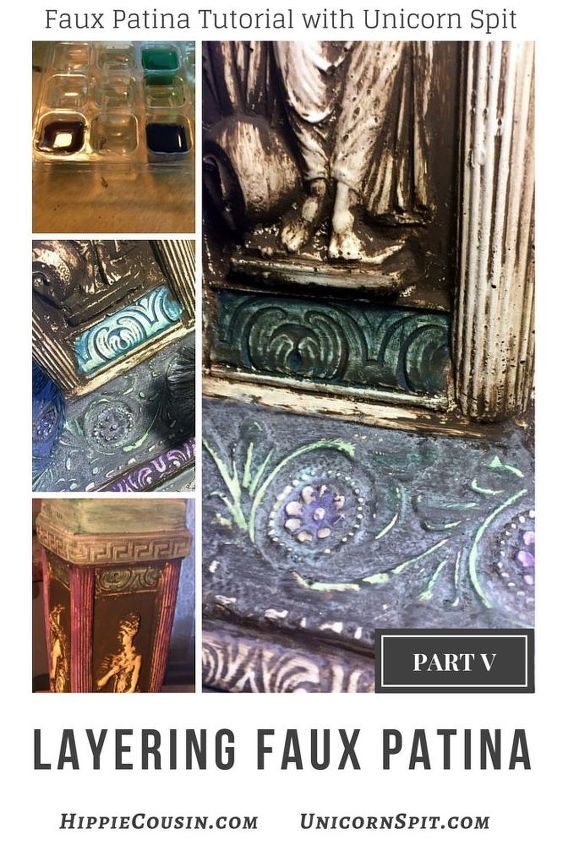
Part V: Layering Faux Patina


We chose to create our layered patina effects with Unicorn Spit Gel Stain & Glaze in the following colors: Purple Hill Majesty, White Ning, Pixie Punk Pink, Dragonsbelly, Navajo Jewel, Zia Teal and Blue Thunder.


We first applied an all over wash to the entire pedestal using White Ning mixed 40/60 with water via a Shany goat bristle blush brush. (Yep, when we run out of fancy soft natural fiber paint brushes around here, we head to our makeup cases for alternative tools.)


For the pillars we generously applied with a small rounded sable brush some Pixie Punk Pink as our primary color coat mixed 50/50 with water. Once the pink layer was dry, we added a layer of Purple Hill Majesty mixed 50/50 with water. After the purple coat was dry, we layered White Ning mixed 50/50 with water. Once the white coat was dry, we did some touch up highlighting in full strength White Ning with a pointed round brush. We also made a custom mix of full strength Purple Hill Majesty mixed with full strength White Ning to make a nice lavender colored highlighter and applied to select spots for emphasis with a detail round brush.


For the maidens we highlighted the edges with White Ning mixed 40/60 with water applied with a small rounded sable brush.


For the floral details we created the leaf outlines in Dragonsbelly mixed 70/30 with water applied via a detail round brush. The flower petals were painted in full strength Purple Hill Majesty applied via a detail round brush. The dotted outlines were full strength Zia Teal applied via a detail round brush. Once the floral details were dry, we wiped off some of the brighter spots with wet cleaning wipes, and then used a 3M 220 grit sanding sheet to lightly faux age the floral area. We then layered White Ning mixed 50/50 with water over the entire base stand with the Shany goat bristle blush brush.


For the upper trim area we applied full strength Navajo Jewel on the top line with a bright brush. We allowed it to dry, then layered Zia Teal 50/50 with water, allowed to dry completely then added some highlighting with White Ning mixed 70/30 with water.


We applied Zia Teal full strength over the second scroll line, allowed to dry then layered Zia Teal 50/50 with water, allowed to dry completely then outlined the detailing via a small detailing brush with White Ning mixed 70/30 with water.


The third and fourth row decorative scrolls located at the top and bottom of the base were each painted in layers of Navajo Jewel 50/50 with water applied via a bright brush, allowed to dry then layered Zia Teal 50/50 with water, allowed to dry completely then a layer of Blue Thunder 50/50 with water, allowed to dry completely, then wet distressed with a cleaning wipe, allowed to dry and then highlighted with White Ning mixed 70/30 with water applied via a detailing brush.


For the bottom base details we used Blue Thunder 50/50 with water for the surrounding areas with a Shany goat bristle blush brush. We used our fingers to apply the leftover custom lavender mix to some trim detailing on the base, then wiped off excess with the cleaning wipe. The very underside layer of the base we utilized 3 thin layers of Zia Teal 50/50 with water applied via a flat brush.


The Unicorn Spit resulted in a vibrant and gorgeous colored glaze and patina on this chalkware piece!
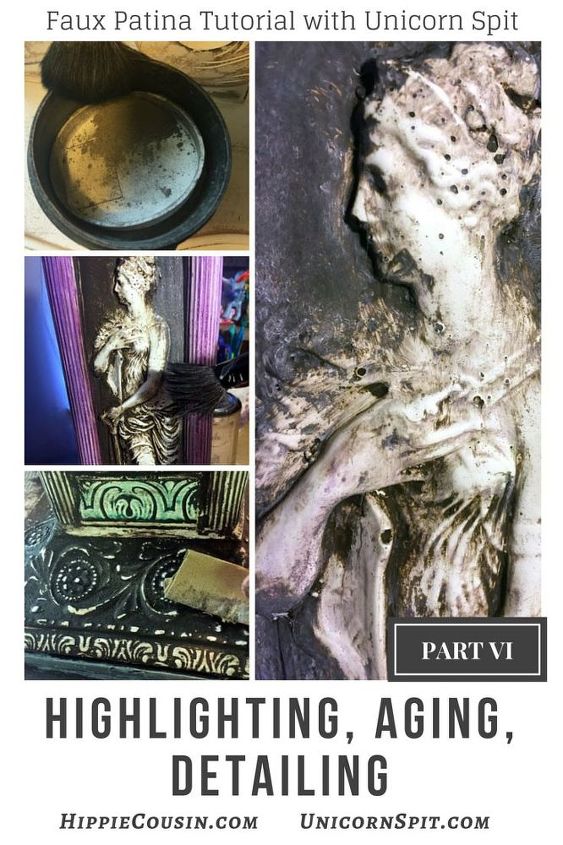
Part VI: Additional highlighting, aging and detailing.


We wanted to mute over the brightness of the colored glazing work, and we went over those areas with 2 more coats of White Ning mixed 50/50 with water applied via the Shany goat bristle blush brush. We took CeCe Caldwell's aging dust while the final layer of White Ning was drying and applied very lightly with a dry Shany Blush Brush to the crevices that we wanted to be more gritty and darkened. Some of the areas we applied more heavily with a small detailing brush for dramatic effect. We used our 3M fine 320 grit sanding sponge and a 3M 220 grit sanding sheet to remove some of our faux patina for a more worn and weathered look in certain areas.
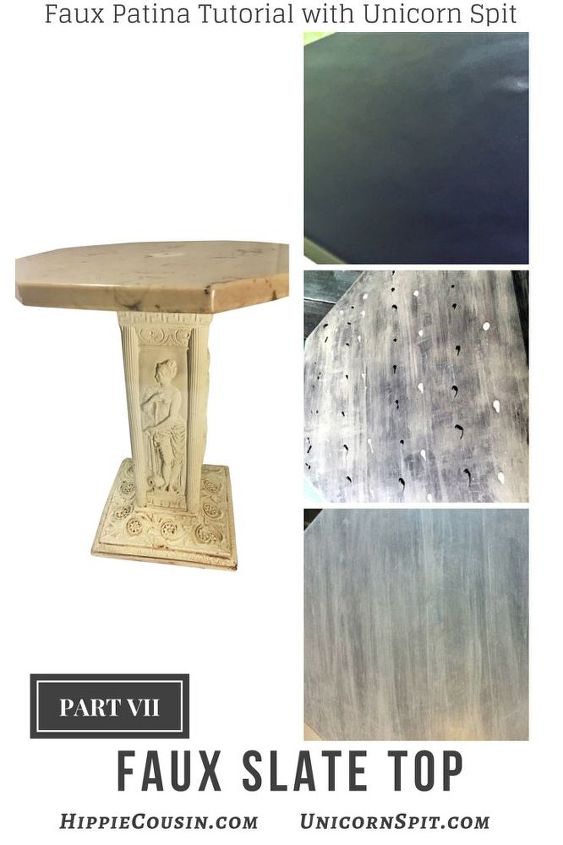
Part VII: Faux Slate Top


The original brown marble top no longer matched since the pedestal was now muted pastels, therefore we knew it had to be updated also. The marble's protectant coating was rubbed off most areas and exposing worn bare rock. We liked that rawness, and we sanded it down a tad more for a more natural effect. We knew the exposed rock would absorb the paint and glaze even better than if we applied a primer coat.


Our primary layer was achieved by using a spray gun to apply a thin base coat in Wrought Iron by Maison Blanche Paint Company. Once the base coat was dry, we applied a secondary thin layer with the spray gun, then once dry added a third layer by hand-brushing on another layer for texture with an angled Purdy XL 1 inch brush. The faux effect of slate was achieved by layering rows of White Ning full strength and Midnight's Blackness full strength. For a natural-looking effect we applied a row of White Ning straight from the bottle in a dotted formation about every 1.5 inches, alternating with a row of Midnight's Blackness every other row. We used our Shany goat bristle blush brush to blend each line into the other. We allowed each layer to dry, then repeated the process 5 more layers, each time alternating the opposite colors on top of the previous layer. Once we had a nice striped effect going, we


took some White Ning 60/40 mixed with water and applied with the Shany goat bristle blush brush in a circular pattern to achieve a softened and polished rock look. For our final layer of the faux slate, we used Midnight's Blackness and White Ning full strength custom mix to make a nice dark gray color, added 50/50 to water and performed a wash over the entire top with the Shany goat bristle blush brush. Once dry, we brushed on a very thin layer of Minwax Fast-Drying Polyurethane in clear satin to lock in our slate top. We allowed the top to dry over night.
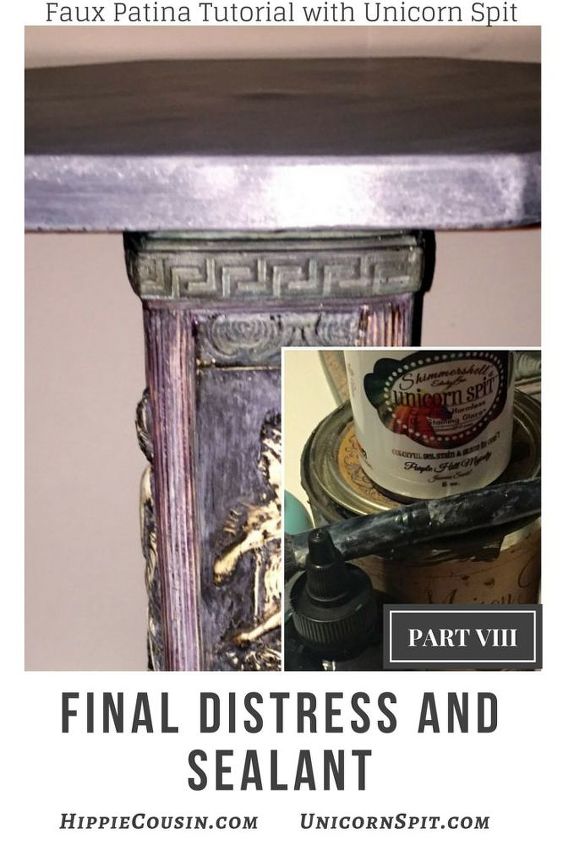
Part VIII: Final Distress and Sealant


We used a 3M fine 320 grit sanding block to lightly sand the poly layer of the table top, before brushing on 2 more coats of Minwax Fast-Drying Polyurethane in clear satin to protect it fully. Once the top was dry, we used Krylon Matte Finish Spray to apply 3 coats of flat non-shiny non-yellowing protection. (We completely dried and used our 3M fine 320 grit sanding sponge between each coat.)
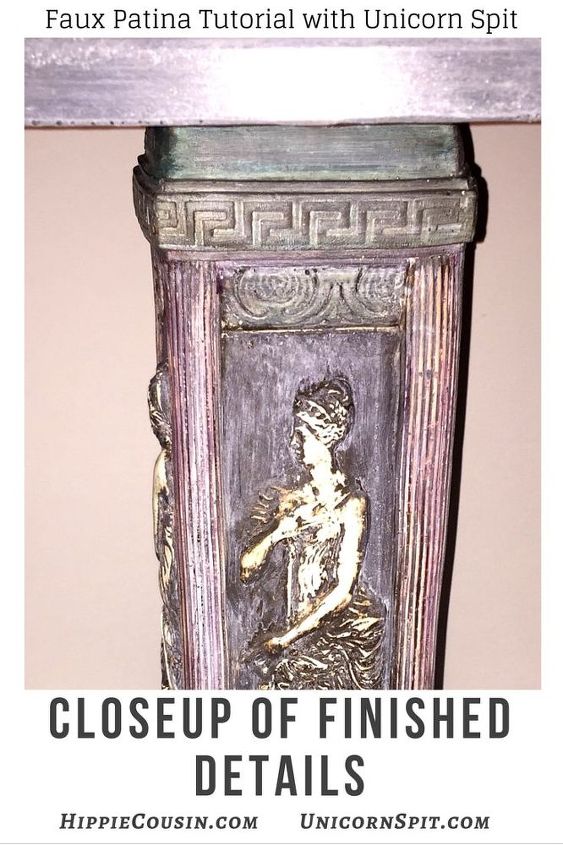
We are really delighted with how this piece turned out! We can't decide if we are going to place this lovely pedestal table in our store or keep it in our studio since it coordinates rather nicely with our pale lavender walls!
Suggested materials:
  • Dr. Bronner's Peppermint Pure Castile Oil Liquid Soap
  • Milliput White Superfine Epoxy Putty
  • Maison Blanche Paint
See all materials
Frequently asked questions
Have a question about this project?
Comments
Join the conversation
 1 comment
  • William William on Jun 10, 2016
    Outstanding! You "Spit" on it and brought all the beautiful details. Superb job!
Next