


Preventing Moisture in Spray Foam Attic With a DIY Mini Split
In this HT tutorial, I show you how to install a DIY mini split air conditioner and heat pump in a spray foam attic for humidity and moisture control. These systems also work great for garages, workshops, basements, and lofts.
I realize this project is a bit costly compared to other HT posts; however, it is a cheaper option compared to a traditional HVAC system and can be installed by a DIY'er.
Mini split air conditioners and heat pumps are becoming very popular in the United States. Furthermore, mini splits now come with pre-charged line sets, which allows you to install the system without hiring an HVAC technician.
My family and I recently moved into a new house.
Our new home contained many energy efficient features such as tankless hot water heater, insulated HVAC ducts, and adequate batt insulation.
Although the insulation adequately protected our living space, the attic reached very high temperatures for most of the year.
As a result, I decided to hire an insulation contractor to install open cell spray foam on the roof line of my unvented attic.
Shortly after, I realized I needed an efficient and affordable solution to reduce high humidity and prevent moisture problems which ultimately lead to mold problems.
After many hours of research, I decided to perform a DIY mini split install (my 3rd) to prevent moisture problems in my spray foam attic.
Keep in mind, the instructions below not only apply to my attic installation, but also a typical wall indoor wall insulation.
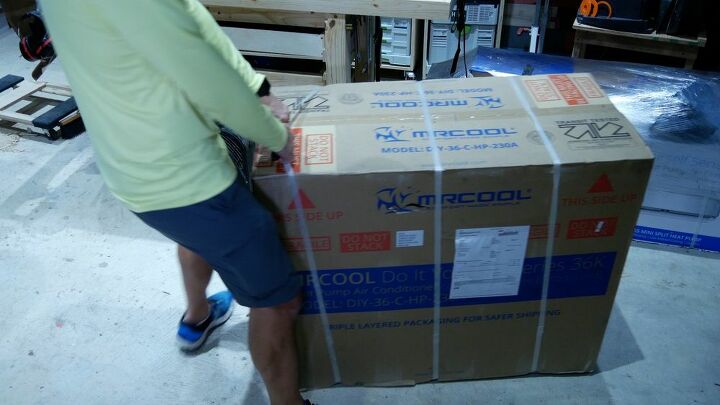
Unboxing
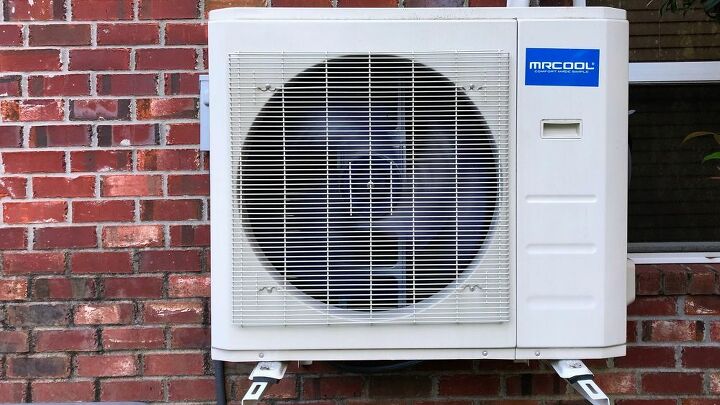
The MRCOOL DIY 36,000 BTU mini split arrived in 4 boxes and packaged very well.
First, the outside condenser unit was packaged in a large box with 2 layers.
Then, I removed the inside air handler from the third box.
The stiff foaming in the boxes provide stability and protection for the box and the contents within the box.
Finally, the fourth and final box contained the mounting bracket for the outside condenser.
The DIY mini split included the following accessories:
- Mounting Plate
- Wall Sleeve Insert
- Wall Sleeve Cap
- Rubber Pads
- Clip Anchor
- Mounting Plate Fixing Screw
- Seal
- Drain Joint
- Drain Hose
- Neoprene Putty to Seal Access Hole
- Air Freshening Filter
- Smart HVAC Controller Amazon Alexa & Google Assistant
Mount Indoor Unit
If you plan to install the mini split on an interior wall, ignore the information within this step regarding the custom mount. Instead, the mounting plate would be mounted to a stud on an interior wall.
First, unscrew the single screw on the rear of the indoor unit to release the wall mounting plate.
Next, I located the cardboard wall template included with the MRCOOL DIY mini split.
Then, I chose a suitable installation location to mount the indoor unit.
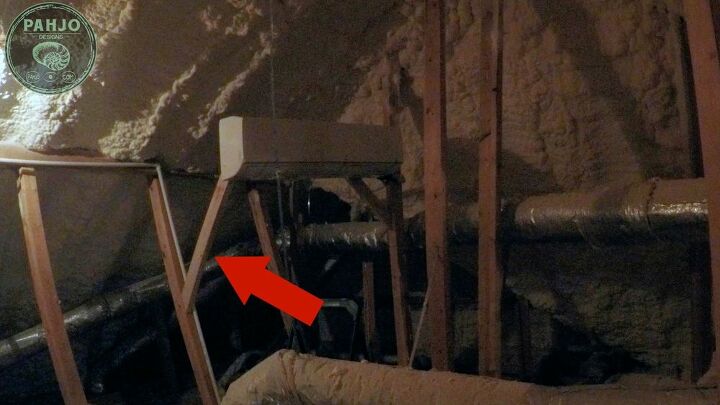
I installed this mini split in the attic which has no flat walls.
Consequently, I secured the mounting plate to a scrap piece of 1x12.
As a side note, I chose the location in my attic above my garage for 3 reasons.
- The majority of the warm air enters my attic from the garage.
- This was the best location due to the length of the refrigerant lines.
- The HVAC unit for my main home is located near this area which makes my electrical breaker box more accessible
I attached 1 2x4 roughly 40" long to an attic stud with stainless steel 3" screws. The 2x4 rests 7' high and parallel to the attic floor.
Next, I attached another 2x4 at a 45 degree angle to support the parallel 2x4.
Once I installed the first 2 2x4s, I used another 2x4 cut at 45 degree angles on both ends to secure the parallel 2x4 from the rear.
Finally, I secured the mounting plate to the parallel 2x4 using 2" screws and verified it was level with my magnetic level.
I lifted the DIY mini split indoor unit and placed it on the mounting plate.
Mount Condenser Bracket on Brick
After I mounted the mini split indoor air handler, my focus shifted to the outside condenser unit.
First, I assembled the mini split condenser mounting bracket.
The mini split condenser bracket package contained the following:
- 2 extension arms
- 2 vertical pieces
- Nuts/Bolts (4 of each) to secure the arm to the vertical pieces
- Nuts/Bolts (4 of each) to secure the mini split to the extension arm
- Anchors/Bolts (4 of each) to secure the vertical pieces to the surface
- Instructions
Ultimately, the mini split condenser mounting bracket instructions provide clear direction so I won't cover the assembly in this post
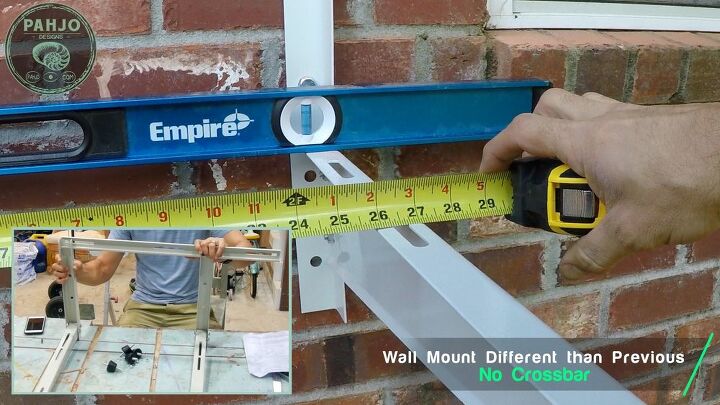
Unlike my first MRCOOL DIY mini split install, this mounting bracket did not include a cross bar.
The cross bar helped keep the mounting bracket at a fixed length apart.
So, I had to measure the length between each foot hole (26.5") on center before attaching it to the brick.
I chose to mount the MRCOOL DIY mini split adjacent to the main HVAC unit.
In addition, the concrete pad my main HVAC unit rests on did not have enough room for the mini split.
I used my 4' leveler to mark a straight line roughly 6" to the left of my garage window.
Next, I placed the right bracket on the wall with the line in the middle of each hole.
I marked 3 holes with a circle using my pencil.
Then, I marked the depth of the bolt on my drill bit to make certain the depth of the hole would be accurate.
I used a masonry bit to drill the hole.
This step isn't necessary, but it made me feel better.
I put weatherproofing caulk in the hole to seal it before hammering the bolt anchor in place.
Next, I placed the anchor in the hole and gently tapped it with my hammer until it was flush with the brick.
Then, I placed the bracket over the hole and tightened the bolt by hand.
I attached my magnetic level to the side to make sure it was level.
Using my drill with the correct size socket, I tightened the bolt. I repeated this process for the other 2 holes.
After one side was secured to the brick, I used my tape measure and leveler to measure 26.5" to the left.
Finally, I repeated the process above for the other side.
As you can see from the picture above, the previous mounting bracket I installed had a horizontal bar.
The horizontal bar eliminated the need for this step.
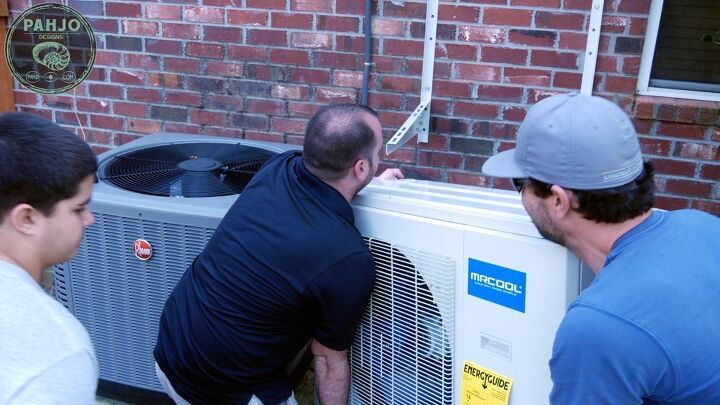
Secure Condenser Unit on Bracket
The outside condenser is very heavy, so I had to call my buddy and his son to help me.
First, I used my furniture dolly to transport the mini split outside condenser from my garage to the install location.
Next, we lifted the condenser on the mounting bracket.
Before attaching the nuts/bolts, I placed the rubber pads below the hole in all 4 corners.
Then, I used the nuts and bolts to secure the 4 corners of the DIY mini split to the wall mounting bracket.
As a final note, I swapped the bolts/nuts included with the mounting bracket to stainless steel nuts and bolts a few days after the installation
Ultimately, I felt the nuts/bolts included with the bracket would eventually rust.
DIY Mini Split Line Set
Now the outside condenser and inside air handler are both mounted, it was time to run the line set from the air handler to the condenser unit.
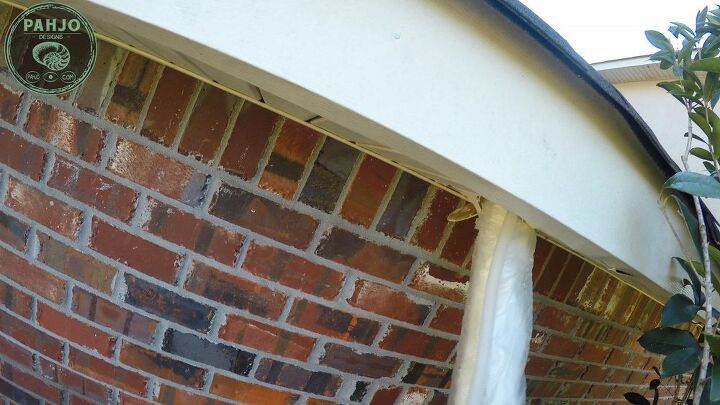
First, I located a spot within my soffit directly above the refrigerant lines.
Also, I made sure the location did not have a stud directly above it.
Next, I used my drill and 3.5" hole saw to remove a piece of the vinyl soffit.
Keep in mind, the process remains the same regardless of the material type.
After I drilled the hole outside, I went into the attic and removed a section of open cell spray foam.
This location in the attic is called the 'attic eaves'.
In addition, I tried to remove the open cell spray foam in large chunks.
Essentially, this makes it easier to reinstall and seal.
Then, I wrapped the pipe and drain hose together with electrical tape.
I pushed the line set through the hole with the drain hose on the bottom (towards the brick) of the line set bundle.
After I pushed about 3' of the line set into the open cell spray foam hole, I went outside and pulled the excess I needed to comfortably connect the refrigerant lines.
Finally, I went back into my spray foam attic and pushed the large pieces of spray foam back into place.
Once they were snug, I used a spray foam gun and closed cell spray foam can to seal everything back in place.
Open cell spray foam is difficult to find in a can, so I used a closed cell spray foam can to only seal.
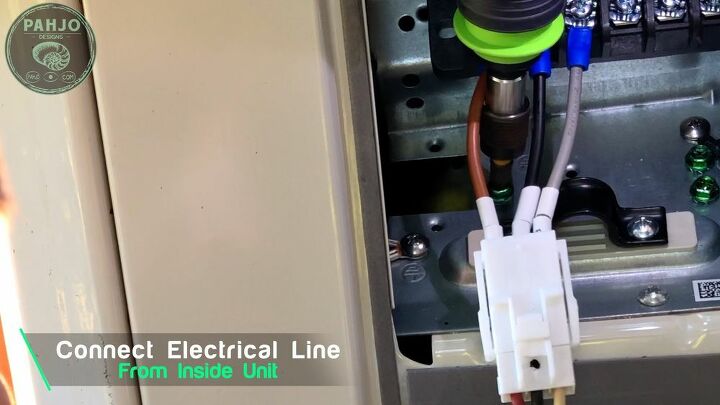
Connect Electrical
First, I used my drill to remove the electrical wiring cover at the top of the unit on the right side.
Also, refer to the wiring diagram for 110V and 220V terminal assignments.
The MRCOOL DIY 36K runs on 220V. So, I used those terminals.
Next, I attached the wiring harness and pushed until I heard a click.
Then, I unscrewed the green ground screw, attached the ground wire, and tightened the screw.
First, I've received so many questions and comments on my blog post and YouTube Video regarding MRCOOL DIY Mini Split precharged line sets.
Below are some comments I received from folks who just refuse to believe these line sets exist. Little do they know, these have been around for years."No vacuuming the Lines? You have to get the air and moisture out dude.""This unit won't last.""This isn't for real. You just got ripped off.
Most of these comments originate from HVAC professionals or people who don't know about pre-charged line sets.
For the sake of time, visit here to learn more about pre-charged line sets.
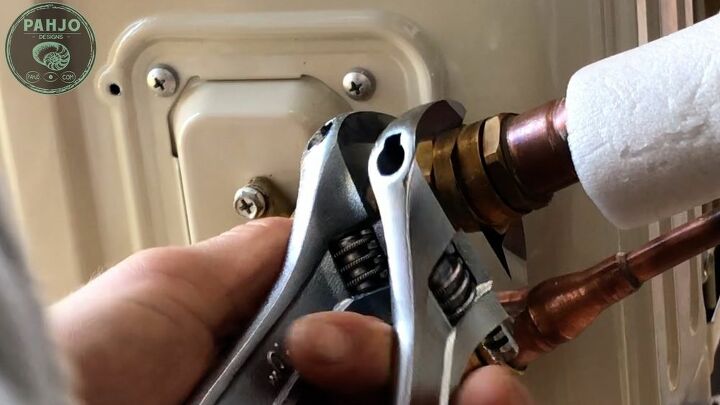
Connect Line Set to Condenser Unit
Below the electrical box, remove the water tray cover to expose the refrigerant valves.
As mentioned previously, this line set is pre-charged with R410A refrigerant.
So, it is vitally important to refer to the instructions in your manual for this step.
First, hand tighten the first few threads for the top valve and the bottom valve.
Next, use 2 open ended wrenches to tighten the bottom connector and then the top connector.
After the top and bottom were secured, check for leaks with soapy water.
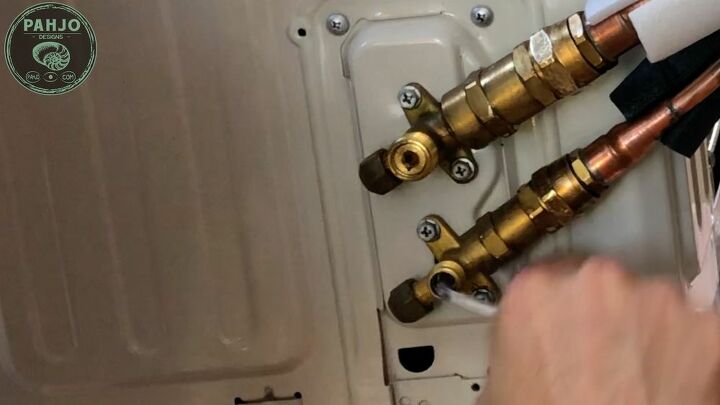
Open Valves
I used the provided 19mm open-ended spanner to open the valves.
First, I unscrewed the cover and inserted the wrench into the valve.
Next, I turned the wrench counterclockwise until it fully opened.
Then, I repeated the same procedure on the other valve.
I checked for leaks again and re-installed the cover.
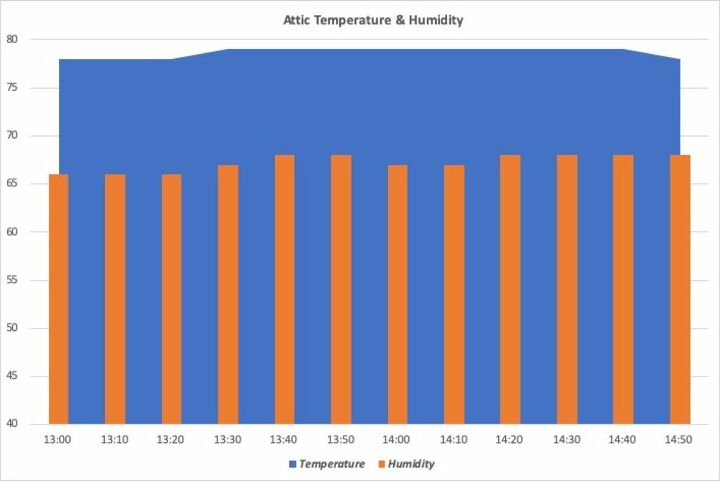
Attic without Mini Split to Control Humidity
Obviously, the temperature and relative humidity in my spray foam attic are not ideal as shown in the chart below.
Relative humidity rises above my threshold of 65% and the air temperature rises above 75 degrees. I prefer to keep relative humidity at 65% or below and the temperature at 78 degrees or below.
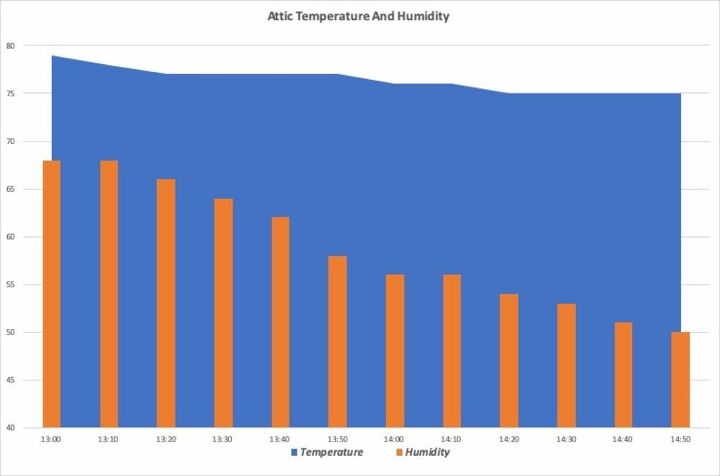
Attic With Mini Split to Control Humidity
So, did my mini split reduce relative humidity to prevent moisture problems in a spray foam attic?
Well, I encourage you to read a bit more to find out.
Please note, the weather was the same during the 2 consecutive days I obtained this data.
First I set my DIY mini split via the Smart Controller app to turn on at 1pm and off at 2:50pm the following day.
Furthermore, I set the mini split to the 'Cool' mode with a set point of 75 degrees.
As you can see from the chart below, it took about 20 minutes for the relative humidity to begin to drop.
The RH continued to drop for 40 minutes from 1:20pm to 2:00pm.
As I expected, the temperature dropped to 75 degrees from 78 degrees and normalized.
In case you don't know, the MRCOOL DIY mini split continues to run even after it reaches the desired temperature.
Therefore, I have to presume this explains why the humidity continued to drop even after the spray foam attic reached 75 degrees at 2:20pm.
Essentially, the mini split worked as intended by reducing RH from 67% to 50% during the 1:50 minute interval.
Furthermore, the temperature dropped 3 degrees while continuing to dehumidify the spray foam attic.
As time goes on, I'll continue to fine tune the settings until I continuously maintain the ideal air temperature and relative humidity.
After about a week, I noticed the fans help the mini split reduce humidity and air temperature 20% faster.
Some folks believe fans provide no value b/c they just circulate the humidity around.
This is an accurate assessment in some cases without any mechanism in place to reduce humidity.
However, it is not true in my spray foam attic. Because my DIY mini split install conditions the attic air and removes moisture.
Conclusion
Thank you for taking the time to read my this HT post. I hope it provided you with value.
Be sure to click here to visit my 6,000 word blog post on this project. I didn't include everything in this post as it is beyond the scope of the DIY mini split install. My blog post contains information regarding:
- Attic Ventilation (Vented Attic vs Unvented Attic)
- Spray Foam Moisture Problems
- Various Options to Reduce Spray Foam Attic Humidity
- Home Automation to Measure & Control High Humidity
Resources for this project:
See all materials


Comments
Join the conversation
-
This is a costly solution that really isn't needed and may be more of a detriment. Cost of the unit, cost of operating the unit. You have an unvented attic then add some roof vents and a thermostatically controlled attic ventilator. Air movement within the attic to the outside will prevent any chance of trapped moisture. Similar as having an exhaust fan in the bathroom. But to each his own.
http://www.gotfoaminsulation.com/fact-fiction-menu
https://www.askthebuilder.com/spray-foam-insulation-condensation/
-
Just read your blog. You have an unused, somewhat well insulated attic. No insulation on floor so pulling air from the main living quarters. A separate undersized mini split system for the attic drawing 220V. Ha Ha, two fans in the attic to blow the split system air around. Each drawing 120V. If someone doesn't plan to convert an attic into living space some turtle roof vents and a thermostatically controlled attic fan, insulation in between the floor joist and on top of the joists is cheaper and does the job.


Frequently asked questions
Have a question about this project?