


How to Fix a Hole in the Wall Quickly and Easily

By Marilyn Syarto
Whether they are made by accident or not, or they’re small or large, holes in a wall can be unsightly. Learning how to fix a hole in the wall is an easy enough skill even for a novice to tackle. It doesn’t require many tools until you get to the super big holes, and for small- to medium-sized holes, you don’t need to know much about drywall.
Our guide gives you steps on how to fill holes in your wall from tiny nail holes to much larger patches. So don’t worry if a doorknob or a toy slams too hard into your wall; it’s all fixable.
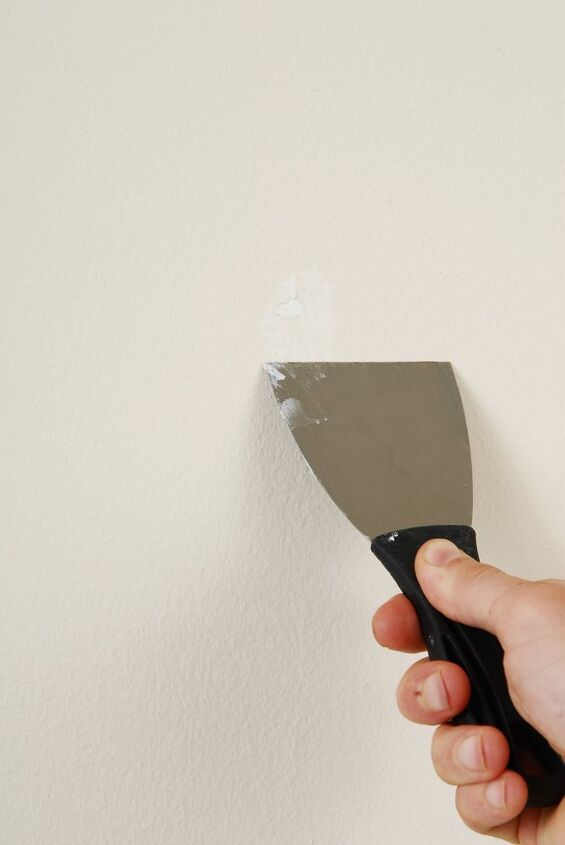
Photo via Shutterstock
How to Fix Nail Holes
Nail holes, dents, and even tiny cracks are easy to fix and do not require many tools or materials. You may want to fix these small holes so you can prime and paint a smoother surface, or, you may want to repair the holes without repainting.
Drywall vs. Sheetrock
Tools and Materials Needed:
- Lightweight, non-shrinking spackle (you can use putty if that’s all you have, but putty is meant for larger jobs like covering seams in drywall)
- Putty knife
- Soft, clean cloth or wet sponge (optional)
- Small piece of fine-grit sandpaper
- Touch-up wall paint
Step 1: Clean the Hole or Crack
Blow on the hole or crack to release any small particles of dust.
Step 2: Apply Spackle
Using the putty knife or even your finger, fill in the hole (dent or crack) with spackle, enough so the spackle completely fills the hole and is level with the wall’s surface.
Step 3: Let Dry
Let the spackle dry for the amount of time recommended on the package (it should be about 15 to 30 minutes).
Step 4: Smooth the Area (optional step)
Using a slightly damp cloth or sponge, wipe the spot to smooth the spackle.
Step 5: Sand the Spot
When the spot is dry, use fine-grit sandpaper to gently and carefully sand the area smooth. Use your fingers to brush away any sandpaper particles and other debris.
Step 6: Paint (optional step)
Touch up the spot with paint that matches the wall. If the hole is very tiny, you won’t always need to paint.
Substitute for Spackle
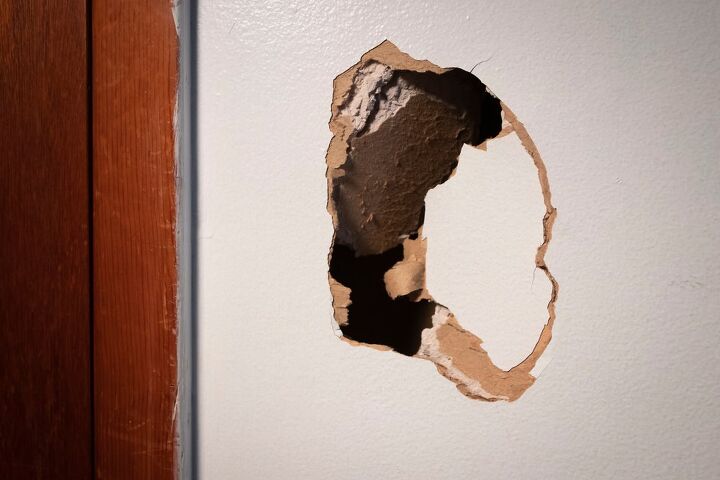
Photo via Shutterstock
How to Fix a Small Hole
A small hole is anything considered about ½ inch to five inches in diameter (roughly the size of a screwdriver, hammer’s head, or a doorknob that accidentally punches through the wall). For this size job, it’s best to take advantage of the many wall repair kits available at home improvement stores. Choose a wall kit that fits your size hole. The kit will generally include the following items:
- Small tub of spackle
- Self-adhesive patch (it may be mesh, metal, or even plastic)
- Putty knife
- Sanding pad
Follow the package’s instructions, but here are general steps so you can see how easy it is to use one.
Tools and Materials Needed:
- Wall repair kit for your size hole
- Primer
- Touch up paint for your wall
Step 1: Clean the Hole
If you can reach inside the hole, pull out any debris and run your fingers around the edges to smooth it out as much as you can.
Step 2: Apply the Patch
You will have some sort of mesh or stabilizing patch in your kit with a tacky coating on one side. Put that over the hole, sticky side on the wall.
Step 3: Spackle the Patch
Use the spackle in the kit to cover the entire patch. Apply in a crisscross pattern and feather the edges so it blends in with the wall’s surface.
Step 4: Smooth the Spackle
Use what the kit suggests to further smooth out the spackle—it could be a wet sponge or sandpaper. Let dry.
Step 5: Prime and Paint
Touch up the area of the wall with prime and paint to match your wall.
How to Handle Popped Nailheads
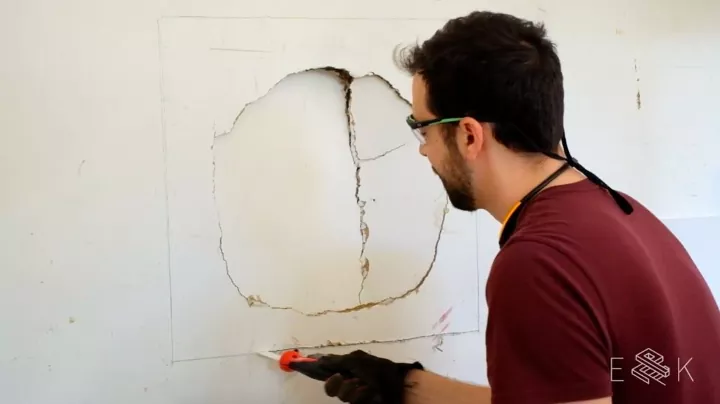
Photo via Evan and Katelyn
How to Fix a Big Hole
A large hole is anything considered over six to eight inches all around to about two feet by two feet. This is a more intermediate DIY project that requires specific tools, but it’s still pretty easy to accomplish even for a beginner.
Drywall Panel Size
Tools and Materials Needed:
- Piece of drywall
- Pencil
- Sanding block and 150-grit sandpaper
- Tack cloth or paper towel
- Two short pieces of 1x4s (wood)
- Drywall knife or serrated knife
- Utility knife
- Drywall screws (at least 12 and 1 ¼ in size)
- Drill
- Construction adhesive/joint compound
- Putty knife
- Drywall joint tape
- Primer
- Paint to match your wall
- Protective gloves
Step 1: Trace Around the Hole
Use your clean-edged piece of drywall (it needs to be larger than the hole in your wall) and hold it up over the hole. Trace around the piece of drywall onto the wall.
Step 2: Cut the Hole
Use your knife to cut along the square you traced on the wall and remove the excess drywall. You should have a clean square on your wall.
Step 3: Sand the Edges
Using a sanding block with 150 grit paper, smooth out the edges of your square. Wipe away dust with a tack cloth or paper towel.
Step 4: Install Wood Backing
If there’s no stud behind your hole, you will need to give the drywall scrap something solid to attach to, such as wood. Place one piece of wood behind the square opening on the left side and use drywall screws, at least three on each side, to attach the wood to the edge of the drywall. Make sure the hole overlaps the wood by about 1 ¼ to 1 ½ inches. Apply the second piece of wood to the right side of the opening the same way.
Hole too Large?
Step 5: Apply Adhesive
When the wood is in place, use a putty knife to apply construction adhesive to the face of each piece of wood.
Step 6: Secure the Patch
Put the clean patch of drywall up to the hole so it fits nice and snug into the space. Press it in so it makes contact with the adhesive on the wood. Then use drywall screws, at least three on each side, and your drill to attach the patch to the wood.
Step 7: Spread More Adhesive
Use a putty knife to spread a generous amount of compound around the edges of the drywall patch. Feather it as you apply it around the edges so it blends into the wall’s surface.
Step 8: Apply Tape
Apply drywall tape (the mesh type of tape will be slightly adhesive) to the compound around the edges of the patch and cut the tape with a utility knife. The compound will hide the tape and smooth out the patch. Let the compound dry completely.
Paper vs. Mesh Tape
Step 9: Sand
Sand the compound with the sandpaper block once the compound is dry. If necessary, add more thin coats of compound and repeat steps until the patch is smooth.
Step 10: Final Sanding
Lightly sand the final coat of dry compound. Then prime and paint the wall.
Buying Drywall
Tips and Hacks for Difficult Cases
Sometimes, a problem is bigger than a simple spackle or patching job won't fix the issue you're facing. Here are some more difficult problems and how to face them.
When to Replace a Drywall Panel
If you have multiple holes or the hole is too large and appears to affect the structural integrity of the drywall, you’ll need to replace the entire or half of the drywall panel.
How to Fix a Hole in the Ceiling
You can use the methods above to patch holes in your ceilings—ceilings are typically made from drywall, too.
How to Reduce Nail Holes
Cut down on the number of nail holes in your walls by using alternative ways to hang artwork on drywall. The best trick: Command Velcro Hangables products.
What kind of material have you used to plug up small holes in your walls? Have you used toothpaste? Let us know your creative fixes for wall holes!
Comments
Join the conversation
-
I have used a white bar of soap to fill nail holes.
-
Great instructions. I have had holes of all sizes. I used toothpaste and white chalk to fill little nail holes before painting. My biggest hole was from a door handle. My mistake was I did not let the spackle dry completely. I know better now and also buy the pink stuff that turns white.


Frequently asked questions
Have a question about this project?