Vintage Dresser Makeover in White Chalk Paint and Oil Rubbed Hardware

Natalie
by Natalie
8 Materials
Easy
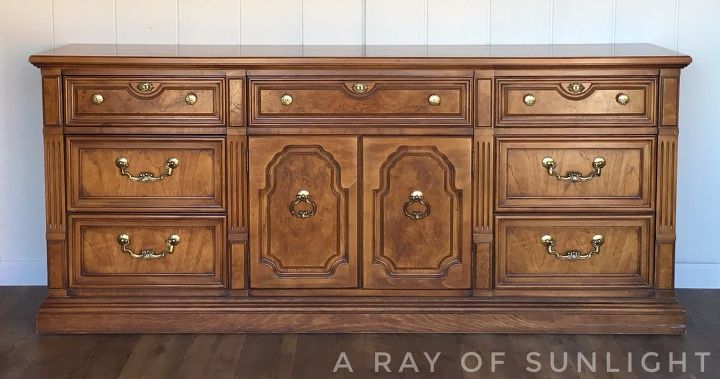
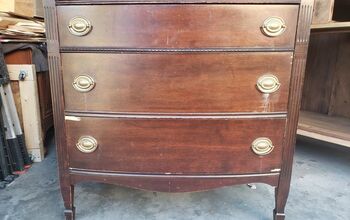
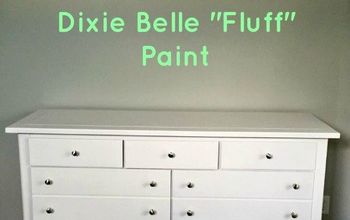
We recently refinished this stunning Thomasville Dresser that we had for 6 months! I can't believe we waited that long to bring it back to life because it sure didn't disappoint in white! This one was solid, super well built and in excellent condition. The only problem was the less than pleasing finish.
We started by removing the hardware (as always), filling the old drawer pull holes in with Bondo and then lightly sanding everything with 220 grit sandpaper just to give the paint something extra to grab onto. Using TSP we cleaned all the dust and gunk off and let it dry.


About a year ago I invested in this Wagner Paint Sprayer. I can't believe I waited so long to get one! Not only does it make painting a faster, it also provides a smooth even finish on all of my pieces! Plus those dreaded chairs or super detailed pieces are a breeze! I'll do a post to explain how amazing it is in more detail, but don't wait around to get yours! You NEED to have it in your life. It's cheap, doesn't need an air compressor and it has 2 containers for paint (one container ALWAYS has poly in it for me). It basically pays for itself even if you're doing just one project!


My go to paint is a homemade mixture of chalk paint made from Behr paint and calcium carbonate powder. Because I use Behr paint my color options are endless, even though for this project I went with the plain and simple "Pure White". Yep, I just walked up to the paint shelf in Home Depot, grabbed a can of flat interior paint in Ultra Pure White and continued on with my shopping. No need to tint the paint, it's already a great shade of white, plus I hate when the line is so long just to get one can of paint tinted - especially if I'm tinting to another shade of white. Of course when using my Wagner Paint Sprayer I thin the paint out, but it's super simple and beats painting a huge dresser with a paint brush.
We took the dresser and drawers outside to our favorite paint spot. It's in the rocks in a wide open area so I don't over spray on anything that shouldn't get painted. We laid down our handy dandy dollar tree shower curtains with wood blocks on each corner to keep the plastic from blowing away and put the dresser and doors up on 5 gallon paint buckets.


We sprayed about 5-6 thin coats to prevent the paint from dripping. Once all the paint was dry I grabbed more 220 grit sand paper and lightly sanded along all the edges and flat surfaces to provide an even smoother completed finish as well as give an distressed look.
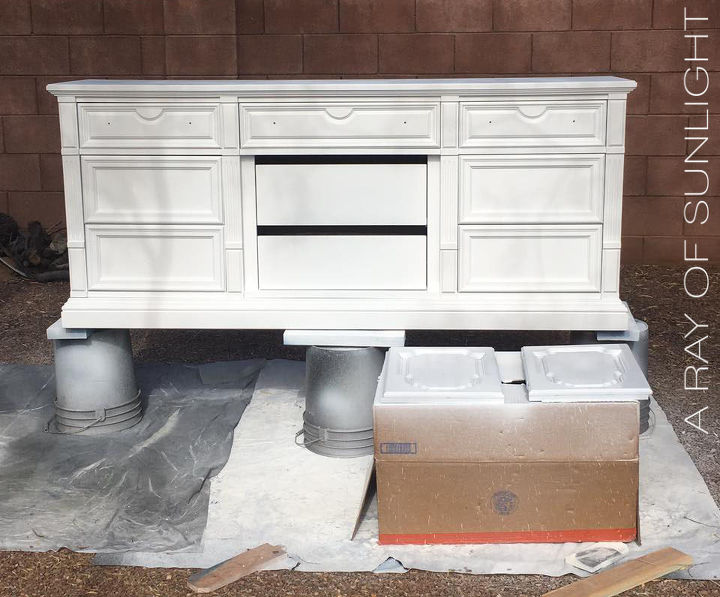
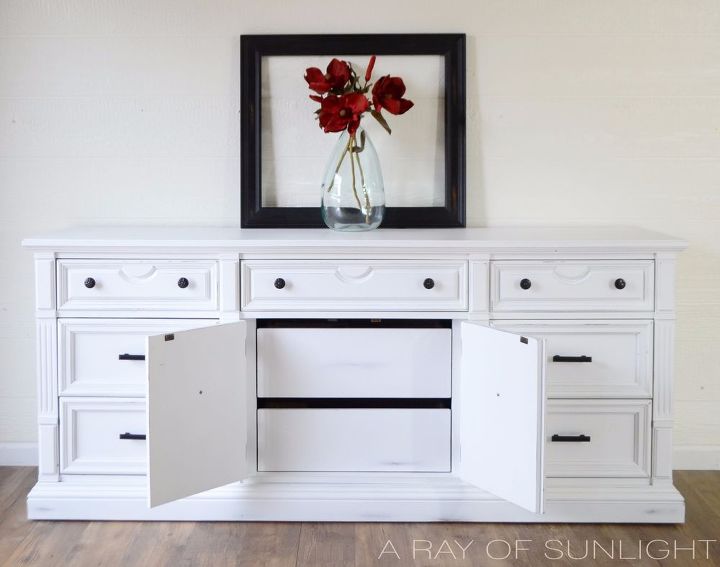
Once all the dust was wiped off I applied 3-4 coats of Varethane Polyurethane. Because some of the hardware was old and some of it was new, we opted to spray all of the hardware with Rustoleum Metallic Spray Paint in Oil Rubbed Bronze before attaching it all back onto the dresser.


I couldn't believe how it went from being an okay dresser to being a completely stunning piece that sold within a few hours of being listed. I kick myself every time I think of how long it sat in my garage before I got around to giving it a new life. And pictures just don't quite do it justice, but I guess you'll have to take my word for it.
For more pictures and tutorials like this please visit the link below!
Suggested materials:
  • Behr Interior Paint in flat
  • 220 grit sandpaper
  • Wagner Paint Sprayer
See all materials
Natalie
Want more details about this and other DIY projects? Check out my blog post!
Go
Frequently asked questions
Have a question about this project?
  1 question
  • Pamela Sand Pamela Sand on Sep 11, 2017

    why do you fill the pull holes with Bondo only to reattach them?

Comments
Join the conversation
4 of 6 comments
Next