


Jazz Up Your Decor With Furniture Paint

Painting furniture has always been a great way to get a custom home decor piece without the budget-busting price. Curbside finds, hand-me-downs and thrift store deals can be totally transformed in a matter of hours with this simple DIY. In recent years, the popularity of painted furniture has skyrocketed as upcycling and repurposing have come into vogue.
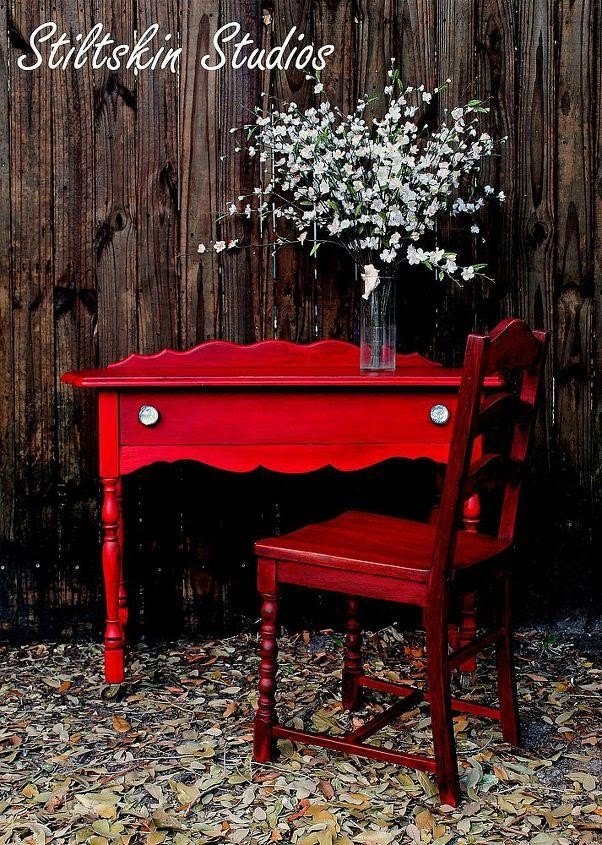
See post: Stiltskin Studios|Milk Painted Furniture
Prepping The Furniture
Prepping your furniture for paint is boring, and you may be tempted to skip it, but honestly, it’s the most important step in the process. No one wants to spend hours making over a piece only to watch the paint crack, peel or bleed away when applied. Proper preparation of the furniture surface you plan to paint will ensure that the paint adheres well, gives you the rich, professional look you desire and lasts for years to come.
The type of prep you’ll have to do will depend upon several factors, including what material you will be painting if it is damaged in any way and what type of paint or technique you have chosen, but in general, the process consists a few steps.
1. Cleaning
Whether you’re painting wood, metal or plastic, cleaning your furniture is always the first step. Before you pick up a brush or roller, you’ll want to make sure that your furniture is clear of any debris. Remove the hardware and drawers and start your clean up. Depending on your piece you can use vinegar and water or a commercial degreaser. A spray application is often easier, but a damp rag will work, as well. You don’t want anything oily, sticky or slick on the surface and you want to be certain that your piece is completely dry when you begin to paint.
As you move onto the next of the process, make sure you’re protected. Gloves, eye goggles, and a mask are recommended. It’s also extremely important to work in a well-ventilated area and use spray paints and oil-based paints outside.
See post: Juneolsen|Using Chalk Paint to Update Your Wooden Furniture...
2. Repairing Wood
If your wood furniture has any gouges, splits or chips you’ll want to repair them before you apply your paint. Your finished piece will only look as good as what’s underneath and while paint can give your table or chair a fresh face, it can’t fill a hole or patch up missing veneer. To do that, simply grab a wood filler and add it to the spot in need of a fix, let it dry and then sand away the excess until the area is smooth. In addition to damage, you may need to fill holes from old hardware or drawer pulls if you’ll be adding new ones with a different alignment. The process for that is the same.
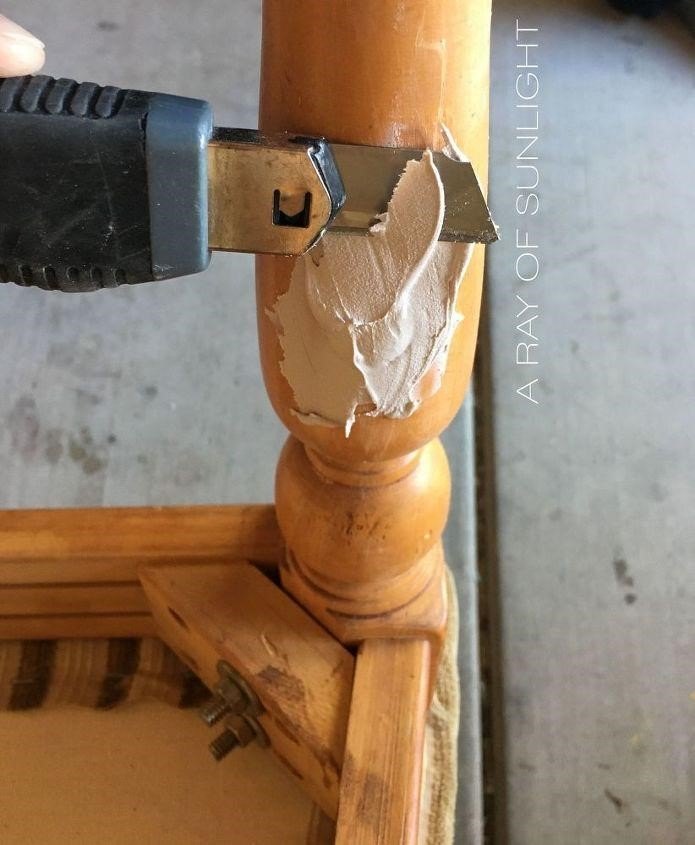
See post: Natalie|How to Easily Repair Furniture to Paint
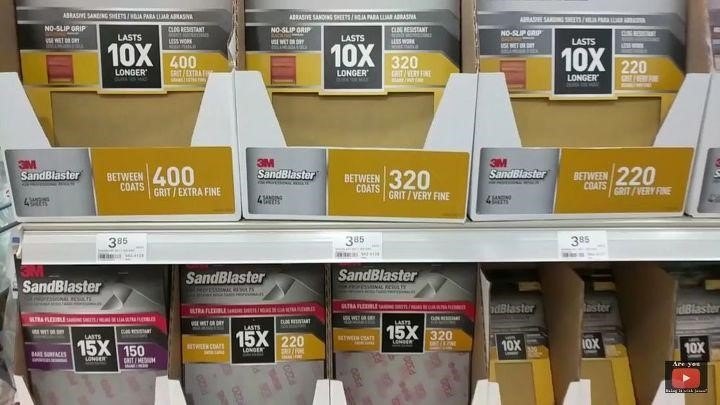
3. Sanding
Sanding the entire piece is up next, especially if you’re working with wood. You’ll want to remove any loose chips of paint and smooth down rough spots. Sanding will also help to clear away any bits of debris that were leftover after washing, making it easier for the paint to stick. An extra fine or fine grade grit is usually sufficient for this task. When the sanding is done, make sure to wipe away all of the dust left behind.
See post: Doing It With Jason|How to Glaze Furniture- Reclaim and Antique Finish Technique
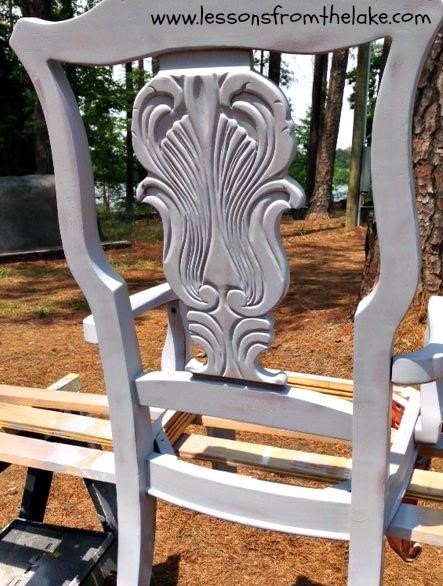
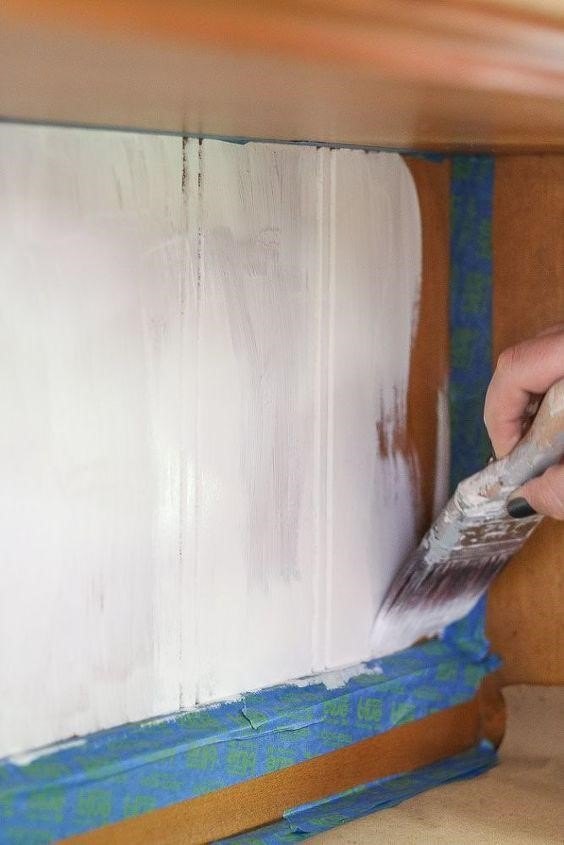
4. Priming
Primers are important because they help the paint cling to the surface you are painting. You may need several coats to cover your furniture adequately, especially if the wood is unfinished when you start. Primers are available in both spray and brush on varieties. Spray primers are ideal for projects with heavy detail, like this chair, where it would be difficult to get a brush. When the priming is complete it’s usually recommended that you sand your piece lightly and wipe it down again.
See post: Caroline|From 80's Blah To Vintage Wow!
Painted Furniture Ideas
Now you’re ready to paint! As with the prep, the kind of paint you’ll use and how you will apply it, depends largely on what material you’ll be covering and the look you’re trying to achieve. There are many different varieties of paint and techniques out there today, to help you makeover your furniture, with a brush or spray can.
Traditional Furniture Paint
When most people think about furniture paint, they envision themselves leaning over a can with a brush or roller in hand. Chalk paint, latex, enamel, metallics, and even decorative touches can all be applied this way. Grab the can, pop the top and go.
Latex Paint
Many people opt for basic latex paint. Apply it to primed and sanded furniture one coat at a time with a brush in long, even strokes going in the direction of the wood. As with priming, it’s usually recommended that you lightly sand each coat of dry paint, before you apply the next for best results. When the piece is dry, you can add a sealer, in a finish of your choice, matte, satin or gloss, if you like to protect it. Basic, easy, done.
Chalk Paint
Chalk paint is another option that has become super popular in recent years, because of its versatility and ease of use. It goes on quickly and easily and doesn’t require much prep. If you’re not into a lot of sanding and priming, chalk painting furniture is the way to go. The furniture surface still needs to be clean and free of debris. Just brush it on and let it dry. Chalk paint has a matte look, perfect for country or farmhouse decor. You can leave it as is or seal it with a coat of wax or varnish. You can also sand it or distress it for an aged look or stencil over it with a custom design. It comes in a variety of colors and better yet, you can even make it yourself.
See post: Linda|PAINTING FURNITURE WITH CHALK PAINT
Stenciled Furniture
Perhaps you’re not interested in painting an entire piece of furniture but would love to add a decorative accent. Why not try a stencil. Stencils are an easy way to get a hand-painted dresser or table quickly and simply. Prep your piece by cleaning the surface, place the stencil pattern on the wood and dab paint on. The type of paint used is totally up to you, latex and chalk paintwork equally well. To protect your new design, add a sealer or coating when it’s dry and you’re all done!
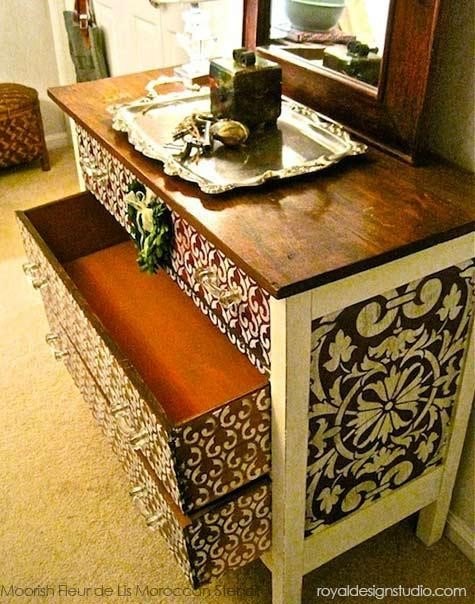
See post: Royal Design Studio|How to Stencil Wood Furniture With Chalk Paint®Decorative Paint
Patterned Roller
Looking for an even easier way to get a designer look? How about taking a patterned roller for a spin? It’s a neat cheat. The design, like this faux crocodile, is printed directly onto the roller, so you just need to roll it across the surface. Once your furniture has been prepped, painted and is completely clean and dry, dip the roller in paint, roll off the excess and add it to your furniture in long, clean strokes. Seal it when it’s dry to lock in the pretty and you’re all set!
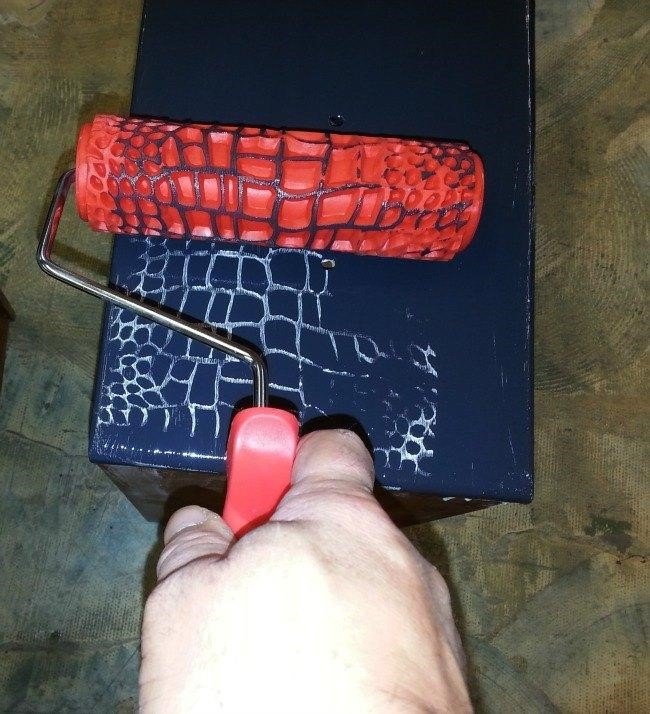
See post: Kellie from Design Asylum Blog|How to Paint Furniture With a Crocodile Roller
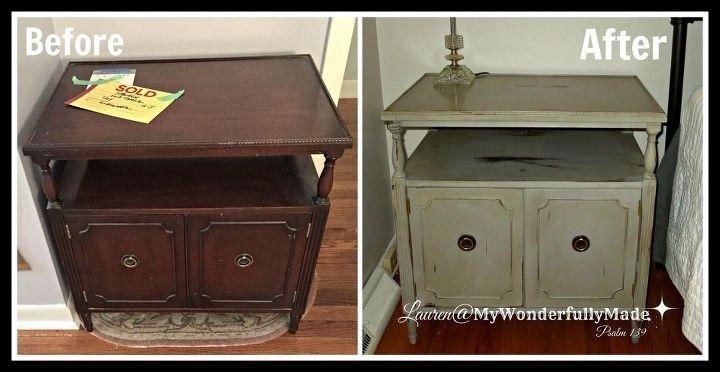
Metallic Paint
Metallic paint can be applied with a roller, as well. It has a very modern look and will add some sparkle and glamour to any room. It looks great on both bedroom nightstands and dining room sideboards and getting the look is easier than you think. Christine, from Decorated Life, recommends using a roller instead of a brush to avoid any marks in the paint. She also emphasizes the importance of prep work when working with metallics, since their sheen will highlight any imperfections in the wood. So take your time and roll your way to be the way to a perfectly shiny piece.

See post: Christine - Decorated Life|Metallic Silver Paint Looks - Shiny, Aged and Antique Furniture
Go for Shine
Metallic paint isn’t the only way to add shine to your room, especially if you’d like to cover your furniture in a color other than silver or gold. This bright yellow dresser was given an updated makeover with automotive paint, however, you can achieve the same look with a high gloss or enamel paint. Again, prep is very important when working with this type of paint and brush strokes will show up more. A foam brush or roller may produce better results. Again patience is key with this type of application, but the results are stunning.
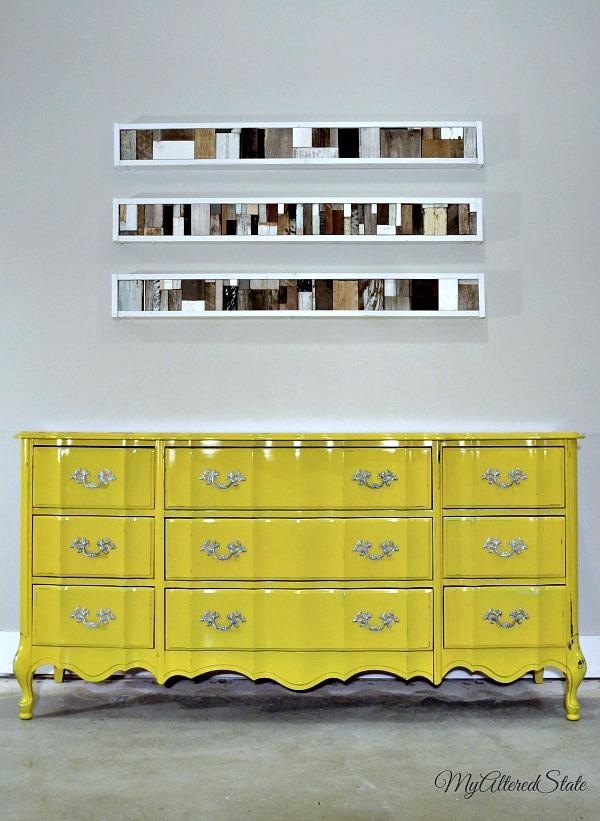
See post: MyAlteredState|Refinished French Provincial | High Gloss Furniture | Automotive Paint
Spray Paint
Looking for a quicker way to get that furniture covered? Well, spray paint is another popular option for painting furniture. Indoor or outdoor accents can be totally transformed quickly and easily without picking up a brush.
Spraying Indoor Furniture
Sometimes it’s easier to spray than to try to get a small brush into all the tiny detailed spaces of a decorative wood piece, such as a ladder back chair or one with spindled legs. Spray paint comes in a rainbow of colors from muted to bright and is just as durable as the brush on varieties. Prep your furniture the same way you would for a traditional application, shake and spray. Several coats, applied evenly to avoid drips, will still be necessary. Seal the piece when done, if desired, and remember sealers come in spray form, as well. Simple.
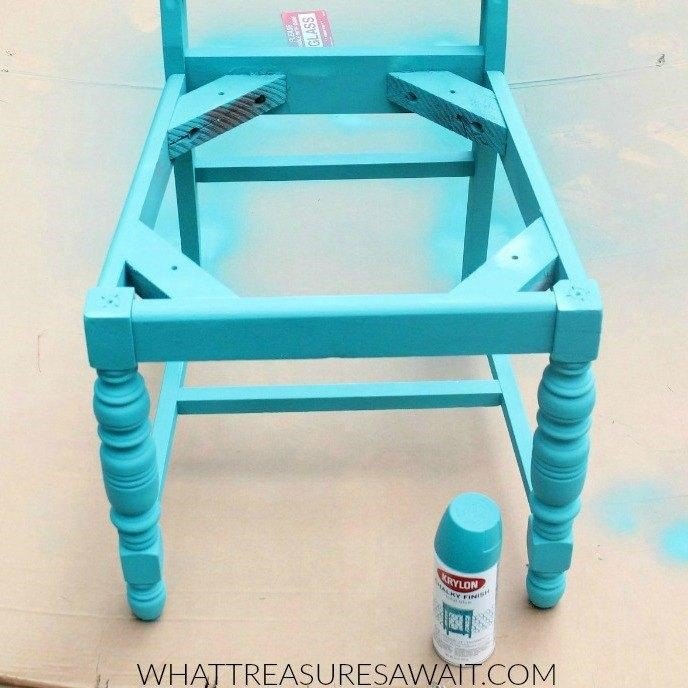
See post: What Treasures Await|Quick & Easy Chair Makeover
Outdoor Furniture Spray Paint
Don’t limit your furniture painting to inside the home. Plastic and metal chairs, tables and shelves can be transformed, too, and hold up to whatever Mother Nature throws at them. Just look for a spray paint made to adhere to your particular material and spray away! Prep for plastic furniture requires washing the item well, but there’s no sanding here. A quick coat of spray primer might be necessary depending on your particular application, but many sprays come as a paint and primer in one, saving you a step and valuable time.
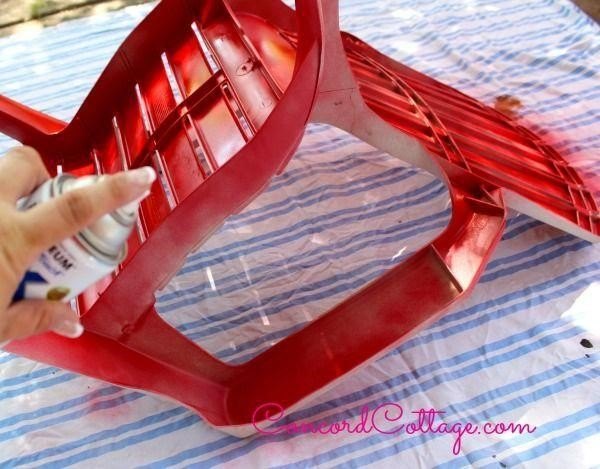
See post: ConcordCottage.com with Lisa Walsh Huff Kroll|Paint Your Plastic Chairs
Chalk Spray Paint
Love the look of chalk paint, but spray paint is your thing? Why not give chalk spray paint a try? It combines the best of both worlds. Just like traditional chalk paint, the spray requires no sanding or priming. It has that same lovely matte finish that can be distressed or waxed or left alone to wear naturally. And there’s no wrestling with small spaces or rounded details. Spray, let the piece dry and spray again for a rustic look in a jiffy.
See post: Lauren Z|SPRAY Chalk Paint Vintage Side Table Makeover
Painting furniture is an easy DIY and a wonderful way to update an old piece to make it your own. With so many different paint choices there’s sure to be one that you’re comfortable working with for next makeover, even if you’re a beginner. From latex and chalk paints to enamels and high gloss, brush applications and sprays, you can get professional results by following a few simple steps. So give it a try and start painting today!
Have you painted your own furniture and want to share your technique? Would you like more information on these DIYs or do you have questions about the process in general? Well, come on over to Hometalk and join the community!
Written for the Hometalk community by: Kim | Exquisitely Unremarkable


Frequently asked questions
Have a question about this project?