How to Paint Outdoor Patio Furniture in 4 Easy Steps

Today I’ll be sharing with you how to paint your old outdoor patio furniture. Faded furniture? Paint it! Worn-out wood? Paint it! Furniture that isn’t quite your style? Paint it!
Want to be the first to know about my new home DIY projects? Sign up here for my emails.
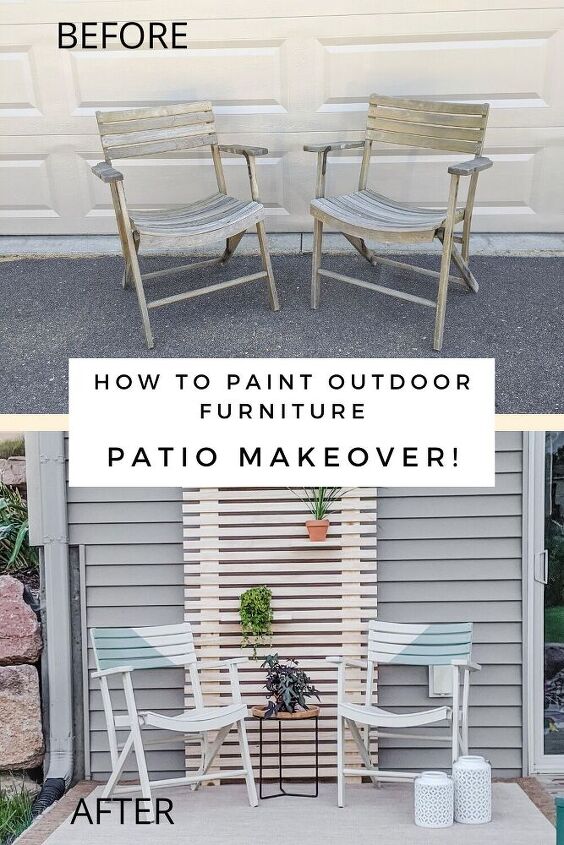
Facebook Marketplace is one of my favorite places to shop. I love the excitement of finding something you love. I love messaging the seller and seeing if you are first in line. I love the joy of picking up an item that is just perfect! Anyone else share my love for Facebook Marketplace?I found these two unique wood outdoor chairs on Facebook Marketplace for $40. I wanted my outdoor chairs to be unique, durable and easy to store. These chairs fold up for easy storage. They have a unique curved back and seat design. I was so excited to paint them to customize them to my unique style preference!
Clean chairs
First I cleaned the chairs with soap and water. These chairs were pretty clean already. They had some spiderwebs and dirt on them. Therefore, soap and water was sufficient. If your chairs have more substantial grime on them like grease, you will want to use a more powerful cleaner or consider a specialized wood cleaner. It is important to have a clean and dry surface before applying paint.
Apply primer to the chairs
Whenever you paint something, it is very important to use the proper paint and paintbrushes. Choosing the right products will ensure that you have a beautiful, long-lasting finish on your piece.I chose to use Sherwin-Williams Exterior Oil-Based Wood Primer because I needed an exterior paint that was very durable. When choosing a paint, make sure to check:
- If it’s exterior or interior (I needed exterior of course!)
- If it’s oil-based or water-based (I chose oil-based for a super durable finish on this worn wood)
- What surface it is best for (I chose this because it is made specifically for wood)
I chose to apply this primer first using a roller and then using a paintbrush. While you would not have to use a roller, I chose to use it because I wanted to speed up the application process.
I first used the Purdy lambskin 9″ roller cover, a Purdy Revolution 9″ frame and Purdy NEST™ 9″ Paint Tray. I chose to use the lambskin roller cover for two main reasons. First, this roller cover works especially well with oil-based paints. Secondly, it holds a great deal of paint. Normally a mini roller would work best for furniture pieces like this but I was in a super hurry so I grabbed a large, full size roller cover and frame for this project. I wanted to ensure that I had a nice, thick coat of primer on my chairs given the current condition of the wood. The 1/2″ nap is perfect for my wood surface, which is not super smooth and not super rough.
Since these chairs have a lot of slats and corners, I used a Purdy 1 1/2″ White Bristle Extra Oregon™ Brush to get into all the grooves. I chose to use this brush for a few reasons.
- It’s perfect for oil-based paints.
- It has soft bristles meaning that it leaves a very smooth finish
- It’s small and angular so that it can get into all the crevices of the chairs.
Allow the primer to dry for at least 24 hours. You can see what an incredible difference it makes to just have this chair primed! It provides a great protective layer on the wood. I only applied one coat of primer because it covered quite well the first time.
Apply paint to the chairs
Once the primer is completely dry, you are ready to apply paint. I chose to use Sherwin-Williams Resilience Exterior Acrylic Latex. I chose this paint because it’s an exterior paint that is resistant to moisture. It is recommended for wood surfaces and it is tintable to many different colors. I got it tinted to Softer Tan to achieve a soft, neutral look. It is recommended for use after applying Sherwin-Williams Exterior Oil-Based Wood Primer. Therefore, I knew it would be perfect!
I changed what paintbrush I was using because the paint changed from oil-based to water-based. I decided to use a Purdy 2″ Nylox™ Glide™ Brush. This brush is my absolute favorite. It’s perfect for latex paints, which I often use when painting furniture. The angular nature of the brush helps me get into all the crevices of the chairs. Furthermore, the soft bristles leave a smooth finish on my furniture.
I applied only one coat.
Add a fun design to the chairs!
It’s time to make these chairs your own! I believe that one of the reasons why home DIY projects are so wonderful is because you can add your own unique twist to them. Therefore, I couldn’t resist the urge to add a bit of color-blocking to these chairs.
I’m a neutrals-loving gal. Green is about as bold as I like to get. Therefore, I decided to add in a green slanted color block just for a bit of fun and interest. You should feel empowered to create your own unique and beautiful design!
To make sure I got really straight lines, I used the a Purdy 1 1/2″ Clearcut® Dale™ Brush. This paintbrush has very stuff bristles so that it is able to create crisp paint lines. I chose to use a smaller angular brush so that I could get in between the slats on the chairs.
I applied only one coat of paint for the color blocking design. I mixed two paint colors, Sherwin-Williams Tricorn Black and Sherwin-Williams Haven, to create this green color.
Let your chairs fully dry and you’ll have beautiful and durable outdoor chairs!
This is what the outdoor space looked like before. It had nothing in it.
In addition to the chairs, I also added a giant slat plant wall, a small plant stand table, some modern lanterns and an outdoor rug. Now THIS is the type of place I want to sit in and enjoy the sunshine!
Want to see another painting DIY project? Click HERE to learn how to refinish furniture and create a beautiful whitewashed look.
Enjoyed the project?
Resources for this project:
See all materials
Comments
Join the conversation
-
-
 Janice Christenson Steele
on Aug 11, 2021
As I looked it over I am sure you made it.
-










Frequently asked questions
Have a question about this project?
AWESOME! I love the diagonal painting! Yes, I too, would like to know where you purchased the slat wall?
Thanks!!
Loved the updated painting. Where did you purchase the slat wall.
Again, where did you get the slat wall