Do you have heavily textured or popcorn ceilings and you don’t want the hassle of removing it? Learn how to install shiplap on your ceiling!
If you love this project, grab your quick start DIY guide & subscribe to our blog!
Before Pictures
Do you have heavily textured or popcorn ceilings and you don’t want the hassle of removing it? Learn how to install shiplap on your ceiling!
If you love this project, grab your quick start DIY guide & subscribe to our blog!
Before Pictures
Installing shiplap is a great way to give a room a little boost. After we completed this project, we marveled at how much brighter and bigger the room seemed!
Step 1. Remove everything from the ceiling.
Start by removing fixtures from your ceiling, including lights, chandeliers, air vents, and anything else that is attached to your ceiling.
Step 2. Locate the ceiling joists.
Before you begin nailing, find the ceiling joists with a stud finder.
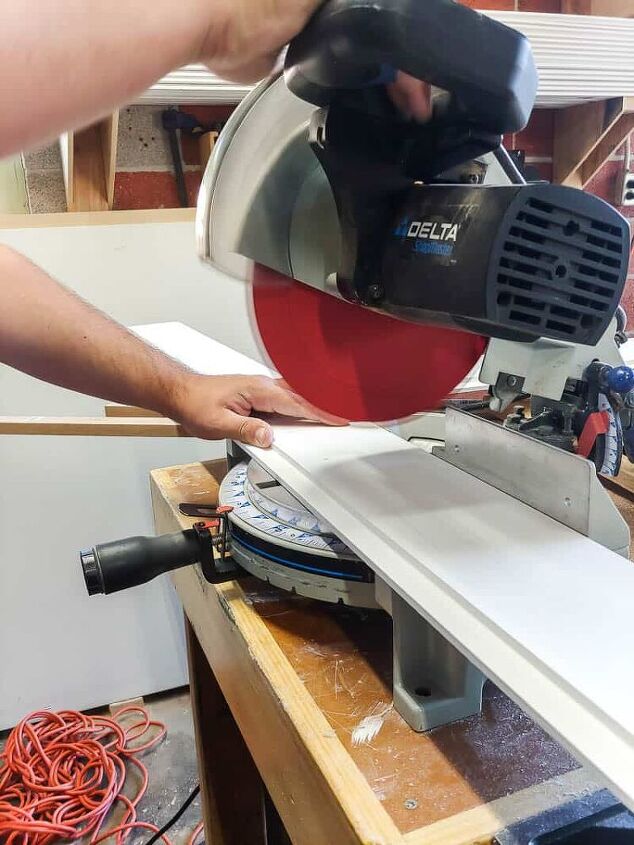
Step 3. Attach the shiplap planks.
Instead of joists, we had sheets of plywood right above our ceiling, so we were able to nail right into the plywood which worked perfectly.
Ideally, the joists and planks should run perpendicular to each other.
After attaching the furring strips into the joists, you can nail the planks directly into the furring strips.
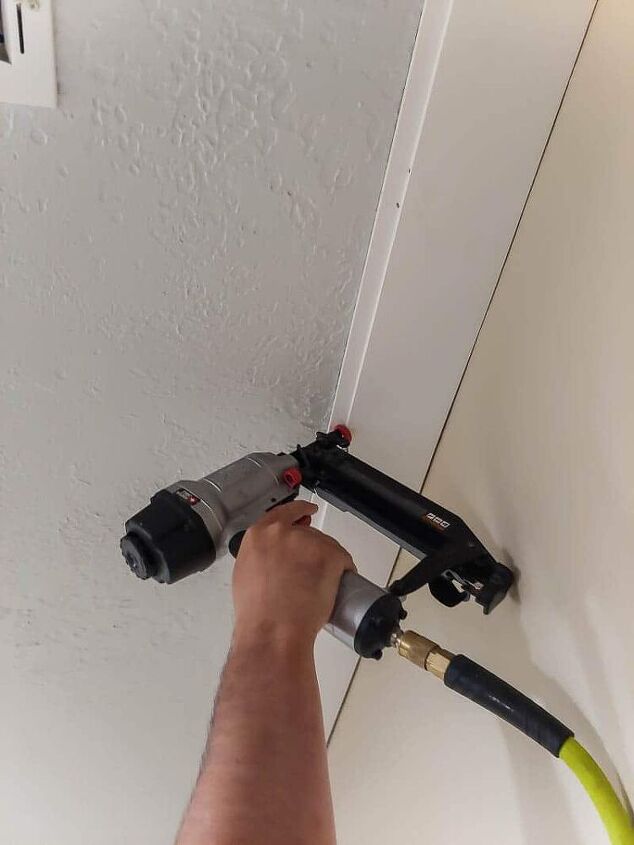
As you begin nailing, make sure you are holding your nail gun at a 45 degree angle. This will prevent the planks from shifting against the other boards and straining the enforcements above.
Using a hole cutter for the circular cuts and a multi-tool for the straight cuts, we cut along the markings so we could easily reattach our fixtures and vents over the shiplap ceiling.
Step 4. Sew things up with caulk and spackle.
Now that your shiplap planks are in place, it’s time to caulk and spackle.
First, apply caulk in a small bead, along the edges of the room. Then, smooth with your finger to create a seal between the walls and ceiling planks.
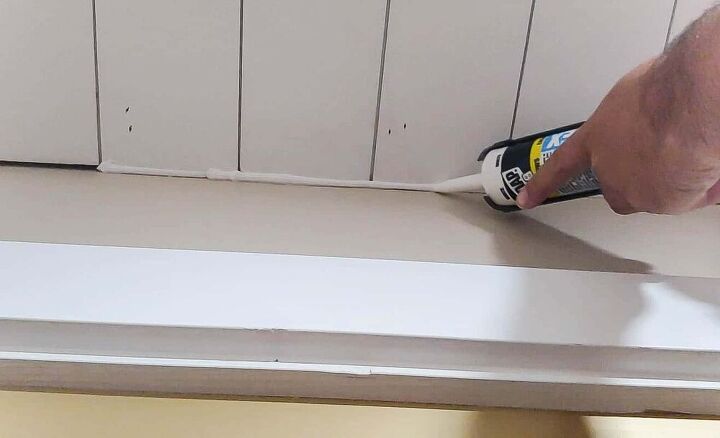
Keep in mind that paint touch ups along the wall may be necessary after caulking. For this project, we planned on painting the entire room, so the messy caulk smears weren’t a major concern for us.
If you wanted to make sure your lines were clean, you could apply painter’s tape to the wall first and then remove the tape after you’re done caulking.
Spackle the nail holes using a putty knife, sand to smooth, and then you are ready to paint.
5. Complete the project
For all of our ceilings, we use Behr’s Flat White ceiling paint, but you can use any color of your choice. Roll on the paint in the directions of the planks.
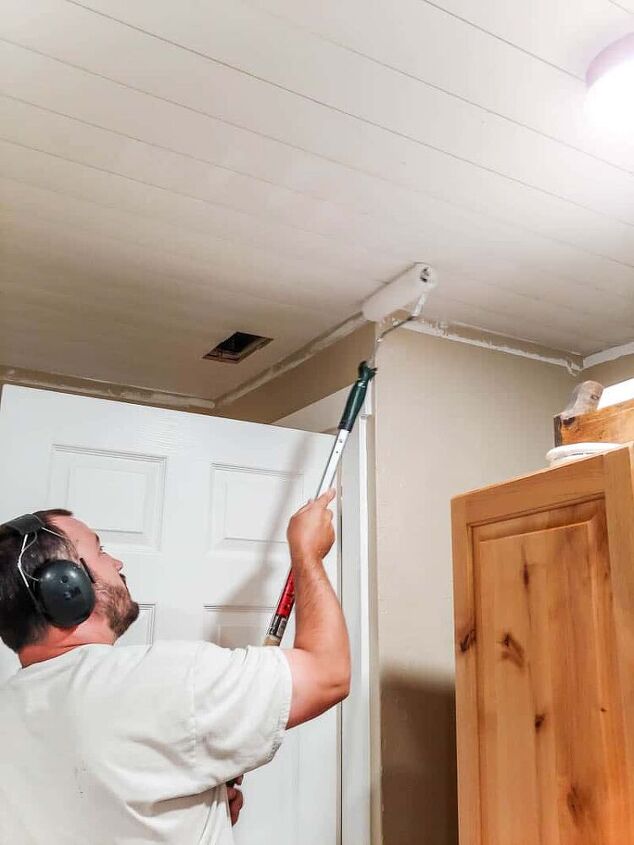
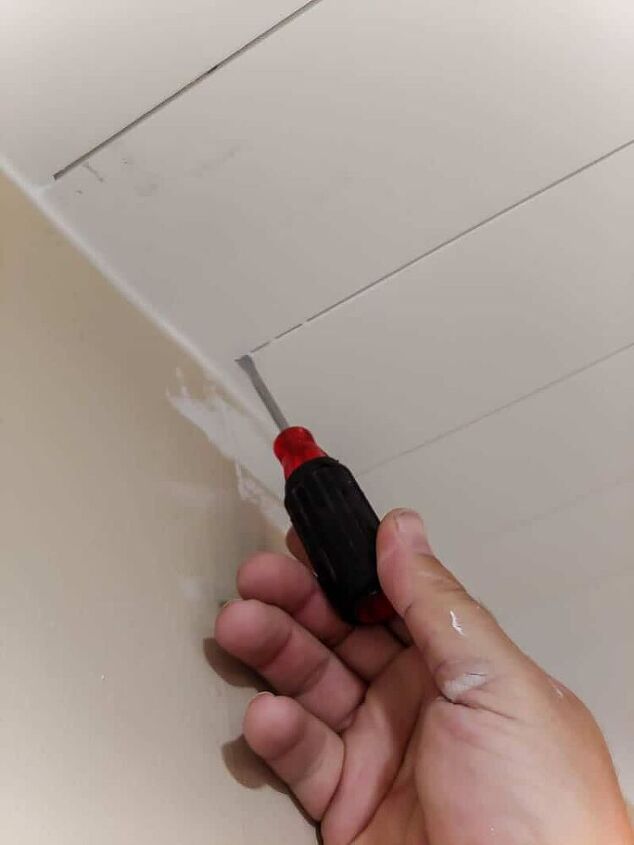
If you find the paint is running between the shiplap planks, run a screwdriver along edges between the planks while the paint is still wet.
As you are painting, be mindful of “bumping” the walls with your roller. For this reason, it’s a good idea to “cut” into the ceiling with a paint brush, painting about an inch or two into the ceiling planks and away from the walls. We use an angeled paint brush for this.
After the ceiling is painted and dried, replace your light fixtures and vent covers, and enjoy a beautiful and bright new look!
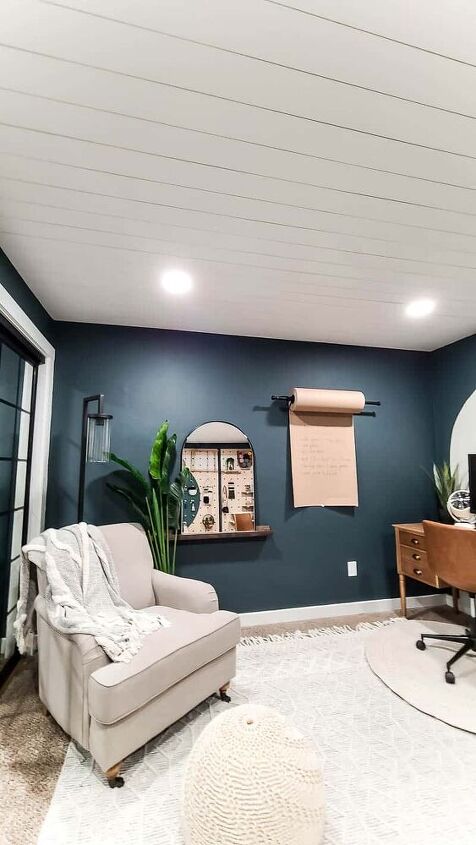
Updating aging ceilings doesn’t have to break the bank! Installing shiplap over textured ceilings is a great way to skip scraping and will give your home an updated look that you can be proud of.
Would you install a shiplap ceiling in your home?
Let us know in the comment below!
If you love this DIY wood crate desk, check out all of my DIY wood projects tutorials in the archive here!
About how much did this cost?
Could you use this in a kitchen?
Yes
Ok our ceiling predates the textured ceiling, we have ceiltex ( squares ) can this be used over this type of ceiling?
Uhhmmm YES!!!! We have shiplapped 3 walls in our home so far and would love to do this at least somewhere in the house! Thinking maybe kitchen that doesn’t have any other shiplap yet!!
I would love to try this. But unfortunately I don’t have all the tools necessary to complete the project.☹️
You could rent or ask at your work or church. Most times if they let you barrow they come with
I love the shiplapped ceiling!!! Yes your color on the walls is fabulous as well.
Thank you for sharing.
It does look beautiful. However, I would only do this to my ceilings if I owned beachfront property like a bungalow or cottage. Great job though👏🏻👏🏻👏🏻👏🏻
Wow, this is gorgeous! Our ceilings are not popcorn, but the "smoshed with a balloon" texture. I would love to do this in my house!
I have my husband convinced. Yay!!!!!
I sent this to my daughter and son in law. They are talking about scraping their ceiling and this looks so much better. Thanks.
I wish I could grow 2' and clone myself! I'd do this in a heartbeat!
Turned out beautifully. I have an house from 1967 with plastered ceilings. This would work great. Thank you.
Love the ceiling redo, but could you tell me name & brand of dark blue wall paint? Absolutely love it!! Thanks!!
Midnight in NY by Behr.
If you love shiplap this tutorial will show you how you can add it to your home!We don't live in an old home, so there's no discovery of old shiplap boards brought back to life. So we have to use new products. There are a lot of different shiplap options now at the home improvement stores but, I am always looking to do my home improvements with budget in mind.That's where faux shiplap comes in. In this tutorial I'll show you how you can get the shiplap look for less.Please Note-The cost of this project is for the plywood boards. The tools and paint I already had on hand.
I don’t say hate very often . . . but friends, I hated this wall. It needed something. But there was one problem, I didn’t want to spend much on this project because in a few years it’s going to be coming down. What to do in the meantime? how about some faux shiplap? And I don’t mean all the hacks you see out there that cost a little less. . . I mean faux shiplap with a sharpie that costs about $5.
A simple 10 min DIY can really make all the difference in a single space. We updated a regular outlet to a USB outlet at our kitchen counter and it’s made all the difference in our makeshift office!We’ve been working from home for months now and we’re constantly unplugging each other’s devices to recharge our own. We wanted to make a quick update that would bring better functionality to our counter.Step 1: Turn off the power at the breakerSafety is really important. It’s best to shut off the electric at the breaker before starting any wiring project.Step 2: Remove the cover and the existing outlet
Popcorn ceilings are not ideal for most homeowners. But removing them can be messy and expensive. We recently tackled a popcorn ceiling in a kid's room makeover, and ended up using ceiling planks to cover them on up. It only took us a few days to complete and the result is 100x better than those ugly popcorn ceilings!For the full step-by-step tutorial, be sure to check out this blog post.
When we first purchased our 1980's ranch home, every ceiling was covered in popcorn texture. Witnessing what a mess it was to actually scrape the popcorn (as we did in our living room) I wanted to try something different.
For whatever reason, builders in my area love popcorn ceilings...and I hate them!! So when I moved into my house, I was determined to get rid of as much of the popcorn as possible. The problem is that the guys who installed the drywall knew popcorn was going over top, so they did a horrible job of taping and mudding (which you really only find out after you have scraped the popcorn off). Plan B? Find ways to disguise the popcorn...Installing faux tin ceiling tiles was a simple and easy-to-install solution.
It all started with this stock kitchen cabinet and a little inspiration from Lowe's new web series, The Weekender.
I’ve been debating for a long time on putting shiplap on our living room window wall. We finally decided to go for it and I’m so happy we did!
As I was repainting the walls in my house, I thought, hmmm...why not paint this section like a faux beam? It's only paint right? if I don't like it, then I will paint it back to the wall color. I would love to cover it with the real thing but I don't have it and I can always do it later.
When I decided to update our family room I knew that I wanted a white shiplap fireplace accent wall. The texture and rustic wood not only give the walls a bit of dimension, but it also adds a visual focal point for the room. Not to mention, I love the way shiplap looks! However, I was not interested in paying almost $10 per board! So I set out to find a cheap shiplap option.We purchased a few sheets of 8×4 plywood from Home Depot and the nice thing is that they cut it for us! I wanted to go with a thicker 8-inch look, so we had them cut each sheet into 6 strips.
(This is a sponsored post for Fusion Mineral Paint and Muddaritaville Studio stencils.)Do you love to paint furniture, but always assumed that you could not paint glass – for cabinet doors, full-size doors, table tops, serving trays, dishware, and more? Thanks to my exciting collaboration with Fusion Mineral Paint, we are debuting ten fabulous new tutorials, created just for you! Each one will demonstrate new skills for you to learn, using all water-based products from Fusion, and a few unexpected surprises.We’re beginning the series with reverse-painted round table glass. I have a cute old round table that is painted Fusion Coal Black, and it needed some bling. I bought a 30″ round piece of glass, pulled together my paint and materials, and wow!BEFORE YOU BEGIN!If you have never painted on glass, please hop over to my getting started page here. It will let you know the basic materials we will be using, and answer your questions before you jump in.6 STEPS TO PAINTING THIS ROUND TABLE GLASS – BACKWARDS!MATERIALS
I’m excited to share this easy to build mudroom bench with you today. Certainly every home needs to have some sort of storage system like this. In fact, that was the case for the income suite that my son and daughter-in-law had built in their basement.A few weeks ago my daughter-in-law, Megan sent me a picture of a mudroom bench. She was wondering if I would help her build one for their basement apartment. After all the time and energy spent finishing their basement, Alex was tired of projects and was not interested in building mudroom storage for their renters.I was excited to help Megan with this project. You see, a few years back she had asked for a table saw for Christmas and she had never really used it. I thought his would be the perfect opportunity to teach her how to use it and get her over her fear of power tools.Well, as it turned out, I didn’t get to help much after all. After a trip to The Home Depot to buy the supplies, Alex came home and started to build the mudroom bench. In fact, by the time I arrived on Saturday, the bench was built. My only portion was to paint the mudroom storage bench with my Wagner paint sprayer.All of the supplies to build this mudroom bench are readily available at The Home Depot. Purchasing primed boards, saves time in the painting process.In addition, you will also need a few tools. A pneumatic brad nailer makes it go up rather fast. However, if you don’t have one, old fashioned hammer and nails will work. In addition, a drill was used to secure the shelf brackets to the wall as well. But you can muscle it with a screwdriver.This post contains affiliate links for your convenience. As an Amazon affiliate we earn from qualifying purchases. See our disclosure for details.)Supplies: primed shiplapfarmhouse arch bracket3/4″ mdf 4×8′ boardspackling puttycaulk48″ unfinished pine stair treadwood glueprimed 2 1/2″ x 8″ boardwood screwspaintstainMinwax Wipe On PolyTool:pneumatic brad nailerdrill/driverWagner paint sprayer
This DIY Painted And Glazed Side Table took a sad thrift store table and turned it into something that is pretty again in a few, short steps. I found this table at my local Salvation Army store. Usually, when I find pieces at this store, they are priced so high that I don’t even get excited about something to catch my eye from a distance. This little guy did catch my eye, but I took my time getting to it, stopping to check out other things along the way.
A client I had in the past msgd me asking for a dresser for her master bedroom! Gave me the general idea of what she was wanting and I got to work on what I thought would be the best one for her. Eventually I found the perfect one! And oversized antique! I love when clients get me to do something colour wise out of my comfort zone!
Like all things that have anything to do with water, if you are not keeping your washing machine clean and dry, the smells will come- and let me tell you those smells won’t be pretty. Over time, washing machines build up sludge from detergents, fabric softeners, and different fibers from our clothing. This sludge then gets trapped in a warm, damp machine.
I have been really into colorful raffia lately! It looks great in so many DIY projects, like the "Raffia Fringe Bag." You will love to make this high-end style basket for your home.
What do you do when you have a large curved surface that lacks character? You add it by using peel & stick planks! Get the barn wood look by using vinyl flooring.I love this weekend project idea! Add much-needed character at a fraction of a cost using peel & stick vinyl flooring planks. Not only was this project easy but creating the faux barn wood was a piece of cake too!Back in the fall, I had the opportunity to travel to one of my dearest friend’s new home in the Texas Hill Country. She purchased and beautiful home with great bones and beautiful appeal. This abode was however lacking a little of the Hill Country charm she wanted. Case in point, the kitchen bar area.The kitchen itself is a perfect size and the bar area is wonderful for friends and family to gather – it just needed a little “Hill Country ranch” oomph. Oomph on a budget!*Heads up! This post does contain an affiliate link. This means I may receive a small commission if you decide to purchase the product but at no additional charge to you. Check the sidebar of my website for full disclosure.
These linen fabric baskets are perfect for serving and storing bread, your favorite craft project, or your hair brushes in the bathroom. If you’ve been following me for a while, you might know that I love linen. Actually, I have an obsession with linen. Therefore, I am always looking for projects in which I can use this awesome fabric. Have you seen my linen apron, linen summer top, or my linen beeswax wraps? Well, here’s another little project: linen fabric baskets! They are not complicated to make for intermediate sewers. And you can finish them in one afternoon!
I had these crochet lace pillowcases when I was growing up that I got to match my grandmother's crochet blanket. I haven't used it in years and wanted to do something with it to honor my grandmother. So, this week, I am going to share how I took these old mason jars (from How to Create a Bathroom Wall Mason Jar Organizing Post) and turned them into DIY hurricane lamps.
This is my favorite kind of DIY project, cheap, easy and environmentally friendly! After updating my bathroom and closet, I needed to spruce up the bedroom. I’m loving the bohemian look these days, so what better than a ottoman made from a repurposed material like an old tire? A not so fun fact about tire disposal is that tires are one of the most problematic sources of waste we face today. 44 States have banned them from landfills, but the recycling process is expensive and almost always passed on to the consumer. Tire DIY /repurposing projects could help, even if just a little….
So strolling through Dollar Tree, I ran across this cotton multicolored rope toy for dogs. I bought it thinking it would make really pretty rope handles for some project someday. By the time I got home, I had a whole new idea for Fido’s toy.
This fun pillow was made from the leftovers of another craft. When I made a sweater felt rug, I cut the sleeves off the jumpers/sweaters and saved them for this project.I actually got the idea for this DIY knot pillow when I spotted them in a gorgeous Scandinavian interior shop in London.
My DIY Beadboard Kitchen Cabinets Project was inspired by an antique beadbard corner cabinet that I gave a makeover to last fall.
This post was written in collaboration with 2 Chicks and a Toolbelt but all thoughts and opinions are my own. Wait until you see how to paint fabric and transform a piece into something amazing on a budget.Are you looking to update upholstered furniture on a budget? Learn how to paint fabric upholstery with chalk paint in 10 easy steps.If you are anything like me, I have so many pieces that need to be recovered. The upholstery fabric is out of date, dingy, and could use an update.Two years ago, I painted the fabric on an antique bench and it turned out amazing!And because that bench turned out so well, I painted the fabric on a vintage chair too that I found on Facebook Marketplace for a steal.I’ve said it before and I’ll say it again if you are considering recovering or deconstructing a piece anyway, why not try to paint fabric first?It’s no loss if it doesn’t work out, because you were planning to recover it anyway.And painting fabric is such an inexpensive way to update a piece.The final result is a dramatic change.
Learn how to make a gorgeous mosquito repellent patio planter with 2 common plants from your local nursery!
Spring break gave me the time needed to complete my latest project.I’m pretty excited about this piece. Not only do I get something for my bathroom wall, I discovered a nifty new way to make a basket that may come in handy in the future.
So we've been in our house for over four years now! Amazing how time flies. Over five years since we lost our home to wildfire - I can't believe it. Every little DIY has made this home we bought feel more like the home we have always lived in. One of our big projects was the kitchen. Check out the "before" pic... pretty, but a little too much "fru fru" for me.
For the eight years I we have lived in our home I have wanted some sort of buffet piece in our dining room. The only problem was it had to a narrow piece because of the minimal space, and we also had a baseboard electric heater on that wall.
Do you want a smoother finish to hide the appearance of wood grain? Here is what I do to help soften the loom of the grain and attract your eye to other areas.
Our garage has mostly open shelving, which is convenient for finding stuff. But I do a lot of sanding out there, so finding places to store things I don’t want to get sanding dust on has been a bit of a challenge. I had been given a free ottoman that I used there, but because our garage is small it always seemed to be in my way! So I decided to use it differently.
I am happy that spring has finally arrived here in New Jersey! I am loving all the daffodils that are blooming in my front yard. I adore the warmer temperatures. I was feeling crafty recently, so I did a quick and easy craft for my backyard – wind chimes!
Decoupage is such an easy project and it's so pretty with these napkins. More details at Hootshack.com
For this piece I used the Grace on Design decoupage paper "Katerina" I used the iron-on method of decoupage using Country Chic Paint Clear Coat and Miss Lillians Patina and metallic for that rusty crusty goodness.
Celebrate spring or any time of the year by creating fun craft projects while at the same time adding beauty to your surroundings! One way is to make an adorable table mat! It's a delightful way to provide a decorative accent feature that can dress up almost any area of your home - including the dining room, kitchen and living areas. And it's a great decorative accent piece that can be used anywhere, on any type of table, including buffets, side tables, end tables, sofa tables, coffee tables and of course dining tables, too. Check how easy it is to make a lovely decoupage table mat:
Approximately $500.