


Giving An Old Beauty New Life With Paint, Glaze, Wax And Appliques

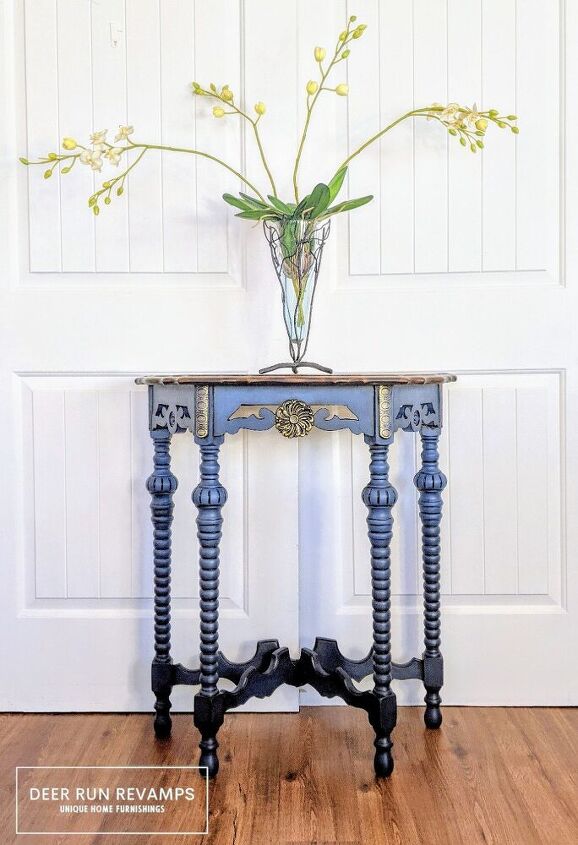
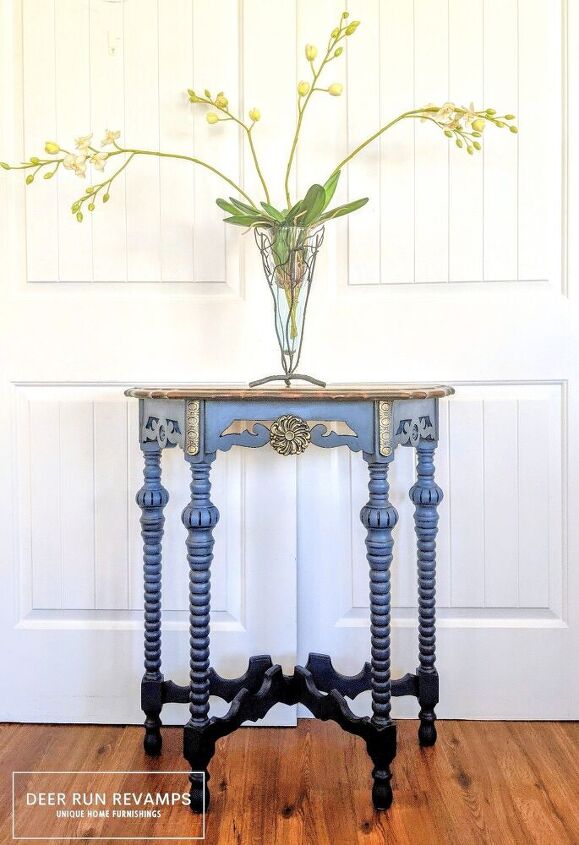
I absolutely adore these half moon tables ♥️
They are great pieces of furniture that can be used in just about any room of the home.
I found this sweet table at an estate sale. She was out on the porch, and looked to have been there for quite some time. Everyone passed her by because of the condition she was in, but that's what drew me to her. I love transformations like this! I love being able to take a piece that most see as trash and turn it into a beautiful work of art 😍
So let's get started....here are the steps that I took to complete this transformation........
*Time estimate is based on work time only, does not include dry time
*Cost is based off of the amount of product used, not the full initial cost of the product
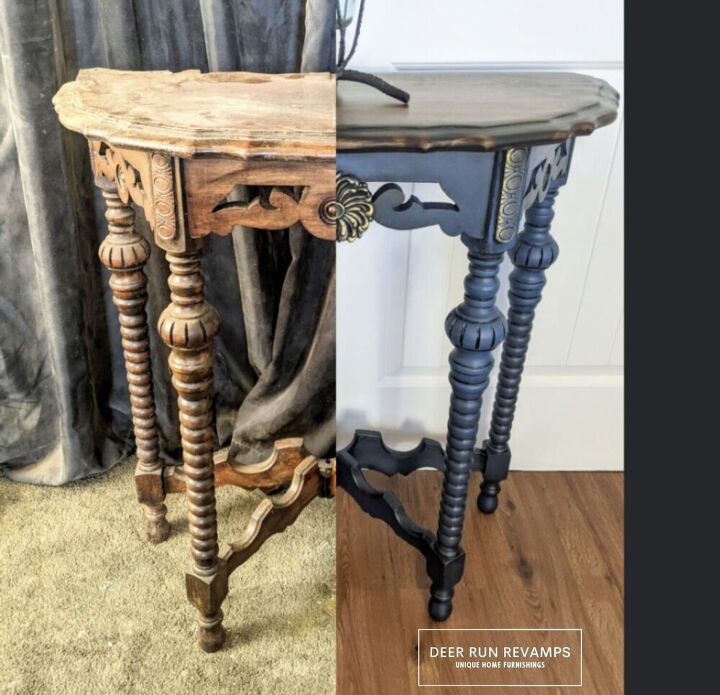
Half and half photos are so fun to look at ♥️
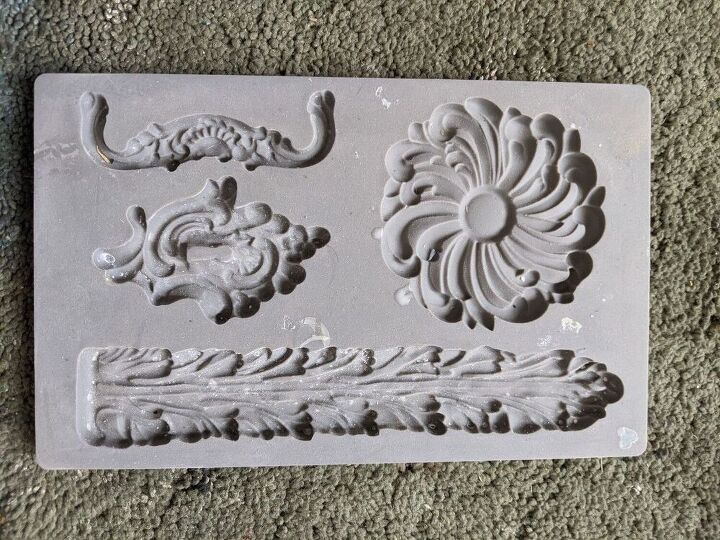
Best silicone molding!
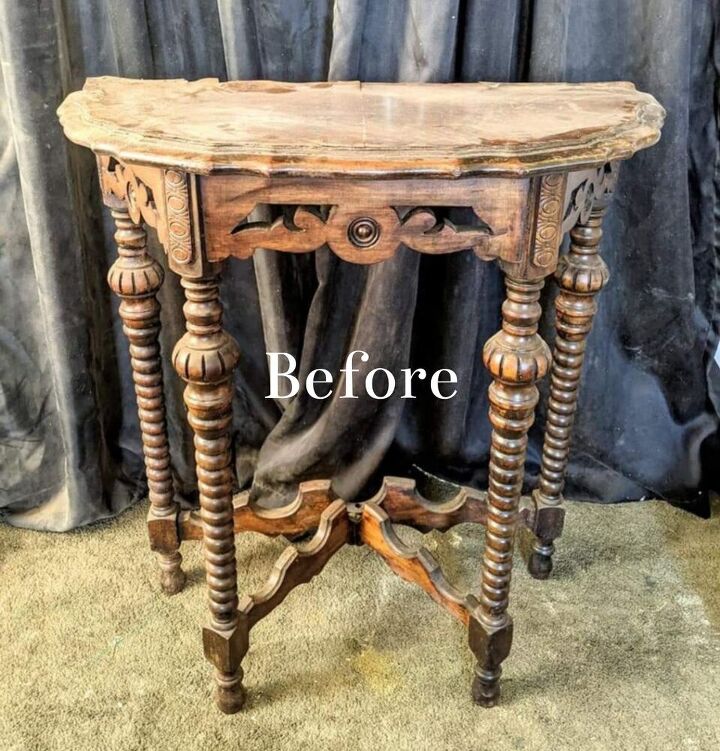
As you can see, she needed a ton of work. But there was no way I could allow this beauty to end up in a landfill!
I just love her ♥️
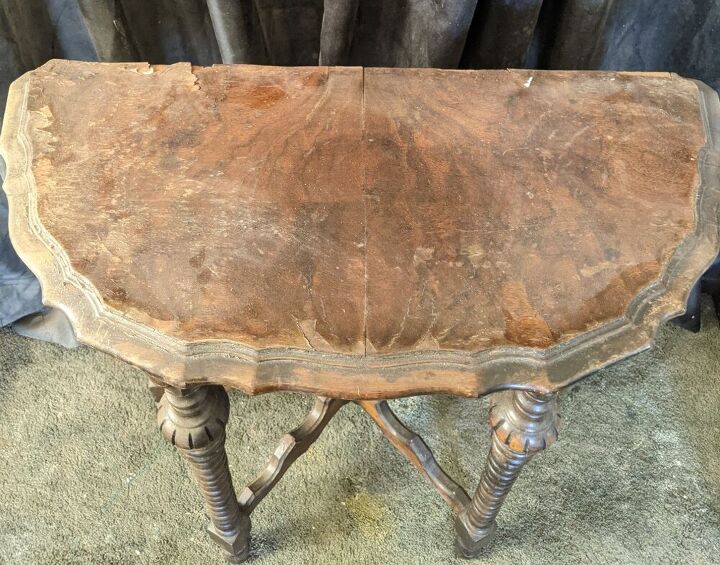
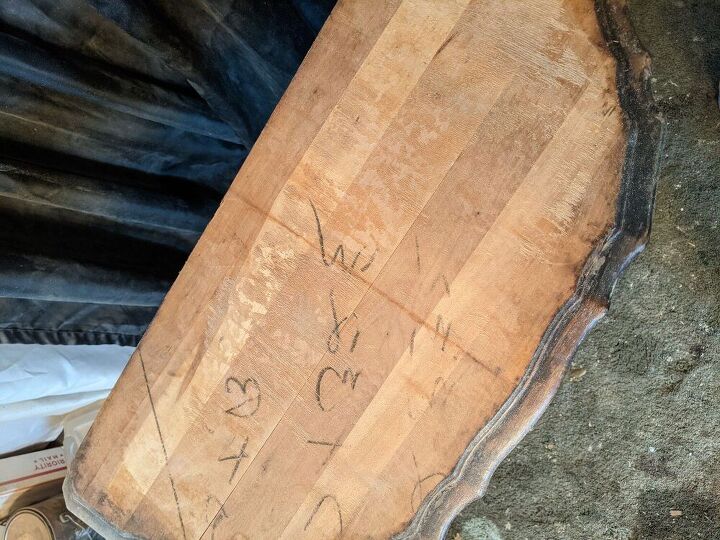
The veneered top 😱
I needed to remove the veneer. It was dry, brittle, sticking up in places, missing chunks along the edge...there was no way I could salvage it.
I've been removing veneer a lot lately and I've tested most of the tips and tricks out there. This is a time consuming task and certainly isn't much fun. So here is what I've found to be the easiest and quickest way to remove veneer...
1. Lay some hot towels down over the surface for 30-45 minutes. Change out the towels every 10 or so minutes to get it hot again. This begins to soften the glue.
2. Remove the towels. Now grab a heat gun and slowly go over a small area numerous times. This loosens the glue.
3. Then take a thin metal chisel or putty knife, and get up under the veneer..you only need to get a small corner of the chisel in under the veneer. Using a hammer, tap the chisel further under the veneer and remove in large pieces.
On the older, high quality pieces, you'll be able to salvage the wood underneath. So keep that in mind while removing the veneer and try not to gouge the wood with the chisel if you're planning on showcasing the wood underneath.
Now it's time to transform the new old top
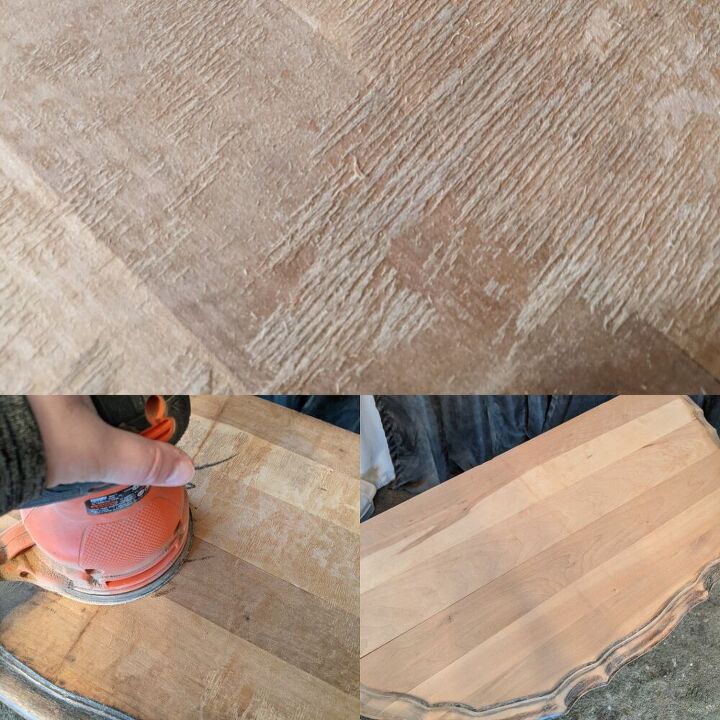
After removing the veneer, you'll have some of the small splinters (top of photo) left behind. These areas sand off easily so don't go crazy trying to remove every little splinter of wood.
Starting with 120 grit sandpaper, take your sander (I use the black and decker random orbital sander) and remove any markings and splinters. Then switch to 180 grit sandpaper to smooth it all out and finish off with 220 grit for a beautiful smooth wood top.
*When using a power sander, allow the machine to do the work. Don't apply much pressure if any at all. It might get the job done quicker if you press down hard or use the edges of the sander to really get in there, but doing so leaves swirl marks and unevenness behind.
Be patient, let the sander do the work, and you'll have gorgeous even wood.
*Do not go over 220 grit if staining the wood, doing so will close the grain and result in an uneven stain application.
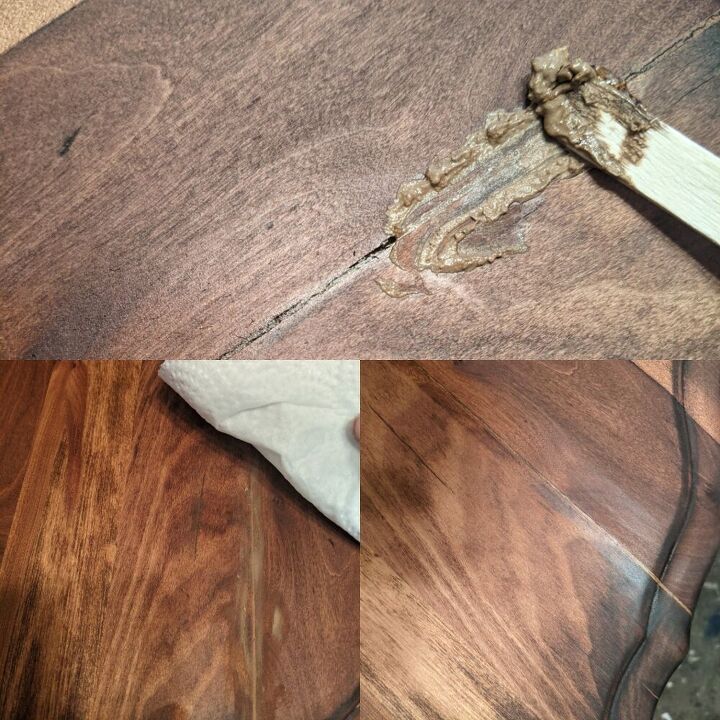
There were a couple of cracks in the top that I wanted to fill. Now, even the wood fillers that state they are stainable, really aren't. It's difficult to match wood filler to the wood. What I do is mix a bit of the stain color into the wood filler and then apply it to the crack. Take a wet paper towel and remove any excess.
I used Minwax stain in Honey. Using a sponge applicator, I applied the stain and wiped back the excess with paper towels.
Clean the body really well with your favorite degreasing cleaner.
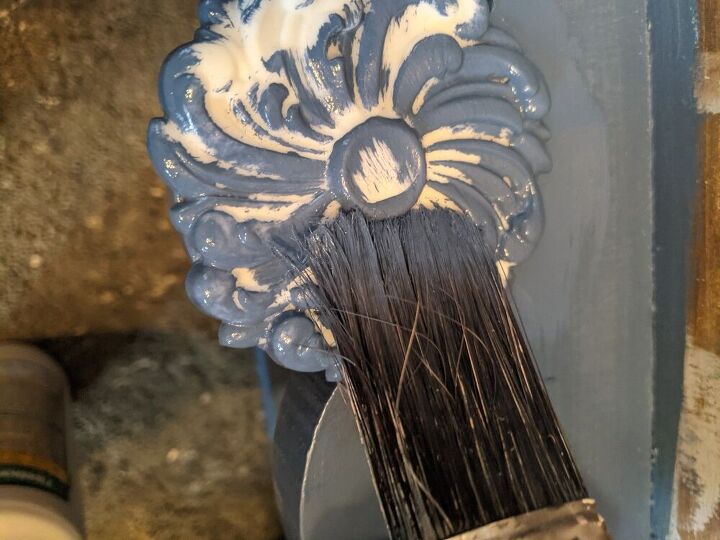
Now, onto that center medallion....
I used an old Prima marketing silicone mould for this one, the mould is called Rennasaince...we do have one available in our Etsy shop (linked below)
I was going to add the medallion on each side as well, so I didn't bother taking photos of the first one. But then decided against the extra medallions, so i don't have photos creating that exact applique...but I do have photos from a previous project using the exact same technique and products.
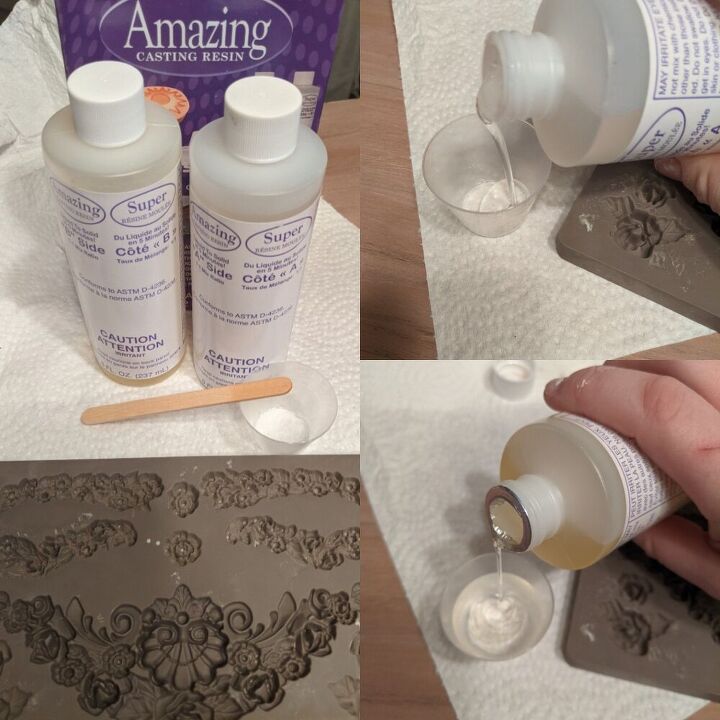
To get the perfect, crisp details in the appliques, epoxy/resin is the best product to use. It's a 2 part system that's easy to use. I prefer the brand called Amazing Resin. They make 2 different types, one that begins to harden within 10 minutes and cures white and another that takes 24 hours to harden and cures clear. I obviously choose the 10 minute one because patience is not a good friend of mine 😆
Pour equal parts of part A and B into a medicine cup (included in the resin box). For the single medallion, I only needed a total of 30ml (15ml of each part)
Using an enclosed popcicle stick, mix the resin well for about 30 seconds or until it's clear (it's a murky yellowish color when you first pour the 2 parts).
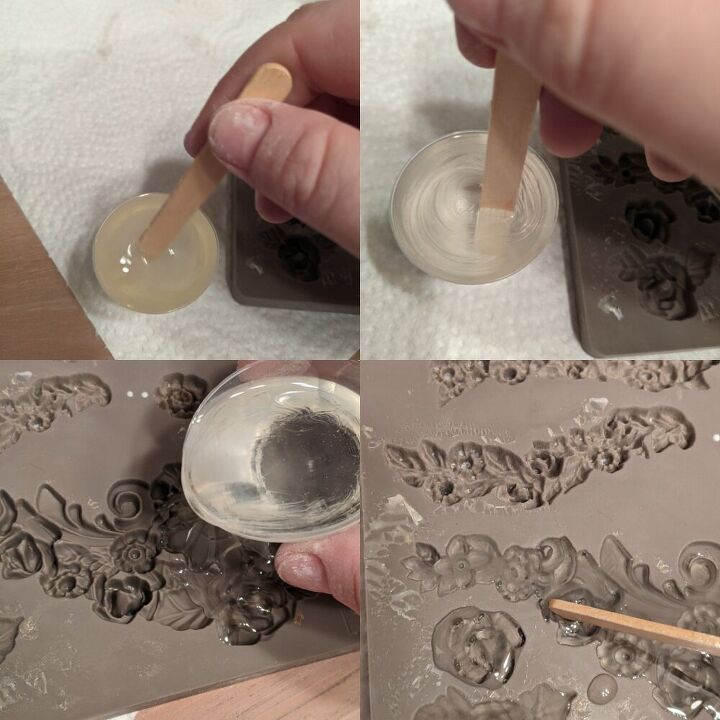
This stuff hardens quickly, so you don't want to mix up too much at a time and you need to work fast.
Carefully pour the resin into the clean silicone mould. Use the popcicle stick to push the resin into small details. Careful not to overfill the mould.
Allow it to dry for at least 10 minutes or until it turns white.
Bend the silicone mould so that a corner or side of the applique pops out of the mould and then you can carefully peel the applique out.
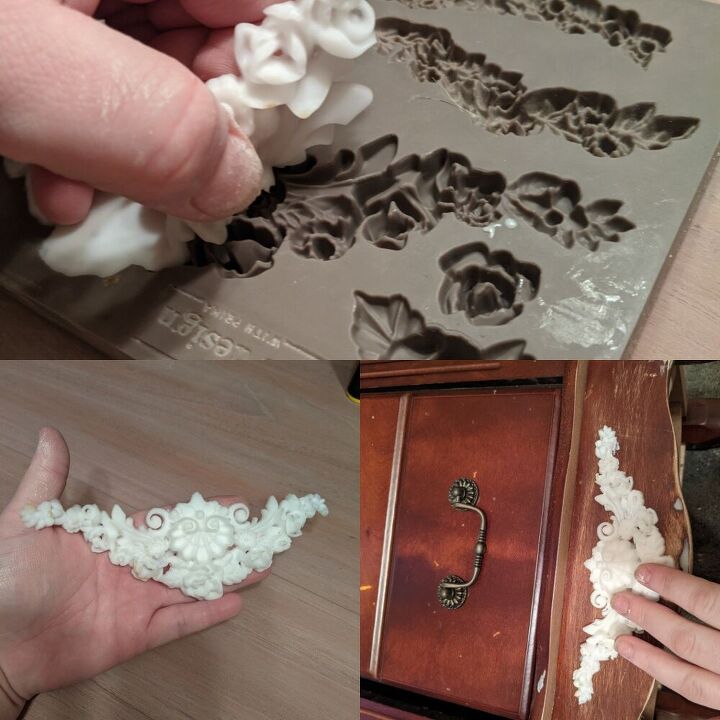
I like to use Titebond Ultimate Wood Glue to attach my appliques to furniture. It is best to lay the furniture piece so that the surface you want to apply the applique to is horizontal.
Apply an even layer of glue to the back of the applique and adhere it to the surface of your piece. Don't add so much glue that it oozes out of the sides when you press onto the surface. If some does ooze out, use a small paintbrush to remove the unwanted glue. If you can't position your piece of furniture so that the surface is horizontal, carefully place a piece tape over the applique to hold it in place while the glue dries
Do a quick scuff sand wherever you're painting using 220 grit sandpaper...this will give the paint something to really grip onto. Then wipe with water afterwards to remove any sanding dust and residue.
**if using Frenchic Furniture Paint, or another high quality chalk and mineral paint, you just need to do a quick sand. You only want to scuff up the surface, no need to remove all of the glossiness.
If using a lower quality paint or a latex paint, you want to get remove majority of the glossiness/varnish/topcoat...in this case, it's easiest to use a deglosser first, and then scuff sand. Or you can just sand it all off, or even use a stripper to remove it.
Now that the glue has dried for several hours, we can paint.
I mixed up custom colors using Frenchic Furniture Paint since I had a ton of leftovers left from previous projects. The main base color for both blue shades is Hornblower. For the darker navy blue, I mixed the Hornblower with Loof (a matte black) to create the dark navy. For the lighter blue, I mixed Hornblower, Moody Blue, and Whitey White.
I never measure when mixing colors. I just go with what looks good ♥️
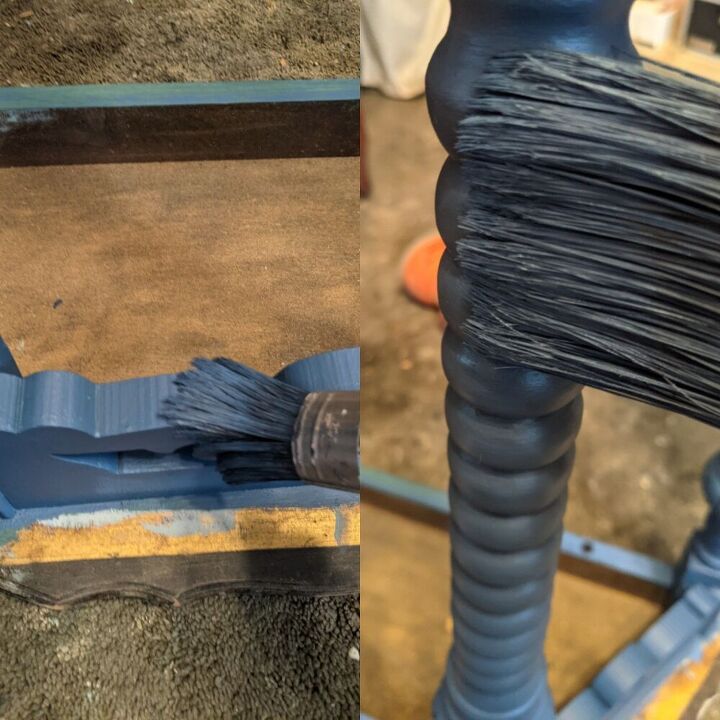
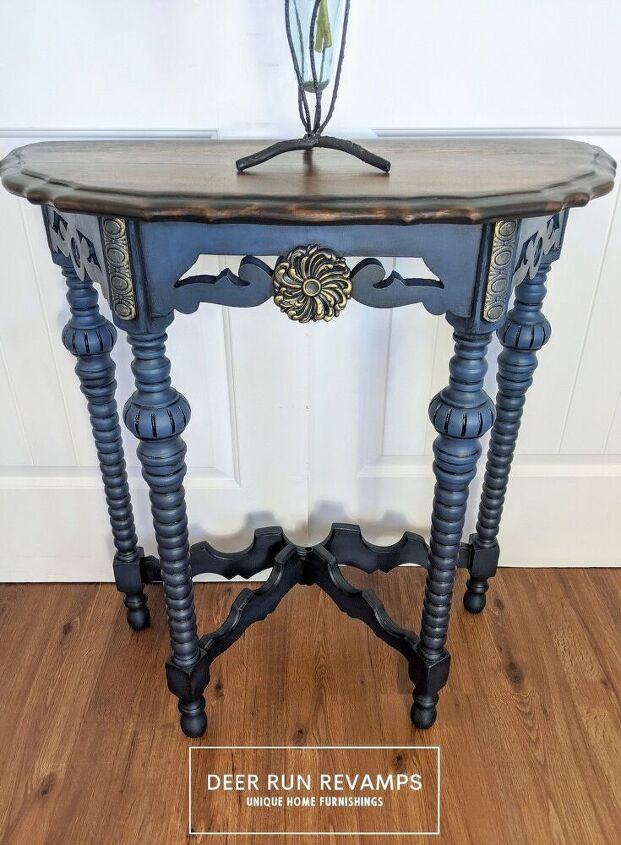
The bottom half was painted in the navy while the top was painted in the lighter blue. I applied 2 coats of each color to each section, allowing to dry in-between coats.
For the 3rd coat, I only worked on the legs. I lightly spirited the leg with water and painted the bottom 2/3rds with the navy, the top 1/3rd was painted in the royal blue, then I blended the two colors together around that 2/3rd mark.
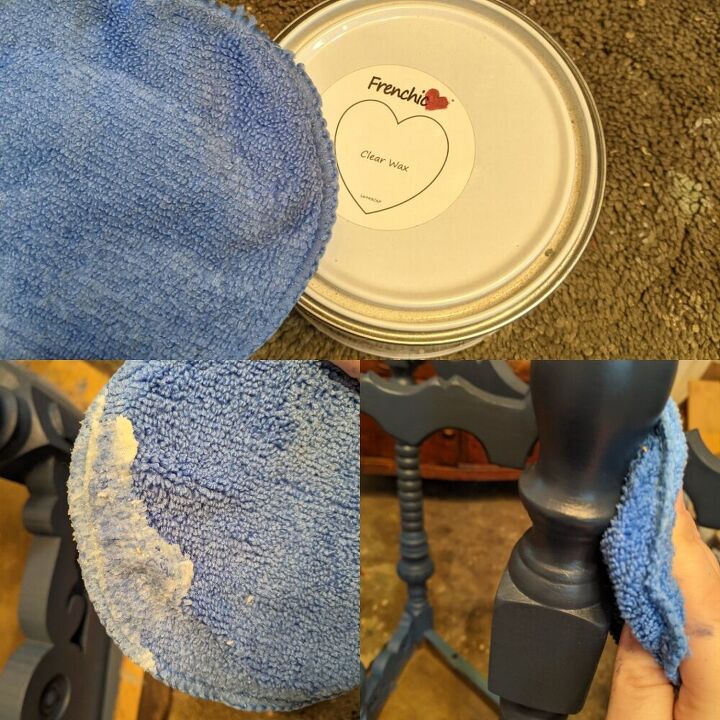
Seal the painted areas....
Grab your clear wax and wax sponge (car wax sponges from Amazon, love em!) and apply it to the entire painted area.
Or, if you prefer a topcoat over wax, apply your favorite waterbased topcoat. This is a necessary step before the glaze. Applying a sealer to the paint before glazing gives you more work time with the glaze and allows you to blend it easily
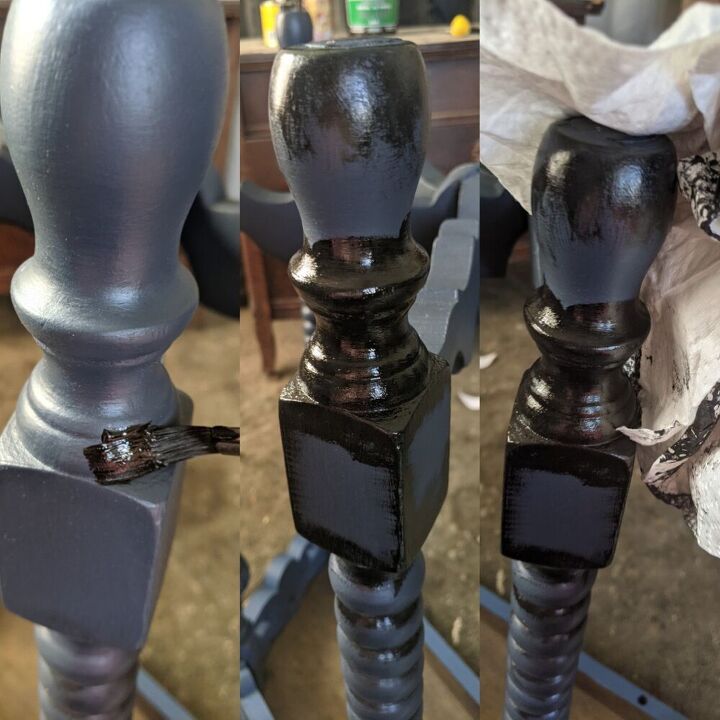
Now apply the glaze. Work in small sections. Using a small paintbrush, apply the glaze to all of the details, nooks and crannies. I also like to outline larger areas to give the blended look. Then wipe away the excess with a paper towel or rag and blend. If the glaze starts to dry and doesn't want to come off easily, use a damp towel to remove it.
The glaze also helps to darken the paint colors
I used Paint Couture's black glaze that I bought from my favorite website, AllPaintProducts.com ♥️
You can also find this glaze on Etsy. Or if you already have a favorite glaze, use that 😁
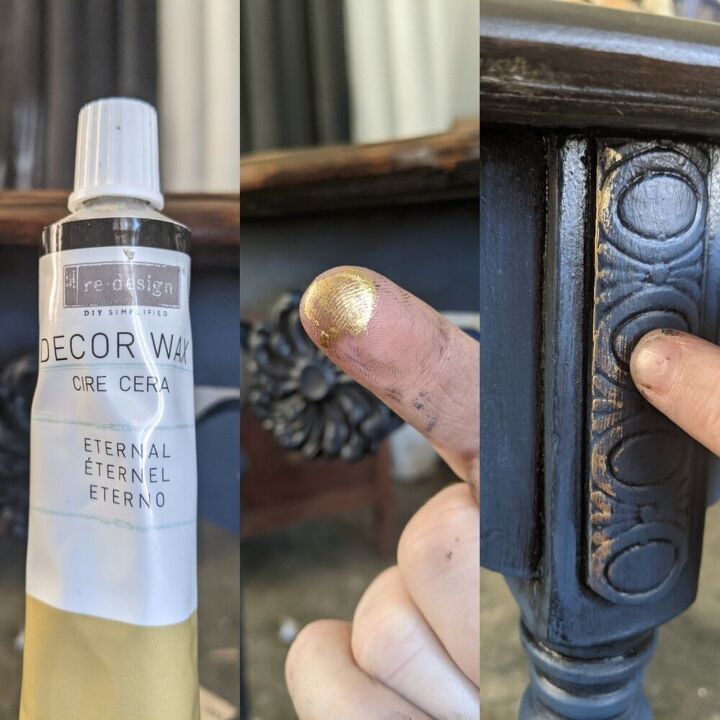
Redesign With Prima makes amazing Decor Waxes ♥️
Not only are they creamy, vivid colors, and go on easily, but they smell great too! A slight floral citrus smell 😍
I used Eternal Decor Wax, a beautiful gold.
A little bit goes a long way with these waxes!
Put a very small even amount on your finger and lightly graze over top of the details you'd like to highlight.
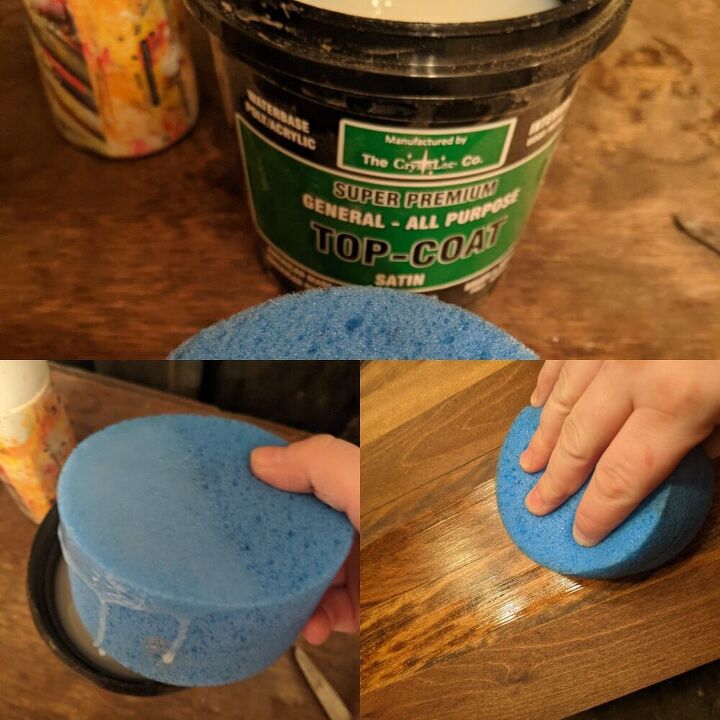
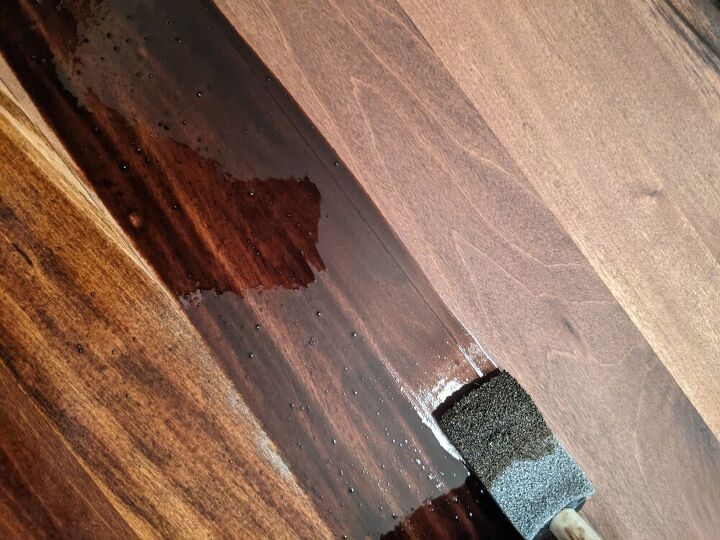
For topcoats/sealers, I love CrystaLac Super Premium General All Purpose topcoat. This stuff never streaks for me!
I get these blue sponges off of Amazon, they're cheaper than the name brand ones and I like them better.....
Dampen the sponge. Just damp, not wet. You want the sponge to easily glide over the surface.
Put a good amount of the topcoat on the sponge and go over the wood top in long even strokes. As long as the sponge is gliding smoothly, I do go back over the same spot once or twice to even it out
Allow to dry completely.
You can sand with 320 grit sandpaper to soften it if it feels rough. Be sure to wipe down well and remove any dust.
Apply 3-5 coats total allowing to dry completely in-between coats
After the topcoat was applied and dried, I also added a bit of the black glaze to the edges on the top to give it a blended look
You can find CrystaLac products right on their website thecrystalacstore.com
Or, use your favorite topcoat with the sponge method
**Tip
Place a wet paper towel around the sponge in-between coats to keep it from drying out. This way, you don't to have to wash it out after each coat 😁
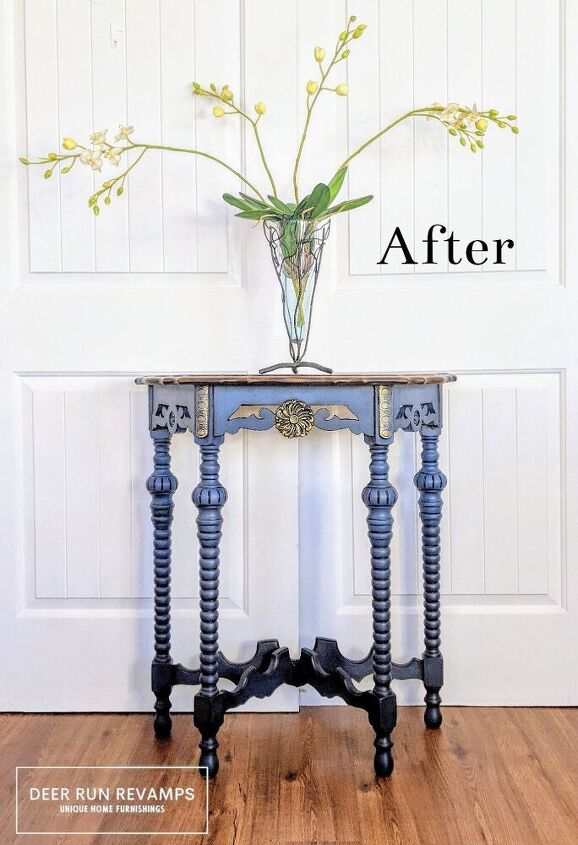
Final step.....and most important.....
Enjoy your brand new/old piece ♥️♥️
This is my passion! ♥️
Saving these old pieces that otherwise would be thrown away or hidden in dark basement and giving them new life!
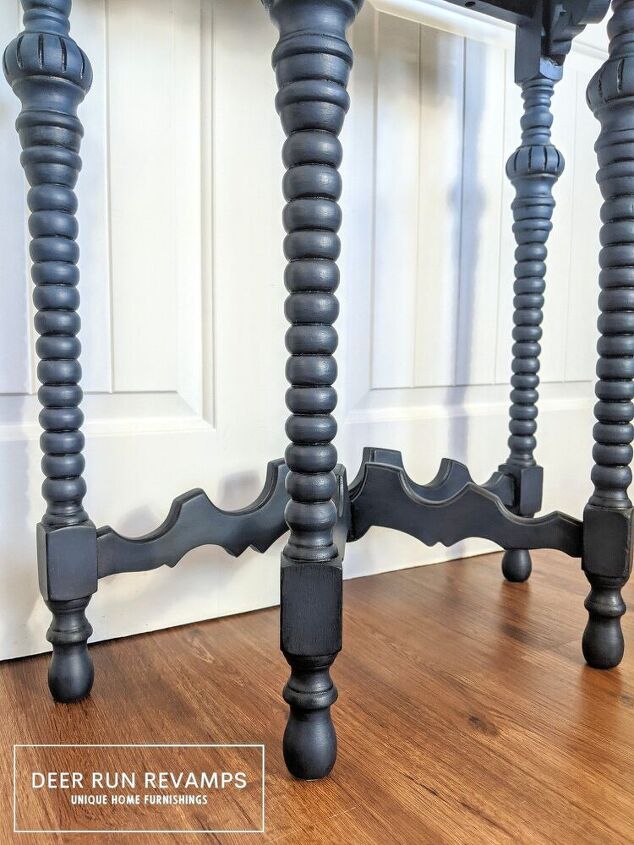
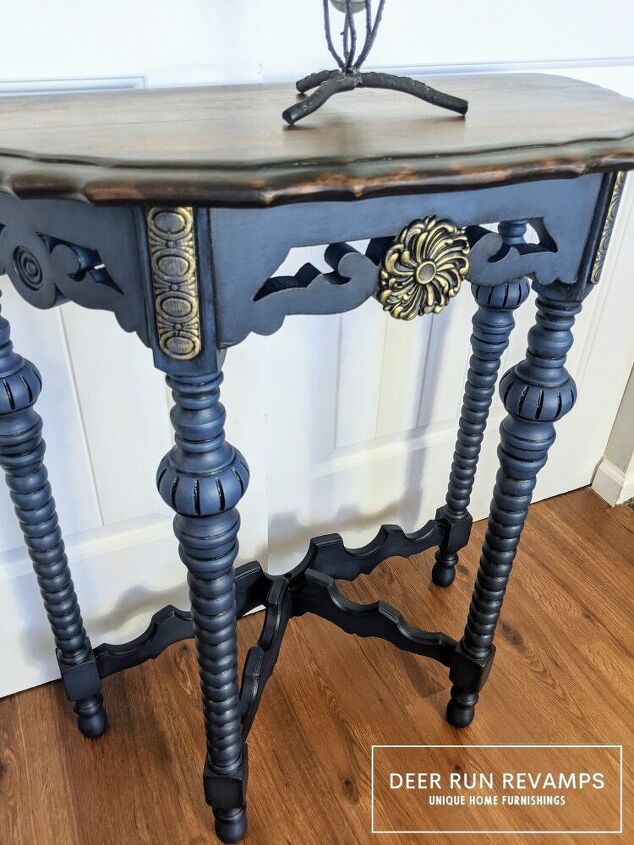
Those legs 😍
Adding the glaze really deepens the colors and adds dimension to the piece.
Whenever you have a piece that looks flat, add glaze! It comes in many different colors. You just can't go wrong 😁

The details on this beauty are unbelievable! The maker, whoever it is, certainly took their time on this masterpiece
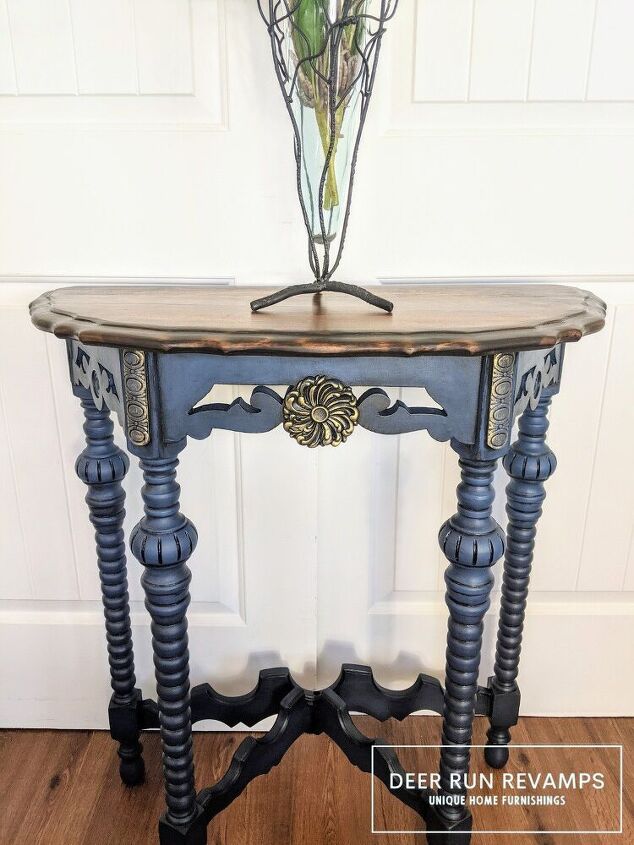
Adding the medallion in the front gave the piece a unique focal point
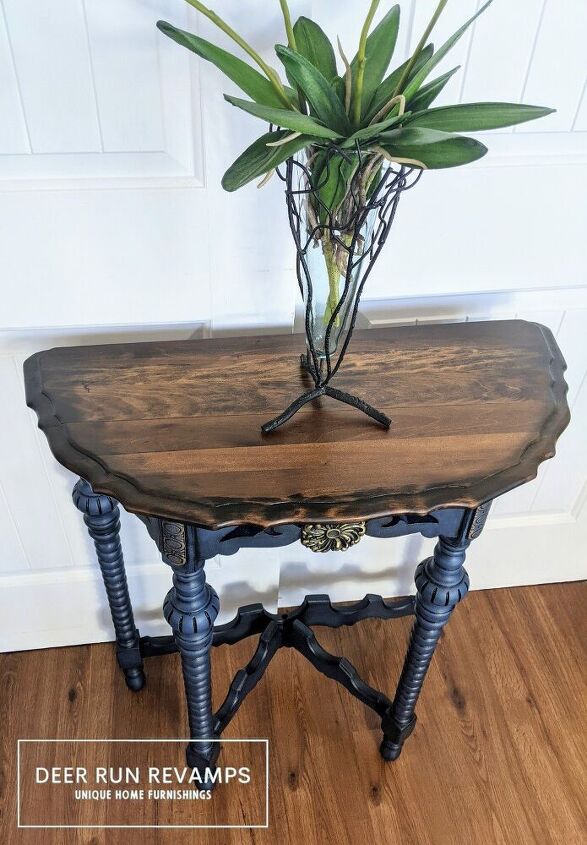
Can you believe this is the wood that was under that peeling veneer?? 😱
It's beautiful! 😍
You can find most of the products used for this project and sooo much more in our Etsy shop
Enter coupon code THANKYOU10 at checkout to receive 10% off 😁
And we offer free shipping on orders over $35 ♥️
You can find us and a lot more furniture and home decor transformations on our Facebook page. We'd love to hear from you! ♥️
https://m.facebook.com/deerrunrevamps/?ref=bookmarks
Thank you for reading! We hope this tutorial has inspired you to create something beautiful ♥️♥️♥️
Resources for this project:
See all materials


Comments
Join the conversation
-
I rarely like overly ornate furniture and add on embellishments. But wow your finish selections honors the style of the piece. I can see this in some old French grand home and be right at home. I like the unadorned top. It compliments the style and finishes of base and legs. A true example of less is more moment and allows the base and your hard work shine. Thanks for sharing your vision
-
It's a beautiful statement piece. It must be so satisfying to bring it from drab to Fab.


Frequently asked questions
Have a question about this project?
The Medallion was a good call...it really looks great! I LOVE the vase...where did you get it..?
The heading said paint, glaze and wax but there are no details on the use of glaze and wax. Can you explain the rest of the project? Do you put the wax over the glaze or what is needed to make this usable?
Can you sand veneer off? How do you know if it's veneer or wood?