New Top for a Treadle Sewing Machine Table

Putting a new top on an old sewing machine that had already been repurposed once
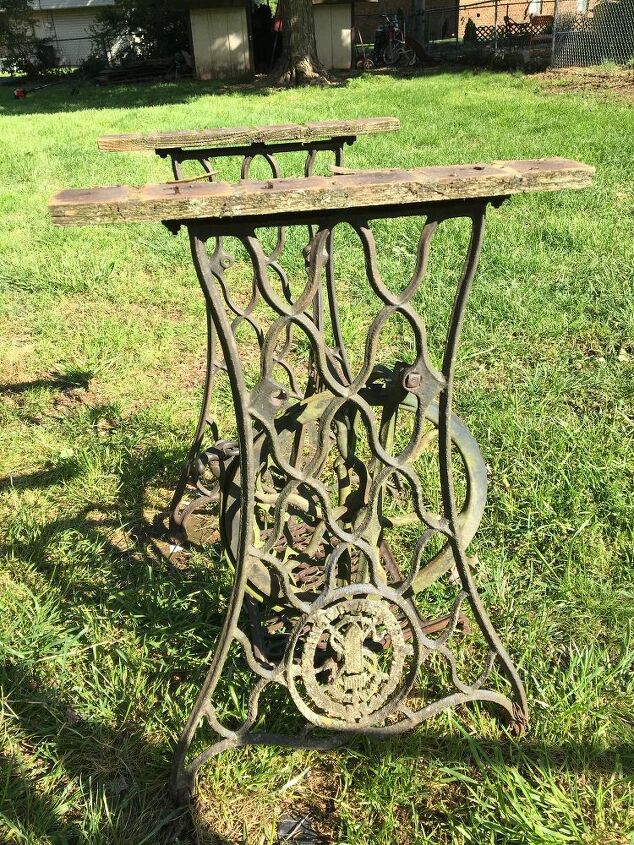
I found this sewing machine table / plant stand in my neighbor Cathy's back yard when I was over helping with something. It had been outdoors and neglected for years. She loves plants and decorates the outside of her home for most every holiday, so I got her husband's permission to give it a quick work over, thinking it might make a nice plant stand.
When I went to grab it the existing wooden top came apart before I could even get it home!
First I knocked off the dirt with some green Scotch-Brite and gave it a coat of Rustoleum Semi-gloss black. Not really trying to restore it by any means, just hoping to slow down the rust. I already had the can of spray paint, one of those things I keep around.
The screws holding on the old top were rusted and had to be cut off.
I measured the width of the top and cut cross braces from a deck baluster to fit. Whenever you angle cut a board you get a long side and a short side. I cut this with a 45° at each end simply for looks, with about 1/2" of overhang for attaching boards as needed.
I measured the length of the sewing machine frame and added 6 or 7" for the length of the top. The frame is really heavy (cast iron) but I didn't want too much overhang that might cause it to tip
I cut three pcs 5/4 deck board to length, and then centered the cross braces. A tape measure helps keep them square. Measure at each end and on each side to make sure you get it right. Don't worry about those rough edges, we'll take care of them ASAP.
I gently clamped the top boards together with a clamp (I bought this for the barn door project. It's handy to have around). Attach the cross braces with outdoor 2" screws.
(OK I cheated here. I had a bunch of 1-1/2" screws on hand so I countersunk holes and used them instead)
Finally I turned the treadle frame over and attached it to the underside of the tabletop. It turns out the frame wasnt' as square as my tabletop, so we had to add some elbow grease in the form of a clamp to make things line up. Next time: Measure BOTH sides ;)
I squared up the ends and removed the rough edges with a cheap power planer ($35-ish). You could use a belt sander or plain sandpaper if necessary.
I took a router with a round-over/radius bit to the ends to match the sides.
Finally a quick sanding of the corners to get rid of the sharp points.
Here it is ready for a quick coat of clear deck stain. I alredy had the deck stain on hand.
And finally best pic of all, my neighbor Cathy. I snuck the table back over to her porch Sat nite 5/11/2019. She came out and found it just in time for Mother's Day. (She had been thinking about putting a new top on it herself) Here's the best part: I didn't know the old sewing machine originally belonged to her mom... so this was a huge hit for the holiday!  . She says this is where she'll have breakfast when the weather is nice.
Comment if you have ideas to improve for the next one or to make it easier for someone else 
Update: We lost my sweet neighbor Cathy to illness 07/17/2019. If you have a chance to do something nice for someone, please don't wait. Both this pic and this project have become even more special to me ♥.
Update No. 2: Cathy's husband Earl passed in May of 2022. Her kids gave me this table  . It needs a bit of brightening up, but it's on my back porch waiting for a planter and something bright to grow.
Blessings Hometalkers 
Enjoyed the project?
Comments
Join the conversation
-
-
 Lin1263925
on May 23, 2020
This is great I love the old into the new look especially metal and wood thanks for sharing and your kindness to others compassion is a true blessing
-










Frequently asked questions
Have a question about this project?
Great job! Did you also use some kind of sealer to keep the base from rusting away?
When we moved from Ks to Al. I needed a small table for our kitchen. I used a sewing machine base, kept the drawers and added team butcher block for the top.Use the drawers for silverware. Now I'm I the process of making 2 more using live edge cedar.
You obviously did a beautiful job on the base so what made you decide to do a plane wood top and not something equally decorative for the top? Was it because it was for the outdoors? Just curious. I’m touched at your kindness.