Step-by-Step Guide to Making a Hula Hoop DIY Outdoor Table

You're going to want to load up on some cheap dollar store hula hoops this summer after you see this fabulous entertaining hack.
In this tutorial I'll show you how to make a lightweight, stylish, and affordable DIY outdoor table. Perfect for your porch, patio, or garden.
And who knew hula hoops could look so chic?
This post was transcribed by a member of the Hometalk editorial team from the original HometalkTV episode.
Tools and Materials:
- 6 hula hoops (21 inches each)
- Butcher block paper
- Black spray paint
- Black zip ties
- Lightweight twine
- Scissors
- Wood round
Hometalk may receive a small affiliate commission from purchases made via Amazon links in this article but at no cost to you.
1. Preparing the Hula Hoops
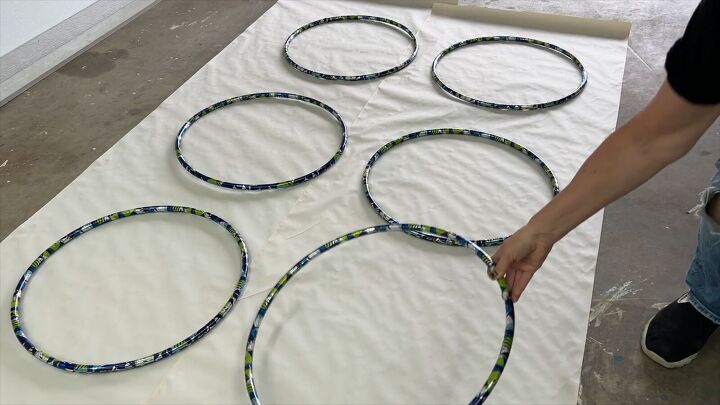
Start by laying down six 21-inch hula hoops on some butcher block paper.
Each hoop will be spray painted black.
Apply several coats to ensure all areas are well covered. Since these hula hoops are often covered in decorative tape, it may require a little extra paint to cover the pattern, but it will work out great.
2. Assembling the Base
Next, you'll join four hoops to the first hoop, attaching evenly on all four sides.
Attach the first hoop loosely with a black zip tie.
Three more hula hoops will be attached to the first hula hoop, creating an even pattern of five.
3. Creating the Structure
A sixth hula hoop will be placed on top of an exterior hula hoop.
It will be attached with a zip tie on its left side only.
Each hula hoop on each side will be positioned vertically.
Then they will be attached to the top hoop to create a cube shape.
Trim the ends of each zip tie with scissors to clean up the look.
4. Adding the Twine
Attach some lightweight twine to one side of the top hula hoop with double knots.
Leaving the roll intact, string the twine across the top hula hoop in random places to create a spiderweb effect.
Wrap the twine twice around the hoop with each stop for added strength. Keeping the twine as tight as possible is key.
End off by leaving lots of extra twine before cutting it off the roll, then knot and trim the ends.
5. Positioning the Wood Round
Finally, position the wood round onto the twine.
Ready for more hula hoop projects?
Hometalk Recommends!
How to Build a Lightweight Portable Table From Hula-Hoops
There you have it, a stylish and affordable DIY outdoor table that's lightweight enough to carry wherever you wish.
Since it's weather-resistant, this little DIY end table is perfect for a porch, patio, or even a lawn party.
If you enjoyed this tutorial, be sure to share your thoughts in the comments below.
Enjoyed the project?











Frequently asked questions
Have a question about this project?