


Antique Dining Table Upcycle: The Beauty in the Beast
Medium
Handan and I spend a lot of time searching for ugly furniture at tag sales, on Craigslist, and at Put & Take.We gather these sad things, these castaways and afterthoughts, these red-headed stepchildren of wood and glue, and we strive to liberate the beauty held captive within. This beauty may be masked by splotchy stains or Crayola scribbles. It may be hidden beneath layers of faded teal and coral paint from 1985, or hidden behind a peeling patina of My Little Pony stickers. The beauty may be smothered by decades of grime or scarred by keys, claws, and kids. Each tortured piece imprisons a pearl. The fun lies in finding the pearl. Usually it's obvious and easy: sand and stain or prime and paint. Often we need to repair, replace or fabricate. But sometimes we find the pearl hidden even deeper within.
On a muggy summer Saturday that promised rain before nightfall, we chanced upon a tag sale. Folding tables in the driveway held the usual assortment of old books, rusty tools, arcane appliances, and accumulated knick-knacks. The garage harbored a few bigger pieces - a washing machine from the 1940s, a clunky upright piano, a heavy roll-top desk, a beautiful Les Paul Standard guitar (sadly asking market price, not tag sale price) and a dining table. An ugly, scratched-up mess of a dining table. But it was made of real wood and was purported to be an antique. Handan zeroed in on it and negotiated a $5 price. I can't be certain, but I believe they may have used the table as a skating rink.
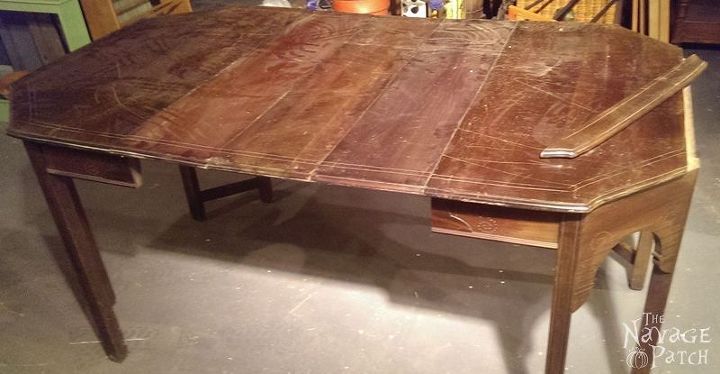
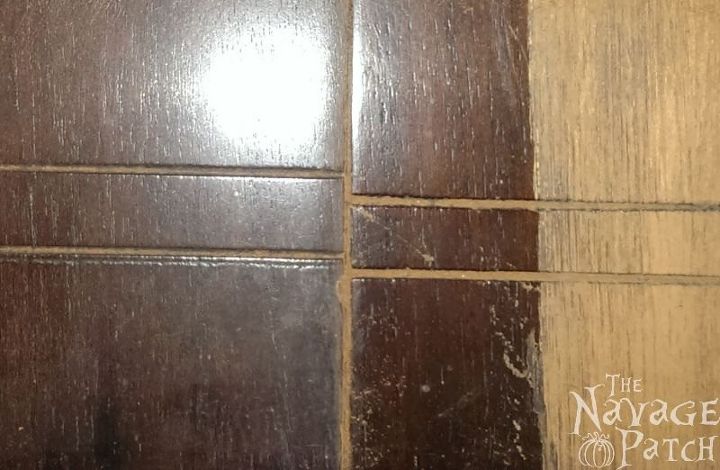
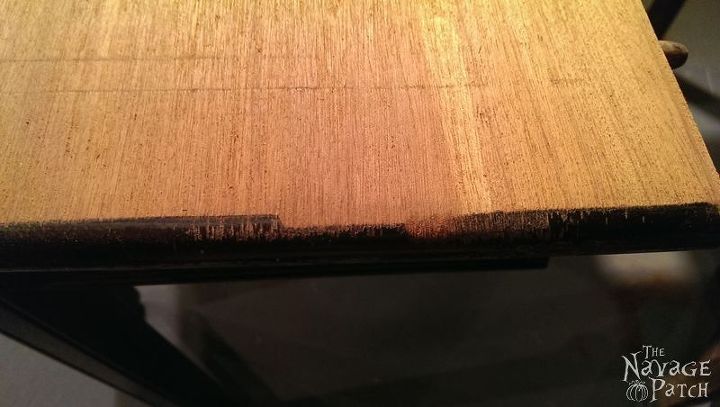
Handan saw the potential for two console tables right away, but I had this idea that I would sand all the wood down and refinish it, restoring it to its former glory as a formal dining table. I bought a hand-held belt sander and immediately destroyed any hope of restoring the table to its original form. You may be wondering why I chose a belt sander. Wouldn't an orbital sander have sufficed? They're just scratches, right? Right. BUT. The two grooves that run around the table DON'T LINE UP WITH THE GROOVES ON THE LEAVES! I'm not OCD, but I can't abide a flaw like this. See for yourself:
My solution was to sand the table down past the groove lines. Things started out well. I think...
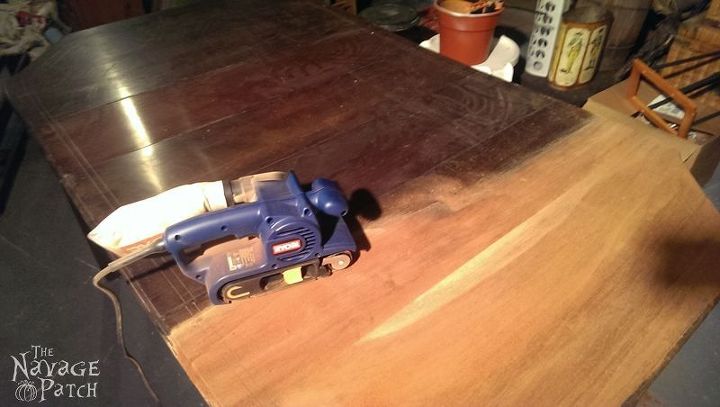
...but ended badly. The grooves were deeper than they first appeared, and the belt sander is a cruel and unforgiving bitch. In my feverish zeal to eradicate any trace of the wretched grooves, I had failed to notice that the back end of the sander had removed vast swathes of routed edging. I needed a new plan.
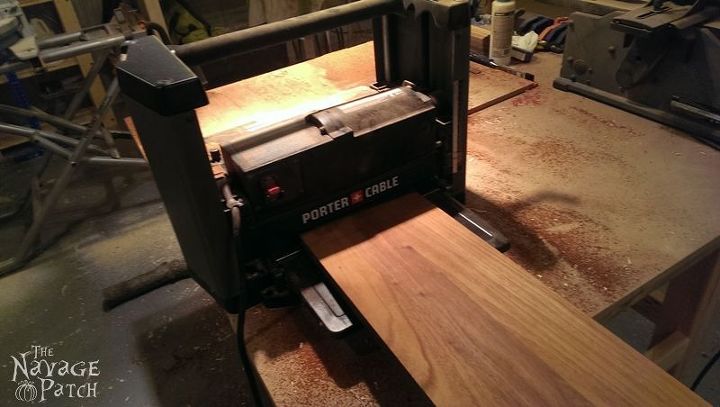
Still thinking that I could restore the table, I decided to run it through the planer. But my planer was only 12 inches wide, so I would have to cut the table top into manageable pieces. I removed all the extension sliders, brackets and catches from underneath the table and unscrewed the top. That left me with two semi-circular ends and three leaves. After cutting the ends in half, I planed everything down past the two grooves.
I glued the end pieces back together and placed the top back on the legs.
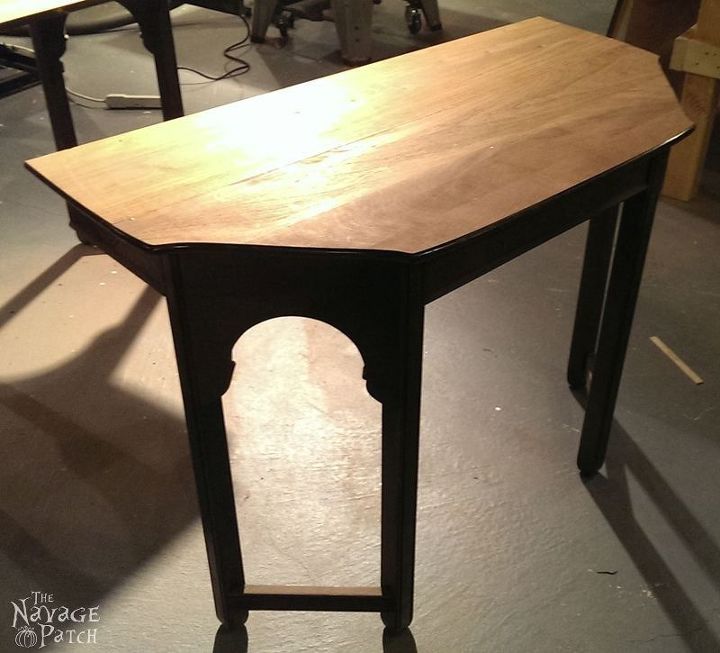
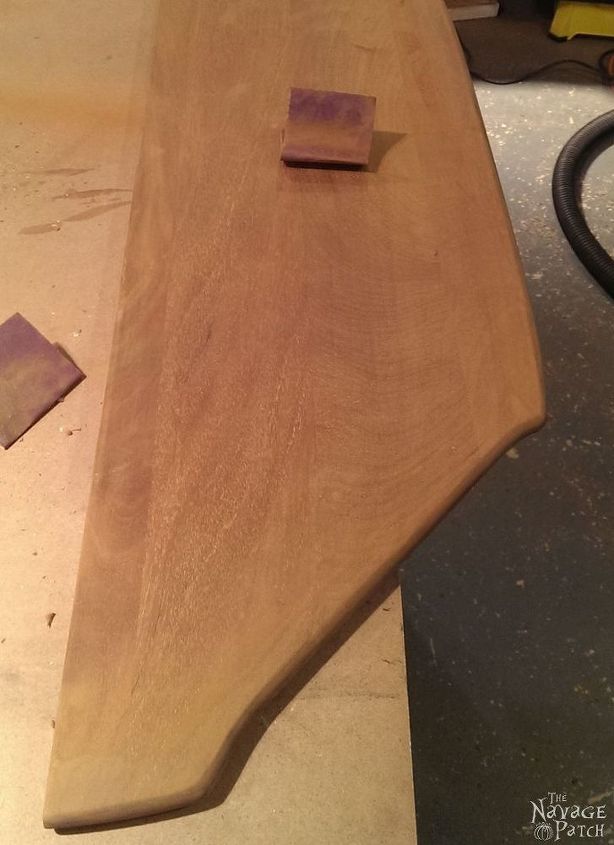
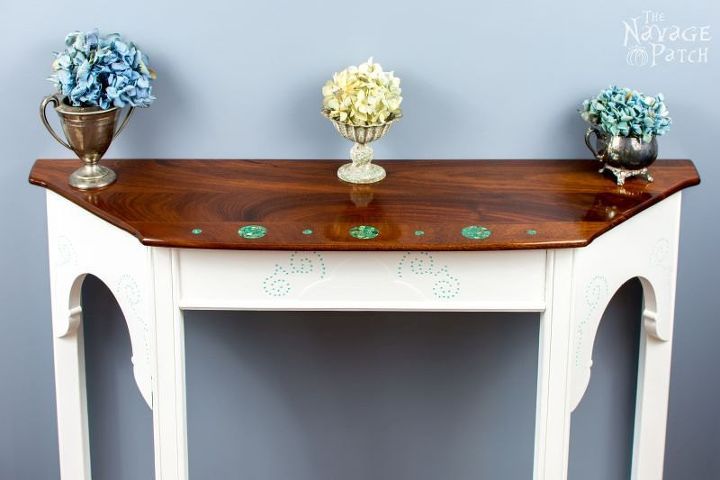
And this is where I completely lost interest in restoring the piece as a dining table. Truth told, I didn't really like the looks of the table. The wood was nice enough, but the double legs looked dated, and I didn't like the curves and arches for a dinner table. I remembered that Handan wanted to make console tables, so I switched gears and turned the project in that direction. I cut the end pieces in half (again!), chopped the side supports from the frame and got busy with the sandpaper. I did a lot of hand-sanding on this piece. I don't know why - it just felt right to hand-sand this one.
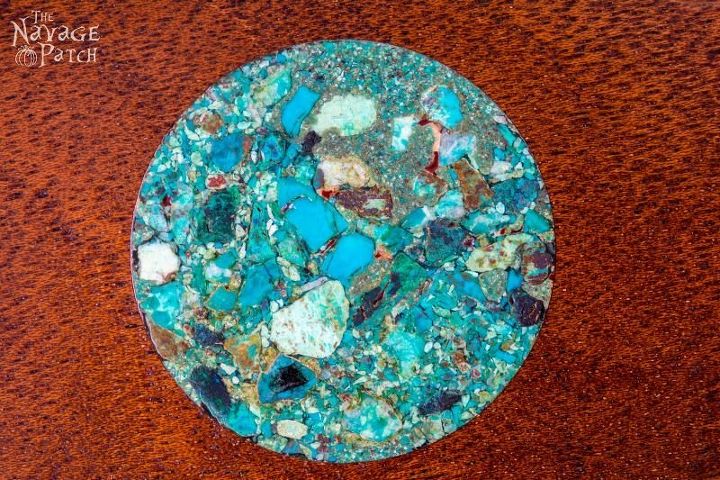
It was here that I decided a turquoise inlay would look pretty good in that table, so I hopped online and checked out the prices for crushed turquoise. Jeezum Crow! $17 for one ounce! I wanted crushed rock, not sterling silver! So what do we do every time we get sticker-shocked? Yep. Learn how to DiY. A quick search on Ebay produced a few peddlers of raw turquoise stone and turquoise mixed with other minerals. I got some chunks of turquoise and some chunks of a turquoise/chrysocolla mix. I bought a small length of black pipe from Home Depot in which to crush the rock, then sifted and sorted it into four grades.
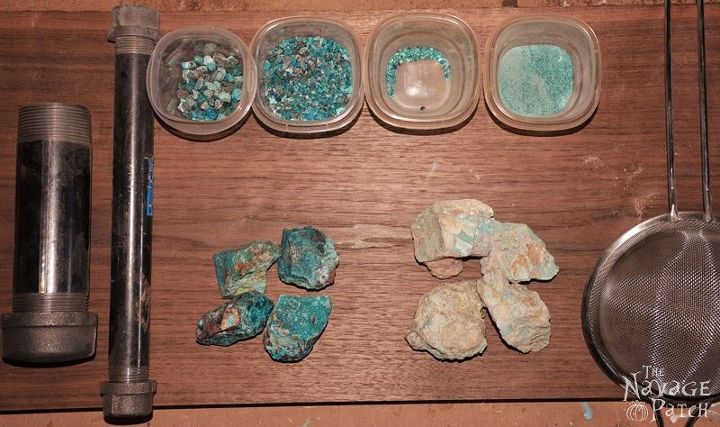
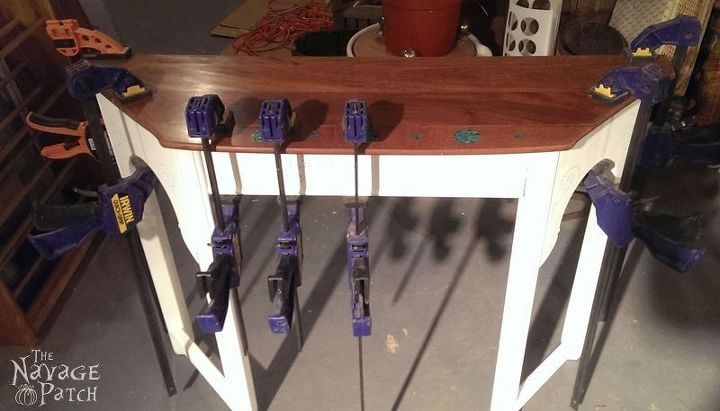
I chose a simple pattern of alternating 1 1/2 and 1/2 holes, primarily because I had Forstner drill bits in those sizes, and circles seemed easier to handle than any other shape. Unfortunately I took no pictures of the entire inlay process, but I will summarize the steps. I will document the steps in a future post when I next tackle an inlay project. After the holes were drilled to a depth of about 1/4, I filled them in with a mixture of all but the largest grade of crushed stone. With the crushed rock sitting just proud of the surface of the table (in other words, the crushed rock bulged above the surface just a bit), I drizzled on some super glue and let the whole mess set for a while. Then came the hard part: sanding. It takes a lot of time and even more sandpaper to smooth down turquoise. I started with a random orbital sander, but it wasn't doing the job, so I moved the piece to my standing belt sander. This is the big, surly older brother of the hand-held belt sander. It is powerful and will remove a ton of material real quick, so you need to be careful. It did a great job of scouring off the excess in a short amount of time. After the belt sander did the bulk of the work, I used the random orbital to polish the stone and get the rest of the table smooth and ready for finishing, but first I attached the top to the base with wood glue and two small L-brackets.
This is mahogany, so staining it would be criminal. I just reached for a can of my Wonder Finish and let the natural beauty shine through.
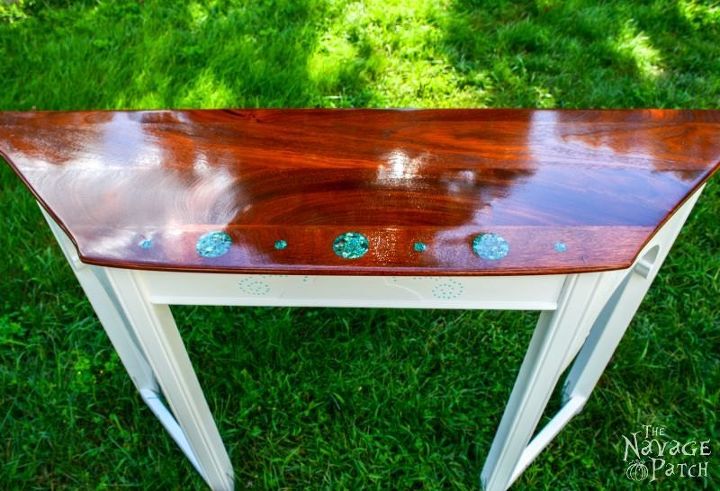
Moving on to the base, I thought simple white would offset and complement the rich red of the mahogany and the blue/green of the turquoise. After two coats of Handan's homemade chalk paint, I highlighted some cosmetic dimples in the original wood with a paint similar in color to the inlays. Handan finished the base with Annie Sloan clear soft wax and power buffed it until it glowed with a soft sheen.
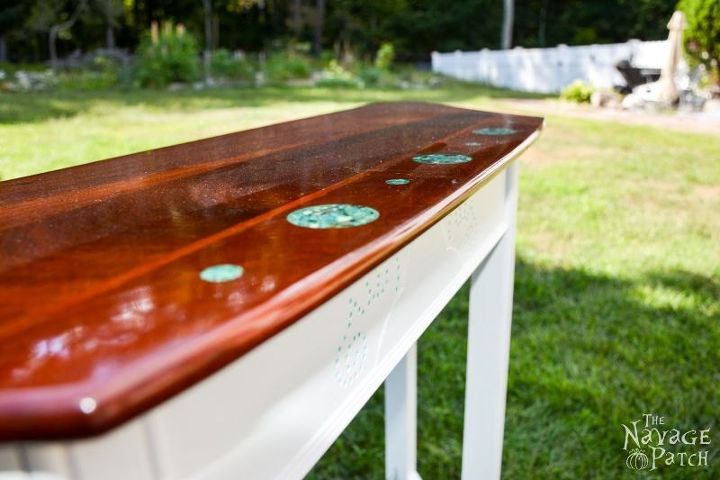
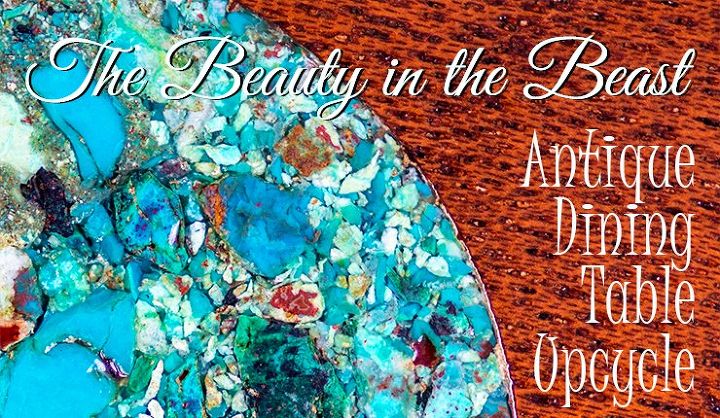
A close-up of one of the inlays. Beautiful colors!
And thus, the Beauty was freed from the Beast.

Want more details about this and other DIY projects? Check out my blog post!
Comments
Join the conversation
3 of 418 comments
-
Thank you so much for all your hard work; just beautiful work. Question; how did you glue the stones together in the holes. When you said drizzle super glue; how much did you need to use. Did you put some in the bottom before filling the hole and then some in the middle and some on top? Thank you.
-
beautiful job...who would have ever known this could be? :)


Frequently asked questions
Have a question about this project?